
GAME TRANSLATE · GBA GUIDE
Super Robot Taisen D
Complete Walkthrough
All 52 scenarios on all eight branches, both heroes, with annotated battle maps, every boss part, every secret unit and a warning before anything becomes missable.
Nothing on this page matches your search. Try a shorter word, or clear the box.
Before you start
💿 The patch
This guide uses the names from our English patch: Joshua Radcliff and Cliana “Lim” Rimskaya, your special squadron (default name Blue Swear), the Ruina, and the official English names of every series. Search the page for whatever the game just showed you.
👤 Joshua or Lim
At the start you pick the hero; the other one becomes your sibling. The story is the same, but many lines change, two scenarios have their own titles (Ice Doll Glacies / Winds of Fate and Where Resonating Souls Go / Say Goodbye to Me), and each hero has a different Ruina partner to recruit.
🔀 Routes
52 scenarios, 54 with the two hero versions. You choose four times. The prologue choice is the big one: it decides where the first 7-8 stages take place and which epilogue you see.
📜 Checked against the game
Every condition here was read from the game’s event script while we translated it: who must talk to whom, kill counts, turn limits and flags. Where the old GameFAQs guides disagree, the Secret Units page says so.
Route chart
Four times the story asks where to go next. Each split lasts one to eight scenarios, then both groups meet again. Because the branches have different lengths, the stage number on the title card depends on the routes you took; the table shows every number a scenario can have.
Splits: after the prologue (Earth, 8 stages / space, 7), after Raid! The Gishin Vega Fleet (Jupiter, 1 / Kailasa-Giri, 2), after Father and Son on the Battlefield (Old Helios, 2 / Angel Halo, 2) and after Emperor of Darkness (Gishin Empire, 3 / Planet Lux, 4). A full game is 36 to 39 maps counting the prologue.
Game systems in one minute
🗣️ Talk
Some enemies can be talked to: move the right pilot next to them and choose Talk (説得). Most secret recruits in D start with a Talk, often over several maps.
🎯 Kill counts
Five rewards check kills: Gamlin (6/10), Amuro (50), Noin + Hilde (10/20), Judau + Roux (40) and the four Newtypes for Haman (400). Give those pilots the finishing blows early.
🏃 Retreating bosses
Many named enemies leave the map when their HP falls under a set line (shown in the tables), taking their part with them. Hit them hard enough to finish them from above the line in one exchange to get the part.
🔗 Combo attacks
Weapons marked (C) can hit several enemies standing in a line next to each other, if the pilot has the Combo skill. Great for clearing grunts.
🎵 Songs
Basara and Mylene sing instead of fighting: songs raise allies’ will, restore stats, and hurt Protodeviln. The Sound Booster later turns them into map-wide concerts.
💥 God Mars
Takeru carries a bomb in his body, so he is a defeat condition in almost every map after he joins. One secret on the Old Helios + Gishin Empire routes removes it.
The Day Earth Vanished
📜 地球が消えた日
Part 1
Two prologues in one. First Ryoma takes Getter-1 against a swarm of Getter Dragons ten years after the Invaders were wiped out; then your hero defends a research base in Antarctica on the day the Earth vanishes from the sky.
Part 2
Walkthrough
- MainPart 1. Only Ryoma is on the map. As soon as one Getter Dragon falls, Hayato (Getter-2) and Musashi (Getter-3) join him, together with Getter Liger, Getter Poseidon and Invaders. Wipe out everything; any ally shot down is a Game Over.
- TipWhen the field is clear a lone Shin Getter-1 (A.I.) appears and the scene ends on its own. You don’t fight it.
- MainPart 2. Your hero starts alone at the base. When 5 or fewer Invaders are left your sibling comes out to help, and with 1 left the ruins start to react. The Invaders here carry a Propellant Tank, a Repair Kit and a Cartridge each in pairs.
- WarningAfter the map you get the first route choice. Prioritize the researchers’ escape leads to the League Militaire route on Earth (8 stages). Go into the ruins to rescue them leads to the Neo Zeon route in space (7 stages). The choice is stored as a permanent flag and also changes the ending, so pick the side you want to see first.
🗺️ Battle map, part 1
Circles are units on the map at the start (red enemy, blue ally, green guest). Squares with a number are reinforcement waves. Yellow tags number the named enemies in the table below, and a yellow diamond marks an enemy that carries a part. Positions are Joshua’s version; Lim’s map is the same unless the walkthrough says otherwise. Tap the map to open it full size.
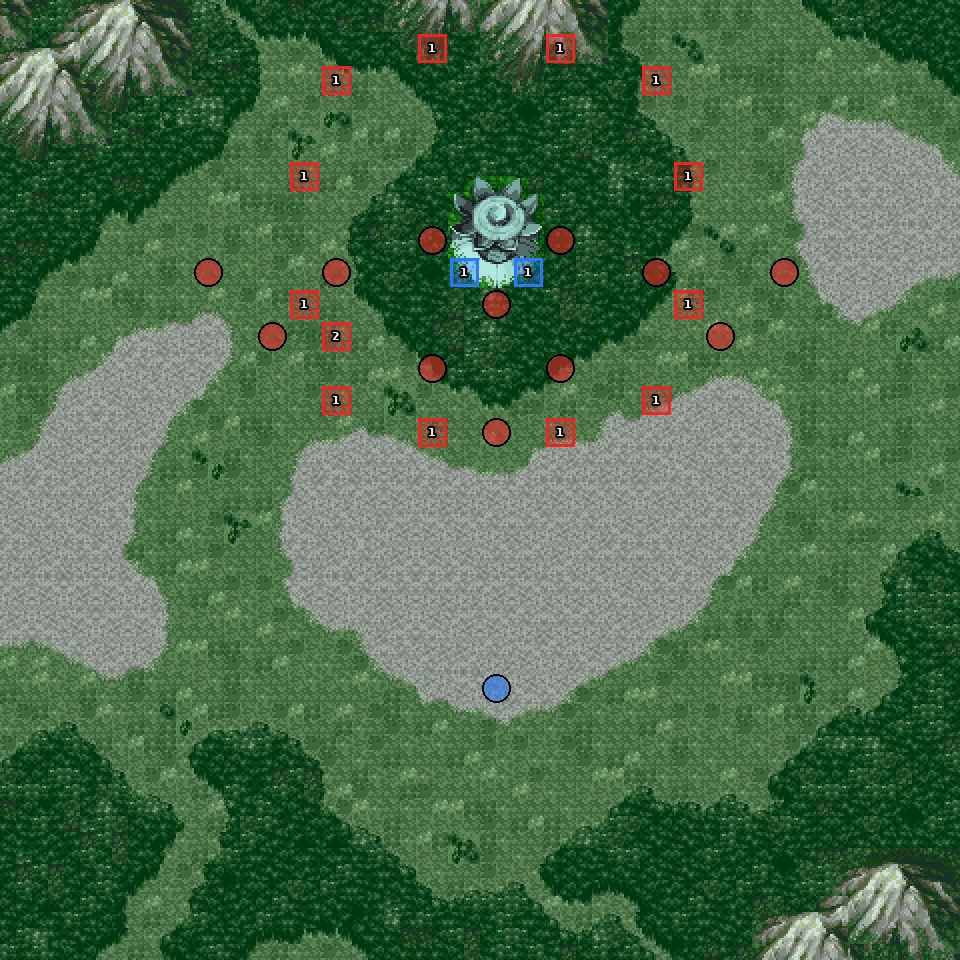
- 1Wave 1 — 11 or fewer enemies left
- 2Wave 2 — all enemies defeated
🗺️ Battle map, part 2
Circles are units on the map at the start (red enemy, blue ally, green guest). Squares with a number are reinforcement waves. Yellow tags number the named enemies in the table below, and a yellow diamond marks an enemy that carries a part. Positions are Joshua’s version; Lim’s map is the same unless the walkthrough says otherwise. Tap the map to open it full size.
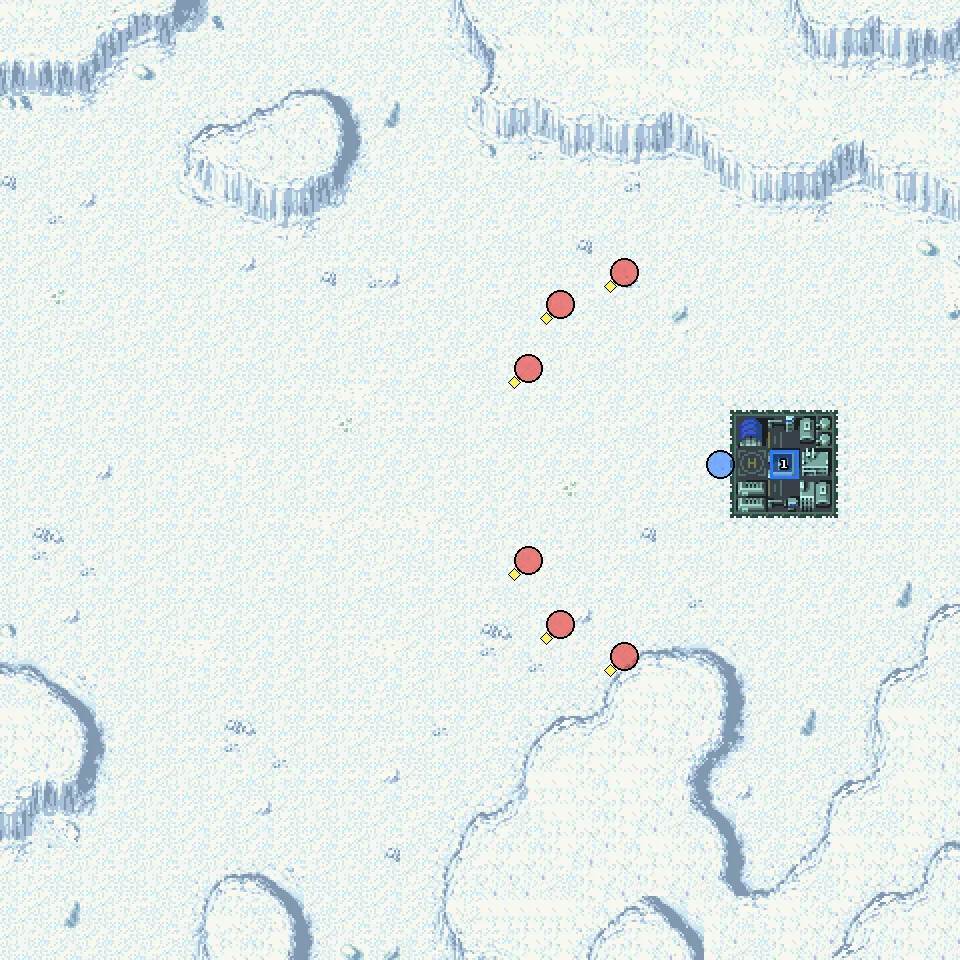
- 1Wave 1 — 5 or fewer enemies left
Parts on regular enemies: Cartridge ×2, Propellant Tank ×2, Repair Kit ×2.
New units & pilots
First time each one fights on your side on this route, during the map or right after it. Purple = only if the condition in brackets is met.
- Ryoma Nagare
- Getter-1
- Hayato Jin
- Getter-2
- Musashi Tomoe
- Getter-3
In a Closed World
📜 閉ざされた世界で
League Militaire route. Your hero wakes up in a shattered, isolated Europe and lands in the middle of Uso Ewin’s first fight against the Zanscare Empire.
⏳ Don’t miss in this map
- Part on a retreating enemy: Chronicle Asher carries Magnet Coating details
Full list across the game: Missables.
Walkthrough
- MainUso starts in a Core Fighter with only your hero beside him, and Uso is the defeat condition. Keep him behind your hero and let him finish weakened Zolos.
- TipOn turn 4, or when 4 or fewer enemies are left, the Boots and Hanger are launched and Uso can dock into the V Gundam.
- WarningChronicle Asher (Shokew) retreats at 30% HP and carries a Magnet Coating. Bring him down from above 30% in one exchange to keep the part.
- TipUso and your hero both have lines with Chronicle. After the map Marbet joins, and Uso and Marbet get V Gundams.
🗺️ Battle map
Circles are units on the map at the start (red enemy, blue ally, green guest). Squares with a number are reinforcement waves. Yellow tags number the named enemies in the table below, and a yellow diamond marks an enemy that carries a part. Positions are Joshua’s version; Lim’s map is the same unless the walkthrough says otherwise. Tap the map to open it full size.
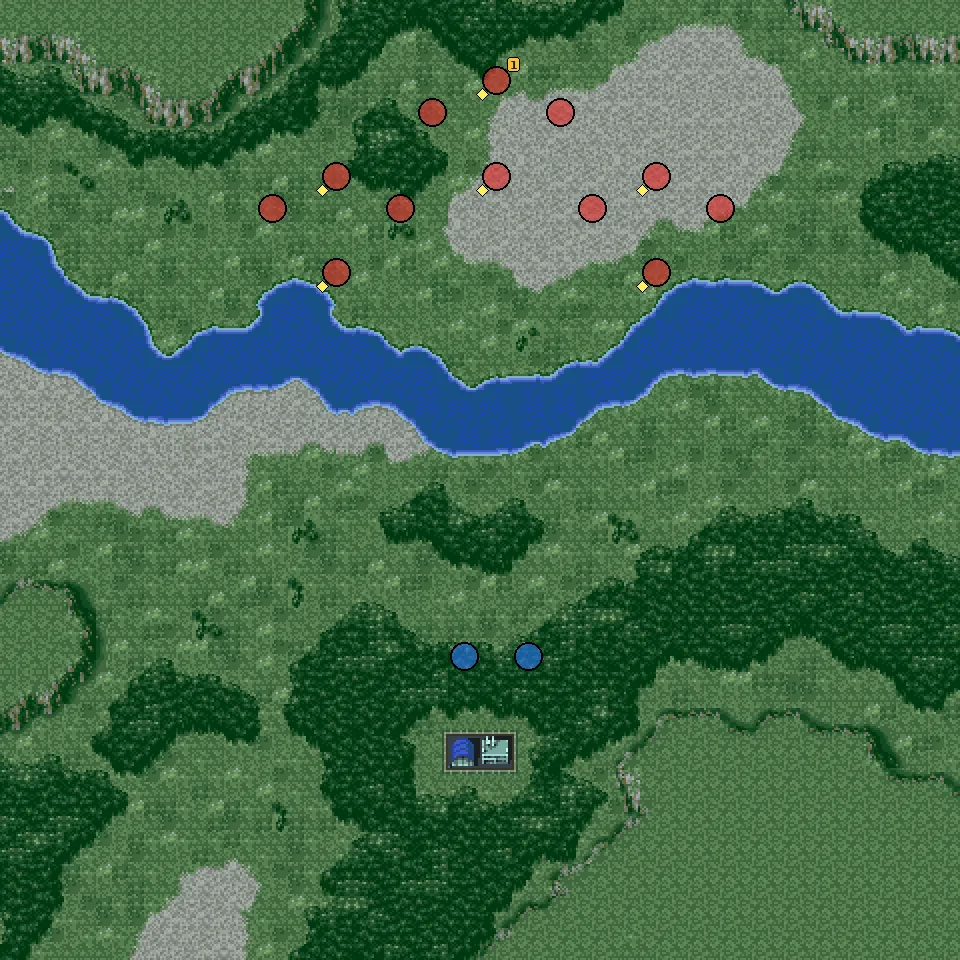
Named enemies & parts
| Pilot | Unit | Part | Appears | |
|---|---|---|---|---|
| 1 Chronicle Asher | Shokew | Magnet Coating | start Retreats at 30% HP |
Parts on regular enemies: Cartridge, Propellant Tank, Repair Kit ×3.
New units & pilots
First time each one fights on your side on this route, during the map or right after it. Purple = only if the condition in brackets is met.
- Haro
- Marbet Fingerhat
- V Gundam
- Uso Ewin
- Core Fighter (V)
💬 Battle conversations in this map (2)
These pairs have their own lines when they fight each other. “Talk command” means moving next to the unit and choosing Talk; the Secret Units page says which ones matter.
- Uso Ewin vs Chronicle Asher
- your hero vs Chronicle Asher
Quaking Land! Shin Dragon Revived!!
📜 激震の大地! 真ドラゴン復活!!
League Militaire route. Hayato’s Tower searches the quake zone where Shin Dragon sleeps, and the Invaders are already there.
Walkthrough
- MainVictory is the usual wipe-out; the Tower must survive. Hayato, Schwarz, Marbet, Uso and your hero start on the map.
- TipOn turn 2 (or at 8 enemies left) the story moves on, and on turn 3 (or at 6 left) the Get Machines arrive: Go, Kei and Benkei join with Shin Getter-1, plus a few more Invaders.
- TipSchwarz has a special line against the Metal Beast Barosoph. A Skill +20 skill part is on one of the enemies, check the table below.
🗺️ Battle map
Circles are units on the map at the start (red enemy, blue ally, green guest). Squares with a number are reinforcement waves. Yellow tags number the named enemies in the table below, and a yellow diamond marks an enemy that carries a part. Positions are Joshua’s version; Lim’s map is the same unless the walkthrough says otherwise. Tap the map to open it full size.
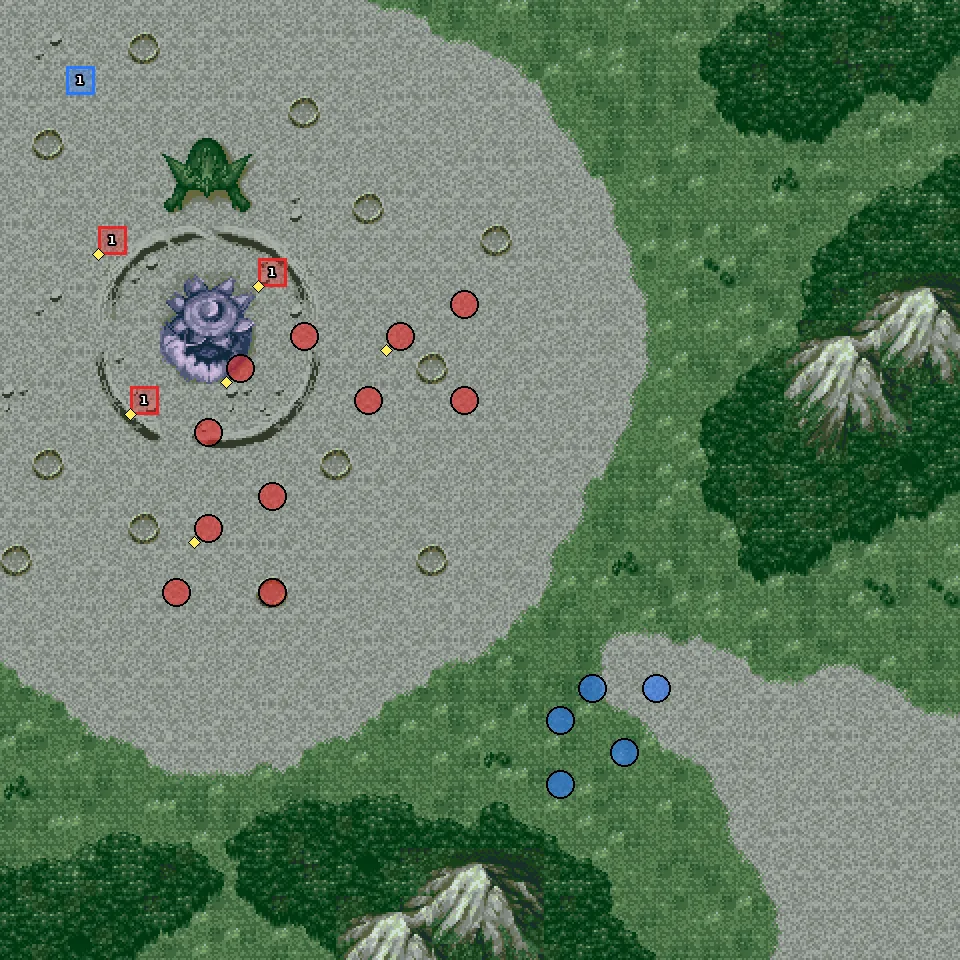
- 1Wave 1 — turn 3 or 6 or fewer enemies left
Parts on regular enemies: Cartridge, Propellant Tank, Repair Kit ×3, Skill +20.
New units & pilots
First time each one fights on your side on this route, during the map or right after it. Purple = only if the condition in brackets is met.
- Yamazaki
- Dr. Shikishima
- Kei
- Benkei Kuruma
- Tower
- Schwarz
- Stelvar
- Go
- Shin Getter-1
💬 Battle conversations in this map (1)
These pairs have their own lines when they fight each other. “Talk command” means moving next to the unit and choosing Talk; the Secret Units page says which ones matter.
- Schwarz vs Metal Beast Barosoph
Nightmare! Invader Saotome!
📜 悪夢! インベーダー早乙女!
League Militaire route. The truth about Dr. Saotome comes out, and Go’s origin with it.
Walkthrough
- MainDr. Saotome’s Metal Beast is huge (10,000 HP class) and carries a Chobham Armor. He doesn’t retreat, so you can take your time and soften him up over two turns.
- TipGai joins before the map and the three Shin Getter forms learn the Shin Getter Change Attack.
- TipThe Invaders thin out in steps (9, 8 and 7 left trigger new scenes). At 7 or fewer, Oliver (V Gundam Hexa) and Junko (Gun-EZ) arrive with another Invader wave.
- TipSchwarz, Uso, Go and your hero each have a special exchange with Saotome.
🗺️ Battle map
Circles are units on the map at the start (red enemy, blue ally, green guest). Squares with a number are reinforcement waves. Yellow tags number the named enemies in the table below, and a yellow diamond marks an enemy that carries a part. Positions are Joshua’s version; Lim’s map is the same unless the walkthrough says otherwise. Tap the map to open it full size.
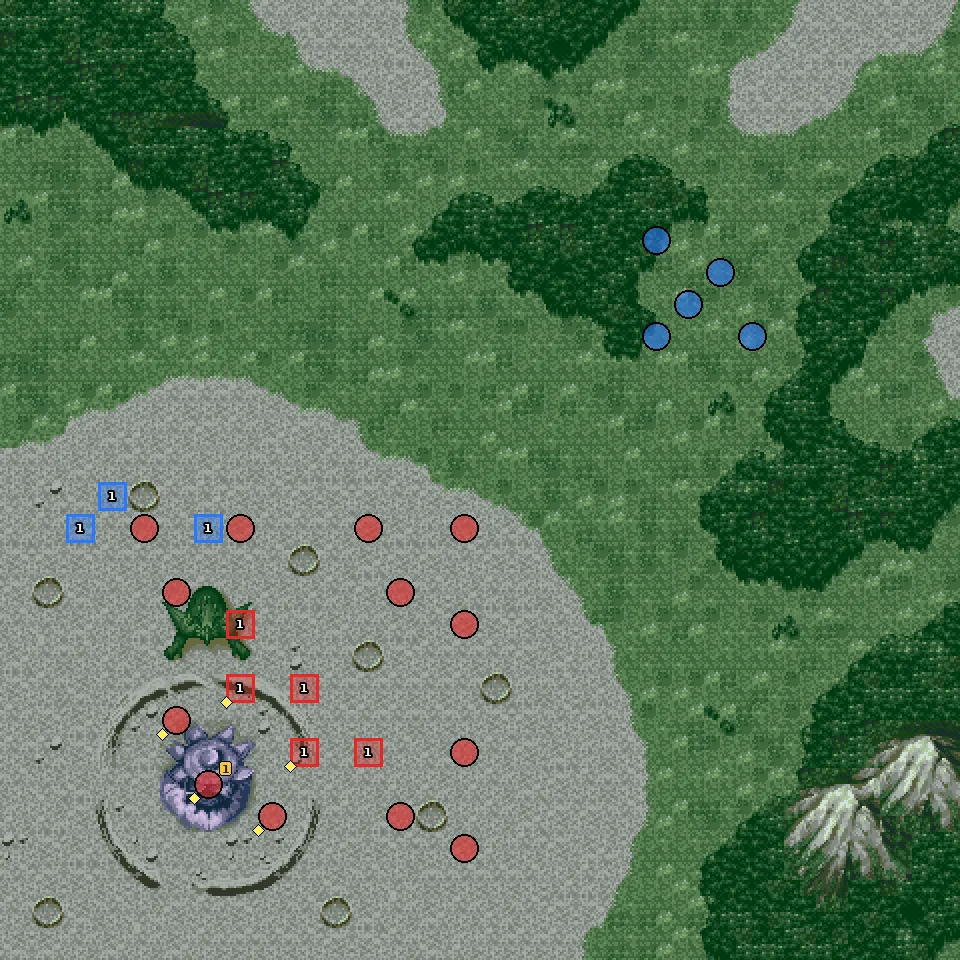
- 1Wave 1 — 7 or fewer enemies left
Named enemies & parts
| Pilot | Unit | Part | Appears | |
|---|---|---|---|---|
| 1 Dr. Saotome | Metal Beast | Chobham Armor | start |
Parts on regular enemies: Propellant Tank, Repair Kit ×3.
New units & pilots
First time each one fights on your side on this route, during the map or right after it. Purple = only if the condition in brackets is met.
- Gai
- Stelvar (Flight Robo)
- Oliver Inoe
- V Gundam Hexa
- Junko Jenko
- Gun-EZ
- Shin Getter-2
💬 Battle conversations in this map (4)
These pairs have their own lines when they fight each other. “Talk command” means moving next to the unit and choosing Talk; the Secret Units page says which ones matter.
- Schwarz vs Dr. Saotome
- Uso Ewin vs Dr. Saotome
- your hero vs Dr. Saotome
- Go vs Dr. Saotome
Fly, Iron Fists! Double Mazinger!!
📜 飛ばせ鉄拳! ダブルマジンガー!!
Added later in the map: Defeat: All allies destroyed; Defeat: The Tower is destroyed.
League Militaire route. Uso is chased by BESPA’s Yellow Jackets while the Mazinger team makes its entrance.
Walkthrough
- MainUso starts alone and is the defeat condition. Use the Top Fighter’s movement to stay out of reach until help arrives.
- TipOn turn 3 (or with 3 enemies left) Oliver, Junko, Marbet and your hero arrive; from then on only losing everyone ends the game.
- WarningChronicle (Shokew) carries a Hit +15 skill part. He leaves when the first phase ends, so beat him before the last Zanscare unit goes down.
- TipWhen BESPA is gone, an OZ force (Taurus, Virgo) attacks and Hayato, Go, Schwarz, Koji (Mazinger Z) and Tetsuya (Great Mazinger) join in. Virgos have Planet Defensors, so use physical attacks or missiles. The Tower is the defeat condition for this phase.
- TipAfter the map Sayaka (Diana A), Boss (Boss Borot), Jun (Venus A) and Shiro (Robot Jr.) join.
🗺️ Battle map
Circles are units on the map at the start (red enemy, blue ally, green guest). Squares with a number are reinforcement waves. Yellow tags number the named enemies in the table below, and a yellow diamond marks an enemy that carries a part. Positions are Joshua’s version; Lim’s map is the same unless the walkthrough says otherwise. Tap the map to open it full size.
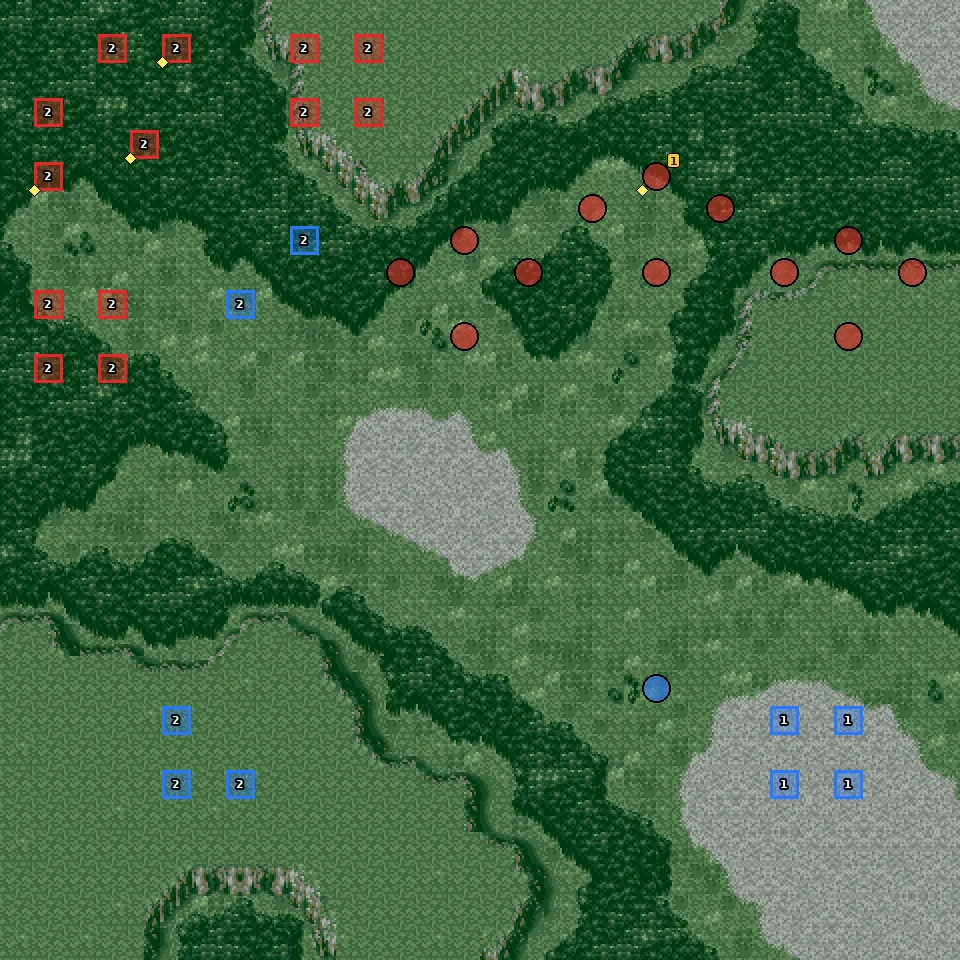
- 1Wave 1 — turn 3 or 3 or fewer enemies left
- 2Wave 2 — all enemies defeated
Named enemies & parts
| Pilot | Unit | Part | Appears | |
|---|---|---|---|---|
| 1 Chronicle Asher | Shokew | Hit +15 | start Leaves the map when beaten |
Parts on regular enemies: Cartridge, Propellant Tank, Repair Kit.
New units & pilots
First time each one fights on your side on this route, during the map or right after it. Purple = only if the condition in brackets is met.
- Sayaka Yumi
- Diana A
- Boss
- Boss Borot
- Jun Hono
- Venus A
- Shiro Kabuto
- Robot Jr.
- Top Fighter (V)
- Koji Kabuto
- Mazinger Z
- Tetsuya Tsurugi
- Great Mazinger GB
💬 Battle conversations in this map (2)
These pairs have their own lines when they fight each other. “Talk command” means moving next to the unit and choosing Talk; the Secret Units page says which ones matter.
- Uso Ewin vs Chronicle Asher
- Chronicle Asher vs V Gundam
Rise Up Amid the Ravages of War!
📜 戦禍の中で立ち上がれ!
League Militaire route. Kento Tate and Danji stumble into the war in the Atlaus and Gumper while protecting the Adalus.
⏳ Don’t miss in this map
- Part on a retreating enemy: Duker Iq carries Apogee Motor details
Full list across the game: Missables.
Walkthrough
- MainThree defeat conditions: the Atlaus, the Gumper, and any enemy reaching the Adalus. Block the approach to the ship first.
- TipWhen the first group falls, Duker Iq and Renda de Paloma arrive in Gallicksons.
- WarningDuker retreats at 20% HP and carries an Apogee Motor; Renda carries a Dual Sensor and does not retreat.
🗺️ Battle map
Circles are units on the map at the start (red enemy, blue ally, green guest). Squares with a number are reinforcement waves. Yellow tags number the named enemies in the table below, and a yellow diamond marks an enemy that carries a part. Positions are Joshua’s version; Lim’s map is the same unless the walkthrough says otherwise. Tap the map to open it full size.
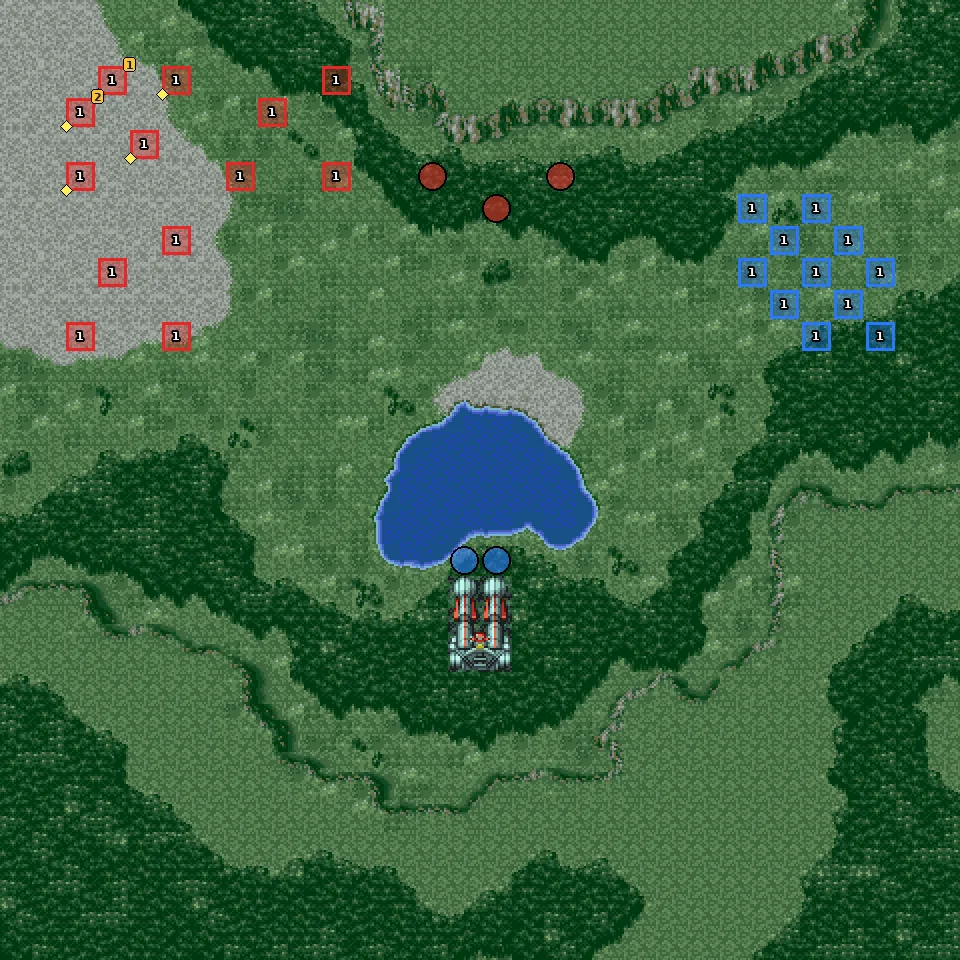
- 1Wave 1 — all enemies defeated
Named enemies & parts
| Pilot | Unit | Part | Appears | |
|---|---|---|---|---|
| 1 Duker Iq | Gallickson | Apogee Motor | wave 1 Retreats at 20% HP | |
| 2 Renda de Paloma | Gallickson | Dual Sensor | wave 1 |
Parts on regular enemies: Cartridge, Propellant Tank, Repair Kit.
New units & pilots
First time each one fights on your side on this route, during the map or right after it. Purple = only if the condition in brackets is met.
- Kento Tate
- Atlaus
- Danji Hiiragi
- Gumper
Mr. Negotiator
📜 Mr.ネゴシエイター
Part 1
League Militaire route. A rogue Megadeus and a remote-controlled Shin Getter turn Paradigm-style negotiation into a brawl; Roger Smith takes the stage.
Part 2
Added later in the map: Defeat: The Tower is destroyed.
Walkthrough
- MainPart 1. Roger (Big O) faces Dorothy-1 and a Shin Getter that is being controlled from outside. Roger is the defeat condition here. He has lines with both.
- TipOnce the controlled Shin Getter is damaged the scene moves on, and when Hayato is hit the next event starts. R. Dorothy joins after this part.
- MainPart 2. A second map against the remote-control source. One turn in (or at 9 enemies left) Kento and Danji arrive with the Daltanious parts; at 5 enemies left more enemies and your sortie arrive, and the defeat condition becomes the Tower.
- TipAfter the map you get Daltanious for good.
🗺️ Battle map, part 1
Circles are units on the map at the start (red enemy, blue ally, green guest). Squares with a number are reinforcement waves. Yellow tags number the named enemies in the table below, and a yellow diamond marks an enemy that carries a part. Positions are Joshua’s version; Lim’s map is the same unless the walkthrough says otherwise. Tap the map to open it full size.
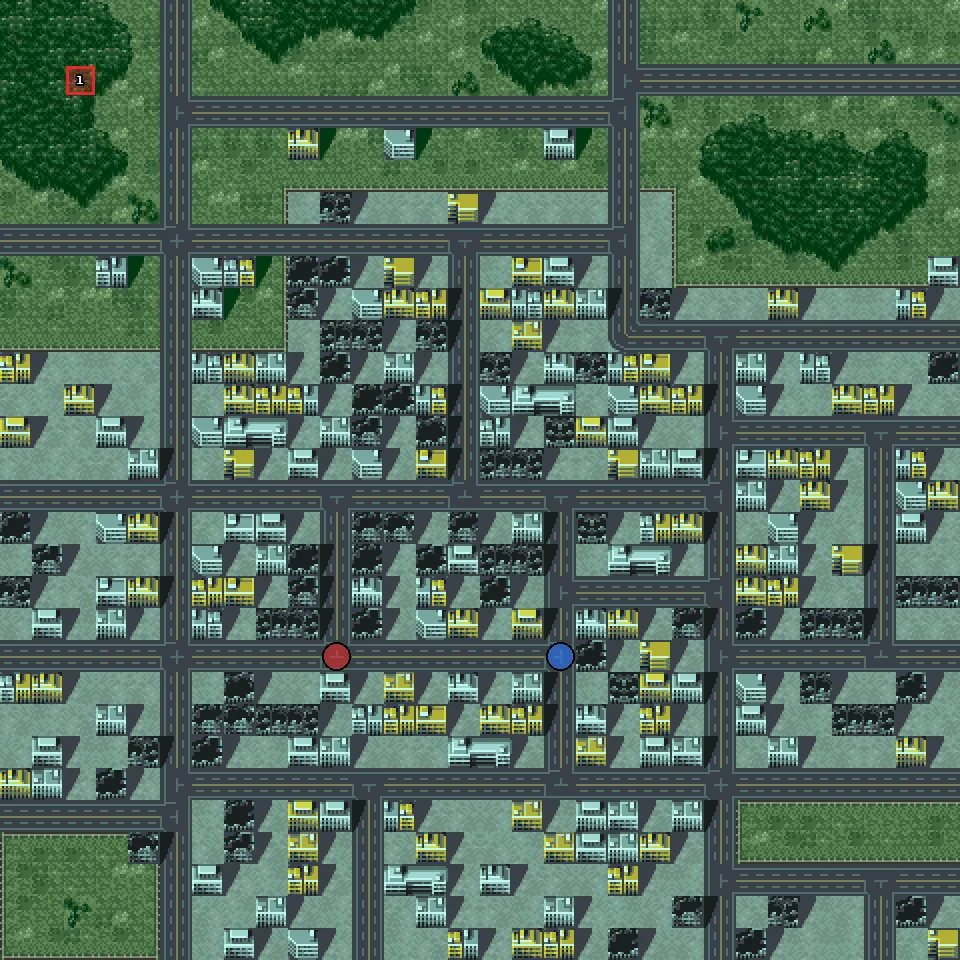
- 1Wave 1 — Go damaged
🗺️ Battle map, part 2
Circles are units on the map at the start (red enemy, blue ally, green guest). Squares with a number are reinforcement waves. Yellow tags number the named enemies in the table below, and a yellow diamond marks an enemy that carries a part. Positions are Joshua’s version; Lim’s map is the same unless the walkthrough says otherwise. Tap the map to open it full size.
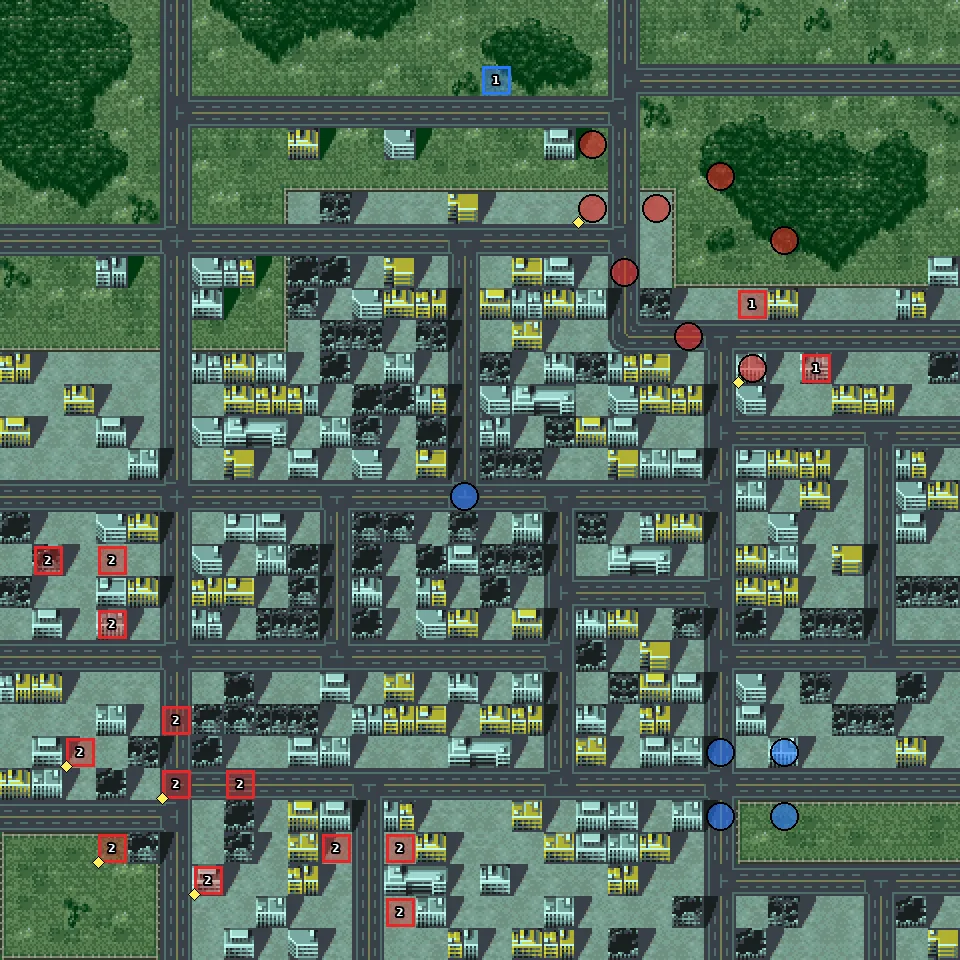
- 1Wave 1 — 1 turn(s) later or 9 or fewer enemies left
- 2Wave 2 — 5 or fewer enemies left
Parts on regular enemies: Cartridge ×2, Propellant Tank ×2, Repair Kit ×2.
New units & pilots
First time each one fights on your side on this route, during the map or right after it. Purple = only if the condition in brackets is met.
- R. Dorothy Wayneright
- Daltanious
- Roger Smith
- Big O
- Beralios
💬 Battle conversations in this map (2)
These pairs have their own lines when they fight each other. “Talk command” means moving next to the unit and choosing Talk; the Secret Units page says which ones matter.
- Roger Smith vs Dorothy-1
- Roger Smith vs Go
Hatred Amid Fierce Battle
📜 憎しみは激闘の中
Added later in the map: Defeat: The Tower is destroyed.
League Militaire route. The Mazinger team corners the Mycenae-style raiders, and a strange machine called Ignis shows up.
⏳ Don’t miss in this map
- Part on a retreating enemy: Ignis carries Skill +20 details
Full list across the game: Missables.
Walkthrough
- MainKoji and Tetsuya start alone; both are defeat conditions until the first group falls.
- TipThen a big second wave arrives with Ignis (Impetus), you deploy your team, and the Tower becomes the defeat condition.
- WarningIgnis retreats at 10% HP. Koji, Tetsuya, Jun, Shiro, your hero, Uso, Kento, Go, Roger and Benkei all have their own lines with him.
- TipBenkei comes back in Getter-1 during this map. A Skill +20 skill part is among the enemies.
🗺️ Battle map
Circles are units on the map at the start (red enemy, blue ally, green guest). Squares with a number are reinforcement waves. Yellow tags number the named enemies in the table below, and a yellow diamond marks an enemy that carries a part. Positions are Joshua’s version; Lim’s map is the same unless the walkthrough says otherwise. Tap the map to open it full size.
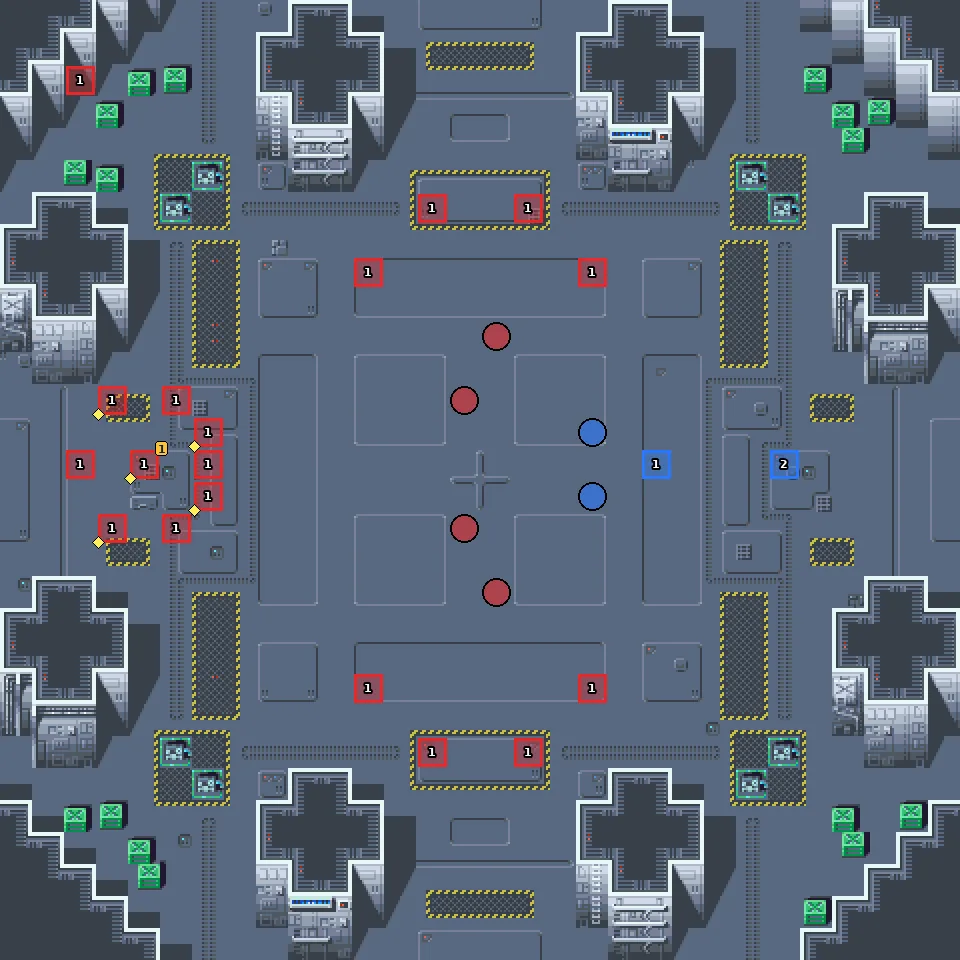
- 1Wave 1 — all enemies defeated
- 2Wave 2 — all enemies defeated
Named enemies & parts
| Pilot | Unit | Part | Appears | |
|---|---|---|---|---|
| 1 Ignis | Impetus | Skill +20 | wave 1 Retreats at 10% HP |
Parts on regular enemies: Cartridge ×2, Propellant Tank ×2.
💬 Battle conversations in this map (10)
These pairs have their own lines when they fight each other. “Talk command” means moving next to the unit and choosing Talk; the Secret Units page says which ones matter.
- Koji Kabuto vs Ignis
- Tetsuya Tsurugi vs Ignis
- Jun Hono vs Ignis
- Shiro Kabuto vs Ignis
- your hero vs Ignis
- Uso Ewin vs Ignis
- Kento Tate vs Ignis
- Go vs Ignis
- Roger Smith vs Ignis
- Benkei Kuruma vs Ignis
Battle Under the Sun
📜 陽光下の戦い
League Militaire route, last stage before the two groups meet. Treize and OZ hold a shuttle base and BESPA comes to burn it.
⏳ Don’t miss in this map
- Part on a retreating enemy: Arbeo Pippinieden carries Repair Kit details
- Part on a retreating enemy: Rupe Cineau carries Repair Kit details
- Part on a retreating enemy: Fuala Griffon carries Beam Coating details
Full list across the game: Missables.
Walkthrough
- MainTwo defeat conditions: the Tower, and any enemy entering the shuttle base. Noin (Taurus S.K. Custom) and Quatre (Sandrock Kai) join before the map.
- TipWaves come at 5 or fewer enemies: first Pippinieden and Rupe Cineau (Memmedorza), then Fuala Griffon (Licarl) with Chronicle.
- WarningPippinieden, Rupe and Fuala all retreat at 30% HP. Fuala carries a Beam Coating, Chronicle a Learning CP, and Duker, Renda, Pippinieden and Rupe a Repair Kit each. Beating Fuala ends the battle, so take the others first.
- TipAfter the map the V-Dash Gundams and the Gun Blaster arrive, the Tower, Schwarz and Roger leave for a while, and the whole space group joins you (Amuro, Char, Bright’s Ra Cailum, Kamille, the Gundam pilots, the Cosmo Crusher, Battle 7 and Gamlin).
🗺️ Battle map
Circles are units on the map at the start (red enemy, blue ally, green guest). Squares with a number are reinforcement waves. Yellow tags number the named enemies in the table below, and a yellow diamond marks an enemy that carries a part. Positions are Joshua’s version; Lim’s map is the same unless the walkthrough says otherwise. Tap the map to open it full size.
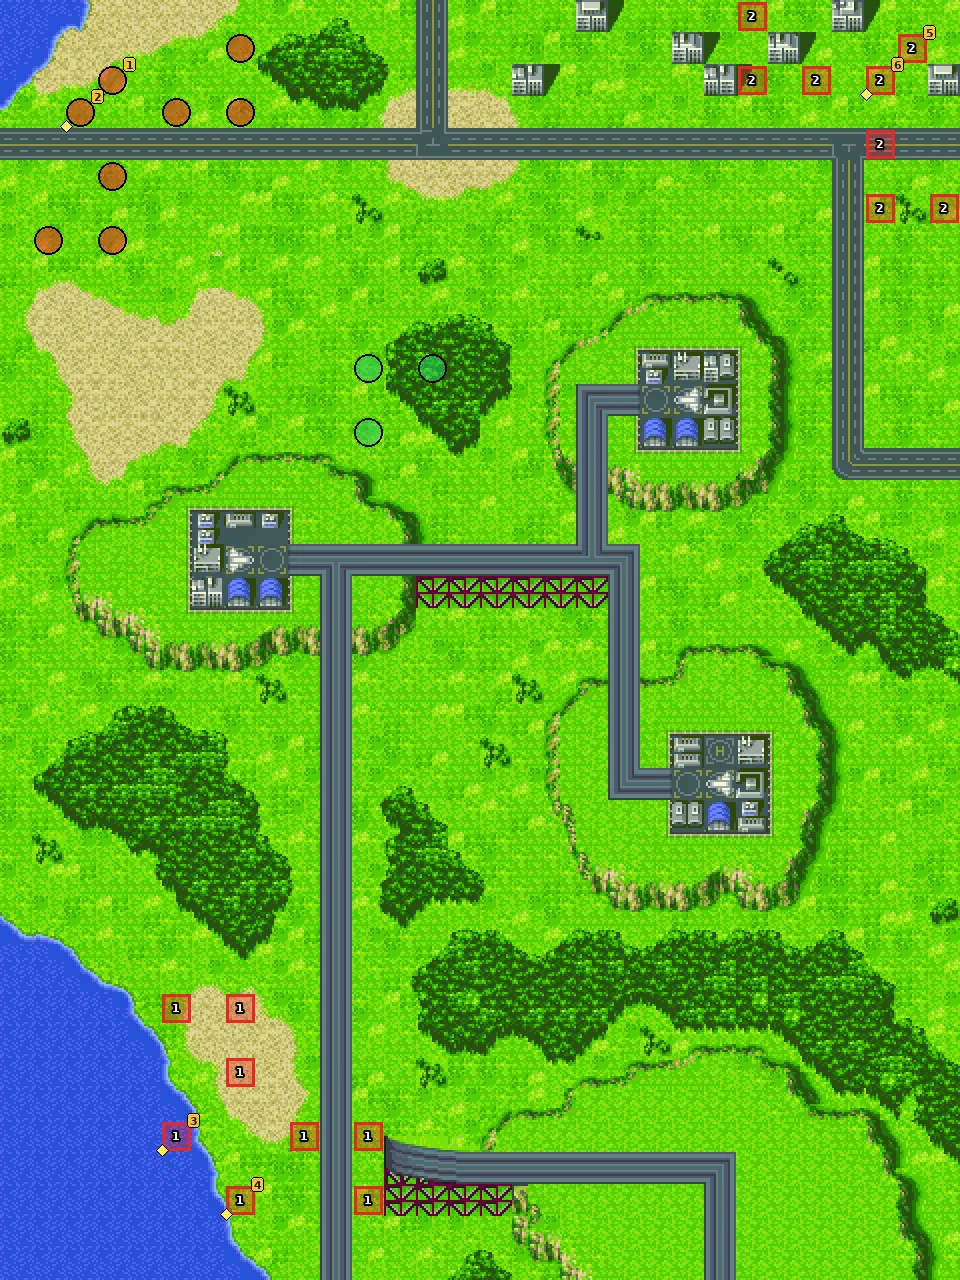
- 1Wave 1 — 5 or fewer enemies left
- 2Wave 2 — 5 or fewer enemies left
Named enemies & parts
| Pilot | Unit | Part | Appears | |
|---|---|---|---|---|
| 1 Duker Iq | Gallickson | Repair Kit | start Leaves the map when beaten | |
| 2 Renda de Paloma | Gallickson | Repair Kit | start | |
| 3 Arbeo Pippinieden | Memmedorza | Repair Kit | wave 1 Retreats at 30% HP | |
| 4 Rupe Cineau | Memmedorza | Repair Kit | wave 1 Retreats at 30% HP | |
| 5 Fuala Griffon | Licarl | Beam Coating | wave 2 Retreats at 30% HP | |
| 6 Chronicle Asher | Shokew | Learning CP | wave 2 |
New units & pilots
First time each one fights on your side on this route, during the map or right after it. Purple = only if the condition in brackets is met.
- Lucrezia Noin
- Taurus (S.K. Custom)
- Quatre Raberba Winner
- Gundam Sandrock Kai
- Gun Blaster
- V-Dash Gundam
- V-Dash Gundam Hexa
- Milliardo Peacecraft
- Gundam Epyon
- Zechs Merquise
- Kamille Bidan
- Zeta Gundam
- Fa Yuiry
- Methuss
- Amuro Ray
- Re-GZ (BWS)
- Bright Noa
- Ra Cailum
- Char Aznable
- Sazabi
- Gyunei Guss
- Jagd Doga
- Quess Paraya
- Heero Yuy
- Wing Gundam Zero
- Duo Maxwell
- Gundam Deathscythe Hell
- Chang Wufei
- Altron Gundam
- Hilde Schbeiker
- Taurus
- Kenji Asuka
- Cosmo Crusher
- Naoto Ijuin
- Akira Kiso
- Mika Hyuga
- Takeru Myojin
- Maximilian Jenius
- Battle 7 (Carrier)
- Exsedol Folmo
- Miho Miho
- Sally S. Ford
- Gadget M. Chiba
- Gamlin Kizaki
- VF-17D Nightmare F
- VF-17S Nightmare F
💬 Battle conversations in this map (6)
These pairs have their own lines when they fight each other. “Talk command” means moving next to the unit and choosing Talk; the Secret Units page says which ones matter.
- Uso Ewin vs Rupe Cineau
- Uso Ewin vs Arbeo Pippinieden
- Go vs Arbeo Pippinieden
- Uso Ewin vs Fuala Griffon
- Uso Ewin vs Chronicle Asher
- your hero vs Chronicle Asher
In the Bewildering Skies
📜 惑乱の宇宙(そら)で
Neo Zeon route. In orbit, Char and Londo Bell are already at war with the Zanscare Empire’s space forces when your hero falls into their lap.
Walkthrough
- MainA straightforward wipe-out. The Ra Cailum is the defeat condition.
- TipThe Zoloats’ beam strings hit hard at range 3; fight them at range 1-2 or use Focus. The Amalthea is the only real threat.
🗺️ Battle map
Circles are units on the map at the start (red enemy, blue ally, green guest). Squares with a number are reinforcement waves. Yellow tags number the named enemies in the table below, and a yellow diamond marks an enemy that carries a part. Positions are Joshua’s version; Lim’s map is the same unless the walkthrough says otherwise. Tap the map to open it full size.
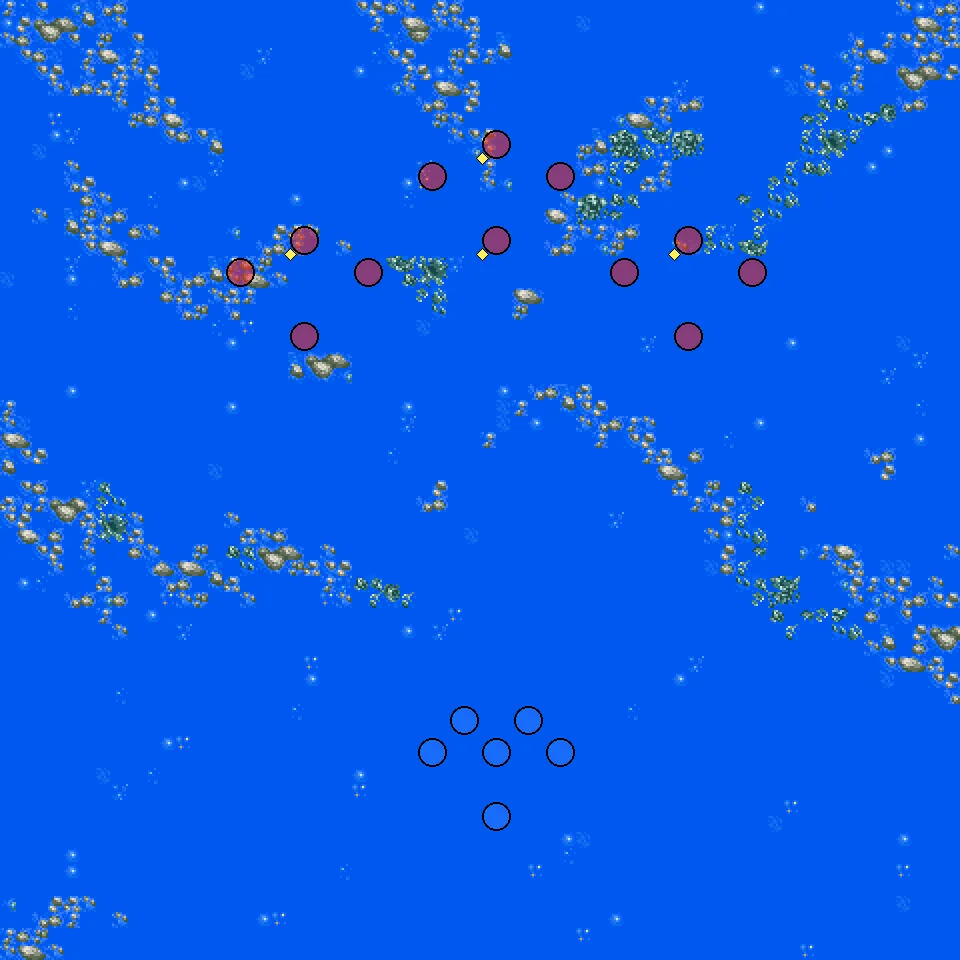
Parts on regular enemies: Cartridge, Chobham Armor, Propellant Tank, Repair Kit.
New units & pilots
First time each one fights on your side on this route, during the map or right after it. Purple = only if the condition in brackets is met.
- Bright Noa
- Ra Cailum
- Gyunei Guss
- Jagd Doga
- Amuro Ray
- Re-GZ (BWS)
- Char Aznable
- Sazabi
- Milliardo Peacecraft
- Gundam Epyon
The Worst Visitor
📜 最悪な来訪者
Neo Zeon route. Quess joins Char’s side and the first aliens of the Gishin Empire, Nesia’s fleet, make contact.
⏳ Don’t miss in this map
- Part on a retreating enemy: Nesia carries Magnet Coating details
Full list across the game: Missables.
Walkthrough
- MainNesia’s mothership retreats at 10% HP. Char, Amuro, your hero, Milliardo and Gyunei all have lines with her.
- TipQuess joins in a Jagd Doga before the map. Stay out of point-blank range of the mothership.
🗺️ Battle map
Circles are units on the map at the start (red enemy, blue ally, green guest). Squares with a number are reinforcement waves. Yellow tags number the named enemies in the table below, and a yellow diamond marks an enemy that carries a part. Positions are Joshua’s version; Lim’s map is the same unless the walkthrough says otherwise. Tap the map to open it full size.
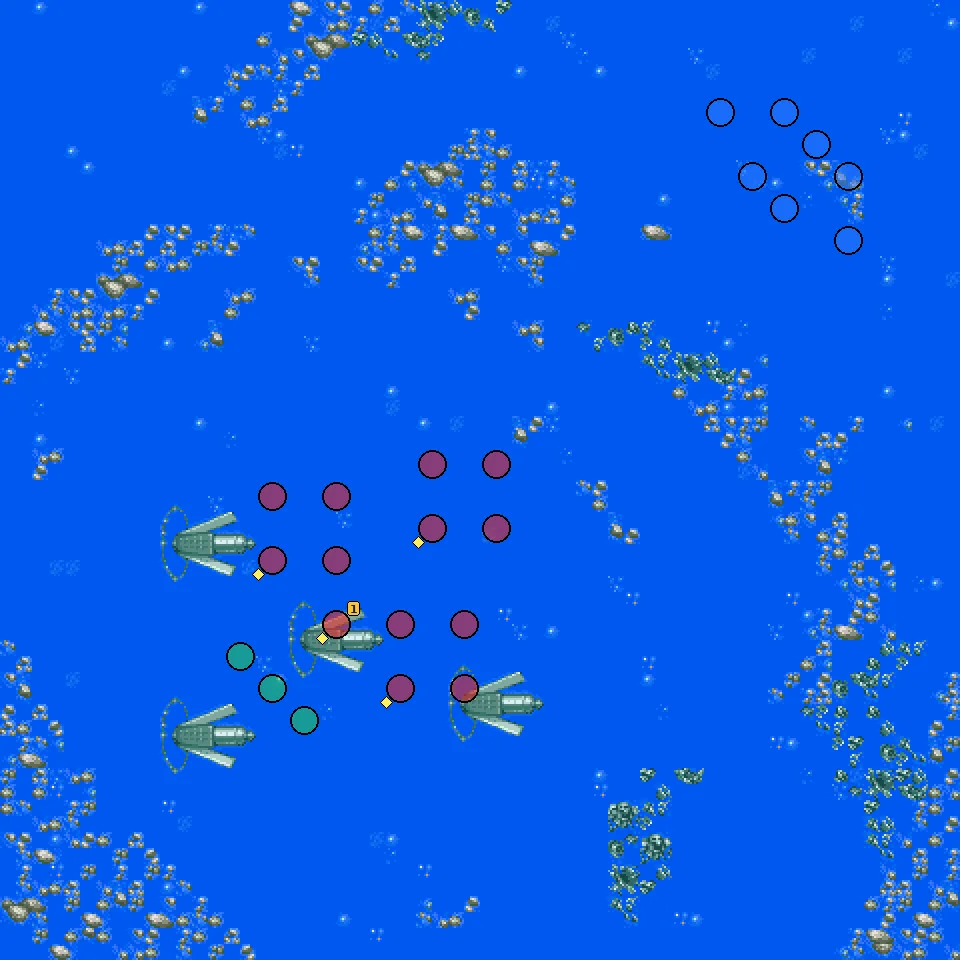
Named enemies & parts
| Pilot | Unit | Part | Appears | |
|---|---|---|---|---|
| 1 Nesia | Nesia Mothership | Magnet Coating | start Retreats at 10% HP |
Parts on regular enemies: Repair Kit ×3.
New units & pilots
First time each one fights on your side on this route, during the map or right after it. Purple = only if the condition in brackets is met.
- Quess Paraya
💬 Battle conversations in this map (5)
These pairs have their own lines when they fight each other. “Talk command” means moving next to the unit and choosing Talk; the Secret Units page says which ones matter.
- Char Aznable vs Nesia
- Amuro Ray vs Nesia
- your hero vs Nesia
- Milliardo Peacecraft vs Nesia
- Gyunei Guss vs Nesia
The Tears of Time Never Stop
📜 刻の涙は止まることなく
Added later in the map: Defeat: Cosmo Crusher is destroyed.
Neo Zeon route. At a lunar city the Cosmo Crusher arrives with Takeru Myojin, and Voider’s fleet follows them.
⏳ Don’t miss in this map
- Part on a retreating enemy: Voider carries Magnet Coating details
Full list across the game: Missables.
Walkthrough
- MainOn turn 3 (or with 5 enemies left) the Cosmo Crusher arrives and Takeru, Naoto, Akira and Mika join. From then on the Cosmo Crusher is also a defeat condition.
- TipWhen the first wave is gone, Voider’s mothership and its escorts appear. It retreats at 10% HP.
- TipKamille (Zeta Gundam) and Fa (Methuss) join after the map.
🗺️ Battle map
Circles are units on the map at the start (red enemy, blue ally, green guest). Squares with a number are reinforcement waves. Yellow tags number the named enemies in the table below, and a yellow diamond marks an enemy that carries a part. Positions are Joshua’s version; Lim’s map is the same unless the walkthrough says otherwise. Tap the map to open it full size.
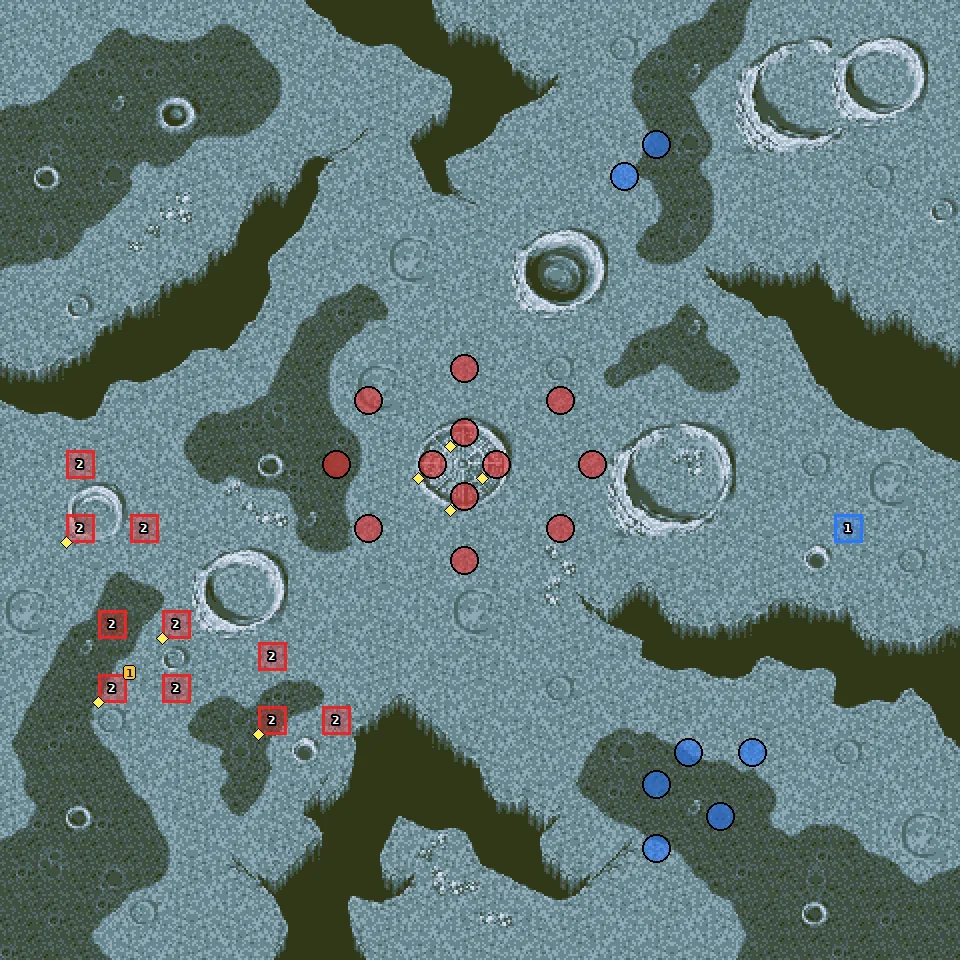
- 1Wave 1 — turn 3 or 5 or fewer enemies left
- 2Wave 2 — all enemies defeated
Named enemies & parts
| Pilot | Unit | Part | Appears | |
|---|---|---|---|---|
| 1 Voider | Voider Mothership | Magnet Coating | wave 2 Retreats at 10% HP |
Parts on regular enemies: Cartridge ×3, Propellant Tank ×3, Repair Kit.
New units & pilots
First time each one fights on your side on this route, during the map or right after it. Purple = only if the condition in brackets is met.
- Naoto Ijuin
- Akira Kiso
- Mika Hyuga
- Takeru Myojin
- Kamille Bidan
- Zeta Gundam
- Fa Yuiry
- Methuss
- Kenji Asuka
- Cosmo Crusher
Listen to My Song!
📜 オレの歌を聴け!
Neo Zeon route. Macross 7 folds in, and Fire Bomber’s Basara sings into the middle of a Varauta raid.
Walkthrough
- MainThe defeat condition is any allied battleship. Exsedol, Miho, Sally and Gadget join at the start.
- TipDefeating Docker, or turn 4, or 3 enemies left moves the story; beating Gigil ends his part of the fight. Gamlin, Char, your hero and Basara have lines with Gigil, and Char, Amuro and Kamille react to the Protodeviln’s presence.
- TipSongs work on Protodeviln. Basara’s Spiritia songs are the best way to stop Gigil.
🗺️ Battle map
Circles are units on the map at the start (red enemy, blue ally, green guest). Squares with a number are reinforcement waves. Yellow tags number the named enemies in the table below, and a yellow diamond marks an enemy that carries a part. Positions are Joshua’s version; Lim’s map is the same unless the walkthrough says otherwise. Tap the map to open it full size.
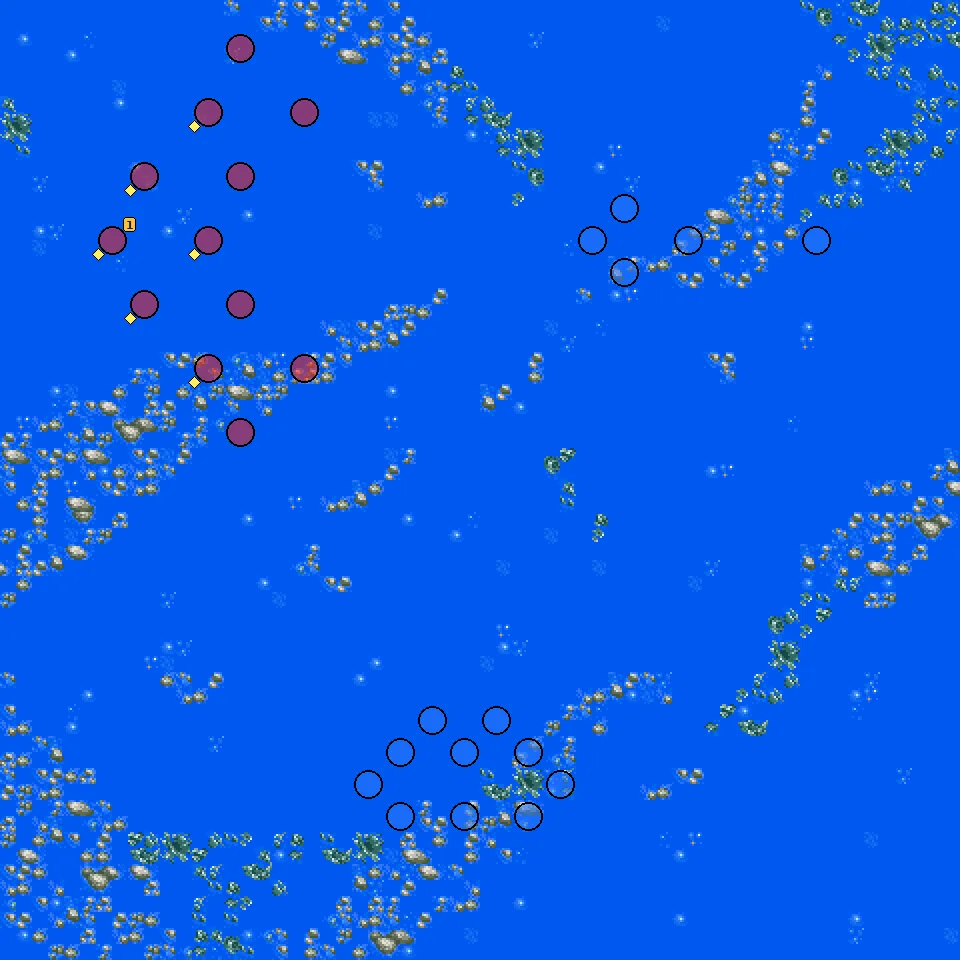
Named enemies & parts
| Pilot | Unit | Part | Appears | |
|---|---|---|---|---|
| 1 Gigil | Fz-109F Elgerzorn | Beam Coating | start Leaves the map when beaten |
Parts on regular enemies: Cartridge ×2, Propellant Tank ×3.
New units & pilots
First time each one fights on your side on this route, during the map or right after it. Purple = only if the condition in brackets is met.
- Exsedol Folmo
- Miho Miho
- Sally S. Ford
- Gadget M. Chiba
- Maximilian Jenius
- Battle 7 (Carrier)
- Kinryu
- VF-17S Nightmare F
- Gamlin Kizaki
- VF-17D Nightmare F
- Docker
- Basara Nekki
- VF-19 Kai Fire Valkyrie F
💬 Battle conversations in this map (4)
These pairs have their own lines when they fight each other. “Talk command” means moving next to the unit and choosing Talk; the Secret Units page says which ones matter.
- Gamlin Kizaki vs Gigil
- Char Aznable vs Gigil
- your hero vs Gigil
- Basara Nekki vs Gigil
The Boys Return to War
📜 少年たちは戦場へ帰る
Neo Zeon route. Heero, Duo and the other Gundam pilots come back to the war.
Walkthrough
- MainChoose your sortie and wipe out the enemy. Any allied battleship is the defeat condition.
- WarningGamlin’s kill count matters now: if he has 6 or more kills when the next stage starts, you can search for a Valkyrie for him, and with 10 or more you can choose the VF-11C Full Armored Thunderbolt. Give him finishing blows here.
🗺️ Battle map
Circles are units on the map at the start (red enemy, blue ally, green guest). Squares with a number are reinforcement waves. Yellow tags number the named enemies in the table below, and a yellow diamond marks an enemy that carries a part. Positions are Joshua’s version; Lim’s map is the same unless the walkthrough says otherwise. Tap the map to open it full size.
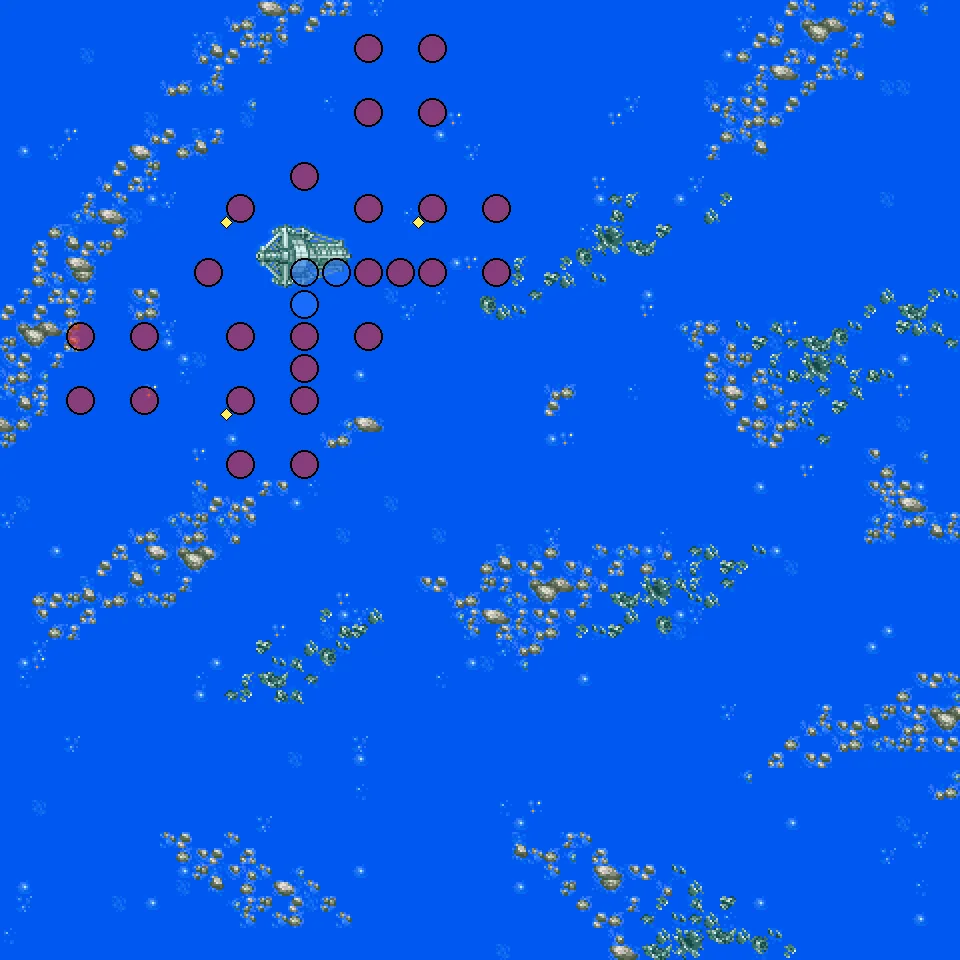
Parts on regular enemies: Repair Kit ×3.
New units & pilots
First time each one fights on your side on this route, during the map or right after it. Purple = only if the condition in brackets is met.
- Heero Yuy
- Wing Gundam Zero
- Duo Maxwell
- Gundam Deathscythe Hell
- Hilde Schbeiker
- Taurus
Fighting Mayor, Ace Milia!
📜 戦う女市長 エースのミリア!
Part 1
Neo Zeon route. Mayor Milia herself sorties to stop a fold drive while Gamlin is without a plane.
Part 2
Added later in the map: Defeat: An allied ship is destroyed.
⏳ Don’t miss in this map
- Before the map, if Gamlin has 6+ kills you can choose to look for a machine for him. With 6-9 kills he gets Mayor Milia’s VF-1J Valkyrie; with 10+ kills you choose between the VF-1J and the VF-11C Full Armored Thunderbolt.
- Part on a retreating enemy: Gigil carries Booster details
Full list across the game: Missables.
Walkthrough
- SecretBefore the map, if Gamlin has 6+ kills you can choose to look for a machine for him. With 6-9 kills he gets Mayor Milia’s VF-1J Valkyrie; with 10+ kills you choose between the VF-1J and the VF-11C Full Armored Thunderbolt.
- WarningSearching costs time: the map’s defeat condition becomes 6 turns pass instead of 8, and the enemy starts in a different formation.
- MainPart 1. Victory: wipe out the enemy or get an ally into the target area (stopping the drive). Any ally shot down is a defeat.
- MainPart 2. Defend City 7: no enemy may enter it. One turn in (or with 8 enemies left) Basara arrives; one turn later (or with 6 left) Gigil appears with more Varauta and the battleship becomes the defeat condition.
- WarningGigil (Elgerzorn) retreats at 30% HP. After the map Milia and Kinryu leave, and Battle 7 changes to its Attack form.
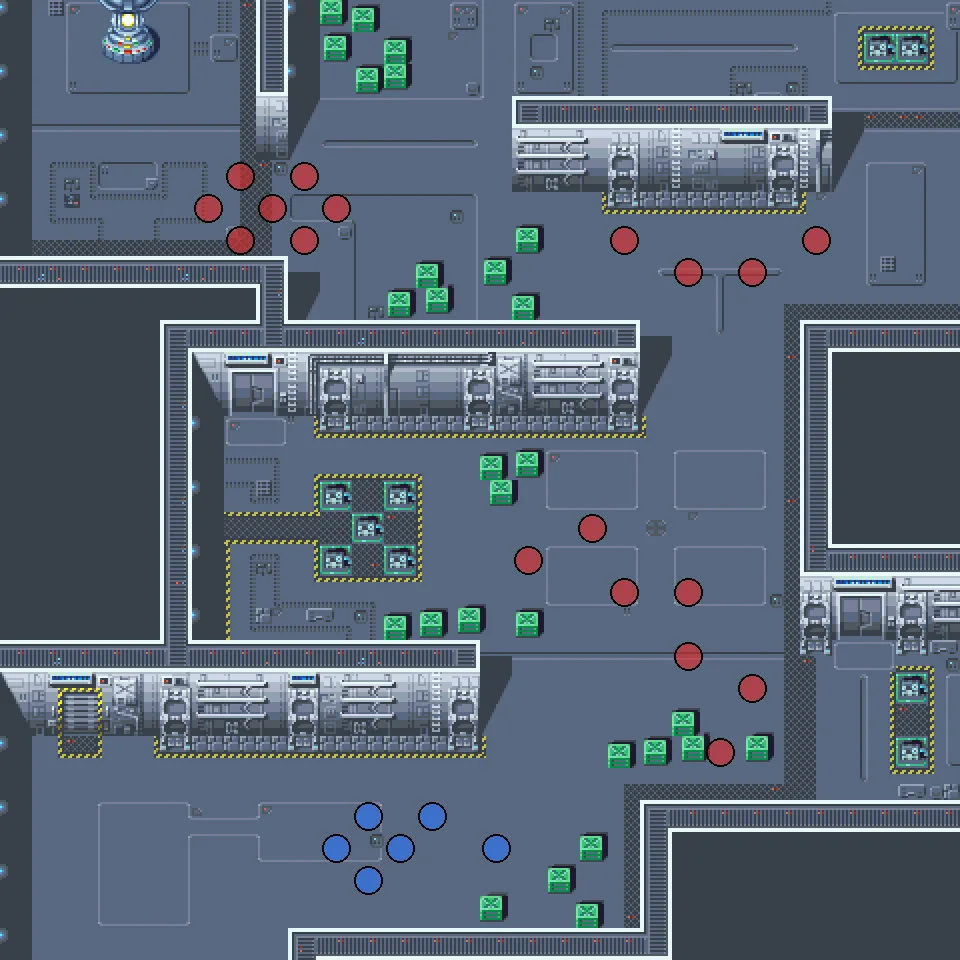
🗺️ Battle map, part 1
Circles are units on the map at the start (red enemy, blue ally, green guest). Squares with a number are reinforcement waves. Yellow tags number the named enemies in the table below, and a yellow diamond marks an enemy that carries a part. Positions are Joshua’s version; Lim’s map is the same unless the walkthrough says otherwise. Tap the map to open it full size.
🗺️ Battle map, part 2
Circles are units on the map at the start (red enemy, blue ally, green guest). Squares with a number are reinforcement waves. Yellow tags number the named enemies in the table below, and a yellow diamond marks an enemy that carries a part. Positions are Joshua’s version; Lim’s map is the same unless the walkthrough says otherwise. Tap the map to open it full size.
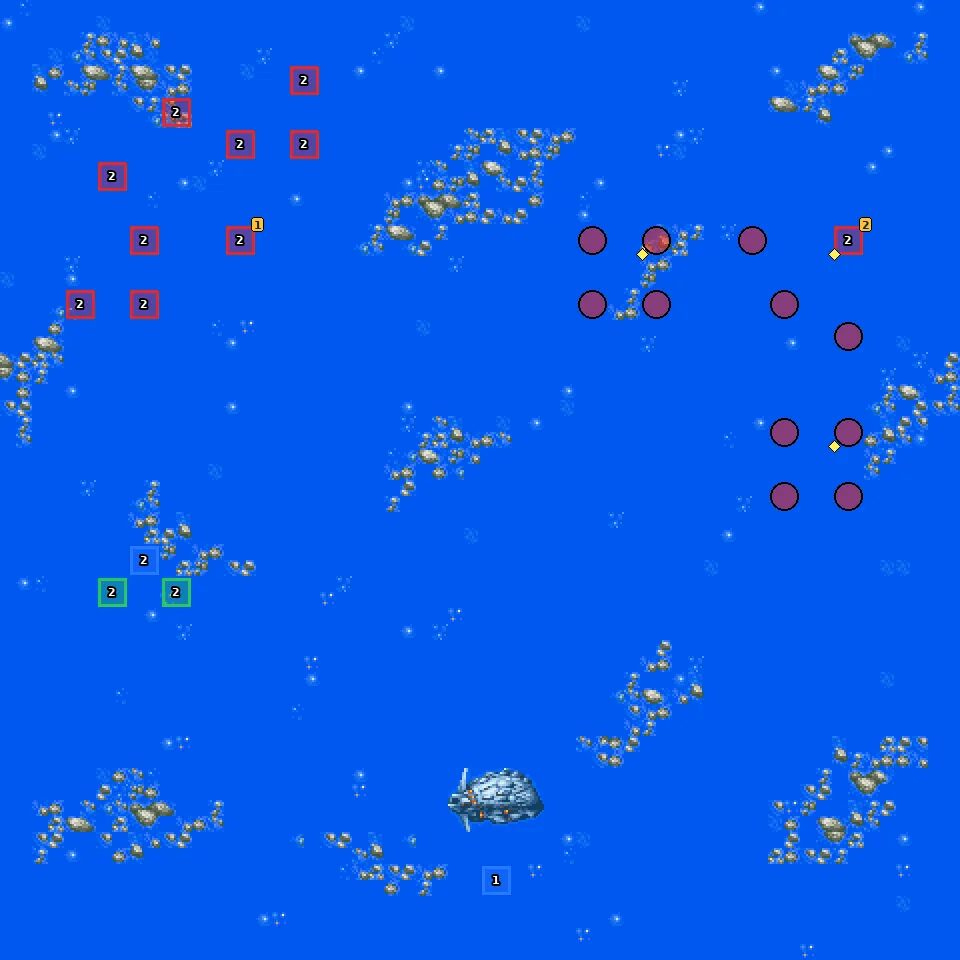
- 1Wave 1 — 1 turn(s) later or 8 or fewer enemies left
- 2Wave 2 — 1 turn(s) later or 6 or fewer enemies left
Named enemies & parts
| Pilot | Unit | Part | Appears | |
|---|---|---|---|---|
| 1 Sivil | Sivil | — | wave 2 Leaves the map when beaten | |
| 2 Gigil | Fz-109F Elgerzorn | Booster | wave 2 Retreats at 30% HP |
Parts on regular enemies: Propellant Tank ×2.
New units & pilots
First time each one fights on your side on this route, during the map or right after it. Purple = only if the condition in brackets is met.
- Battle 7 (Attack)
- VF-1J Valkyrie F (VF-1J picked)
- VF-11C FA Thunderbolt (VF-11C picked)
- Milia Fallyna Jenius
- VF-19 Kai Fire Valkyrie B
Blue Cradle of Mankind
📜 蒼き人類のゆりかご
Neo Zeon route, last stage before the two groups meet. Godwald Hein’s Zanscare fleet stands between you and Earth.
⏳ Don’t miss in this map
- Part on a retreating enemy: Kabuto carries Sup. Def +3 details
Full list across the game: Missables.
Walkthrough
- MainWipe out the first group; then Kabuto’s mothership and its escort arrive. Any allied battleship is the defeat condition.
- TipMilliardo, Amuro and Char have lines with Godwald. Kabuto retreats at 20% HP.
- TipAfter the map the Earth group joins: Wufei, Uso and the League Militaire, the Mazinger team, Shin Getter, Benkei, Kento’s Daltanious, Quatre and Noin.
🗺️ Battle map
Circles are units on the map at the start (red enemy, blue ally, green guest). Squares with a number are reinforcement waves. Yellow tags number the named enemies in the table below, and a yellow diamond marks an enemy that carries a part. Positions are Joshua’s version; Lim’s map is the same unless the walkthrough says otherwise. Tap the map to open it full size.
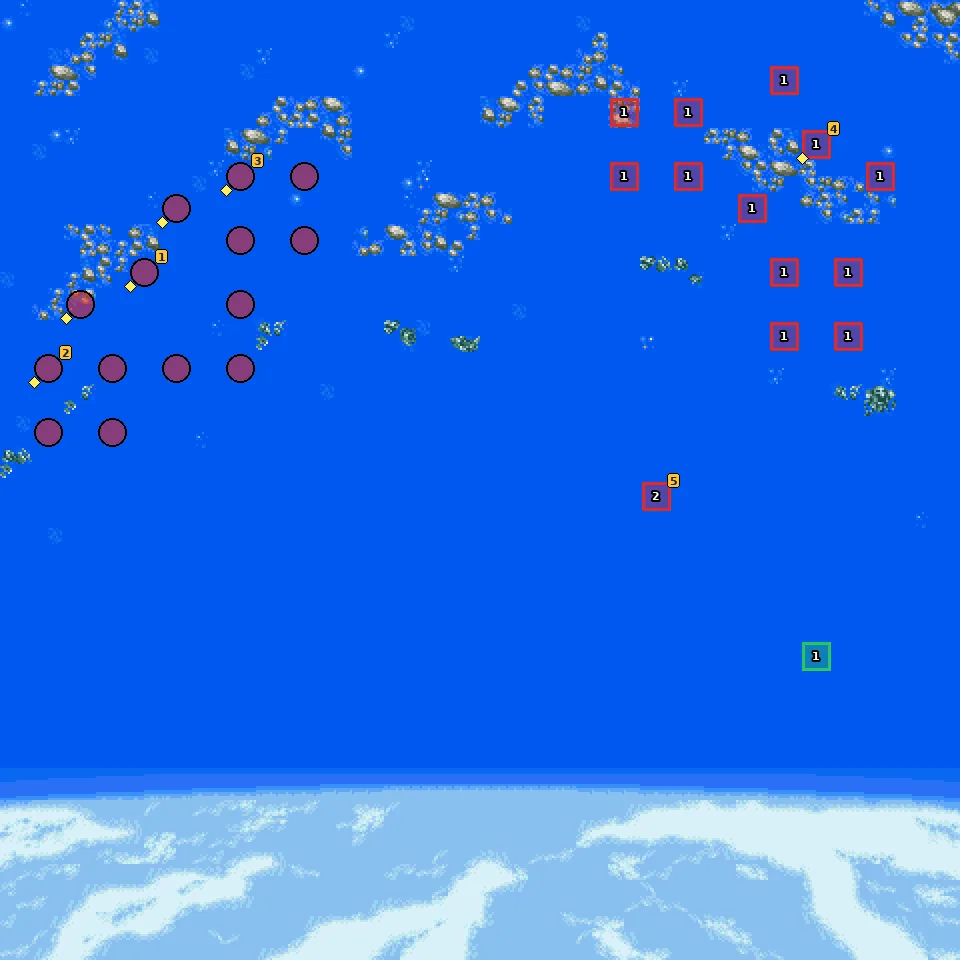
- 1Wave 1 — all enemies defeated
- 2Wave 2 — Kabuto is defeated
Named enemies & parts
| Pilot | Unit | Part | Appears | |
|---|---|---|---|---|
| 1 Godwald Hein | Abigor | Hi-Perf. Radar | start | |
| 2 Goze Barl | Abigor | Dual Sensor | start | |
| 3 Bloch | Abigor | Learning CP | start | |
| 4 Kabuto | Kabuto Mothership | Sup. Def +3 | wave 1 Retreats at 20% HP | |
| 5 Balen | Vacuum | — | wave 2 Leaves the map when beaten |
Parts on regular enemies: Propellant Tank ×2.
New units & pilots
First time each one fights on your side on this route, during the map or right after it. Purple = only if the condition in brackets is met.
- Chang Wufei
- Altron Gundam
- Uso Ewin
- Haro
- V Gundam
- V-Dash Gundam
- Marbet Fingerhat
- Oliver Inoe
- V Gundam Hexa
- V-Dash Gundam Hexa
- Junko Jenko
- Gun Blaster
- Koji Kabuto
- Mazinger Z
- Sayaka Yumi
- Diana A
- Boss
- Boss Borot
- Tetsuya Tsurugi
- Great Mazinger GB
- Jun Hono
- Venus A
- Shiro Kabuto
- Robot Jr.
- Go
- Shin Getter-1
- Kei
- Gai
- Benkei Kuruma
- Kento Tate
- Danji Hiiragi
- Beralios
- Daltanious
- Atlaus
- Gumper
- Quatre Raberba Winner
- Gundam Sandrock Kai
- Lucrezia Noin
- Taurus (S.K. Custom)
💬 Battle conversations in this map (3)
These pairs have their own lines when they fight each other. “Talk command” means moving next to the unit and choosing Talk; the Secret Units page says which ones matter.
- Milliardo Peacecraft vs Godwald Hein
- Amuro Ray vs Godwald Hein
- Char Aznable vs Godwald Hein
Special Squadron Formed
📜 結成 特殊独立戦隊
Both groups are together now. Treize joins, the special squadron is formed, and three Gishin commanders attack Daltanious at once.
⏳ Don’t miss in this map
- Part on a retreating enemy: Nesia carries Combo +3 details
- Part on a retreating enemy: Voider carries Sup. Atk +3 details
- Part on a retreating enemy: Kabuto carries Combo +1 details
Full list across the game: Missables.
Walkthrough
- MainDefeat conditions: any allied battleship, and Kento, Danji and Beralios (Daltanious). Treize joins with the Tallgeese II before the map.
- TipAt 6 enemies left Voider arrives, at 6 left again Kabuto. Each commander retreats at 20% HP and has a line with Daltanious.
- TipAfter the map the squadron gets its name (default Blue Swear) and a menu asks whether your hero likes it; the answer only changes a few lines.
🗺️ Battle map
Circles are units on the map at the start (red enemy, blue ally, green guest). Squares with a number are reinforcement waves. Yellow tags number the named enemies in the table below, and a yellow diamond marks an enemy that carries a part. Positions are Joshua’s version; Lim’s map is the same unless the walkthrough says otherwise. Tap the map to open it full size.
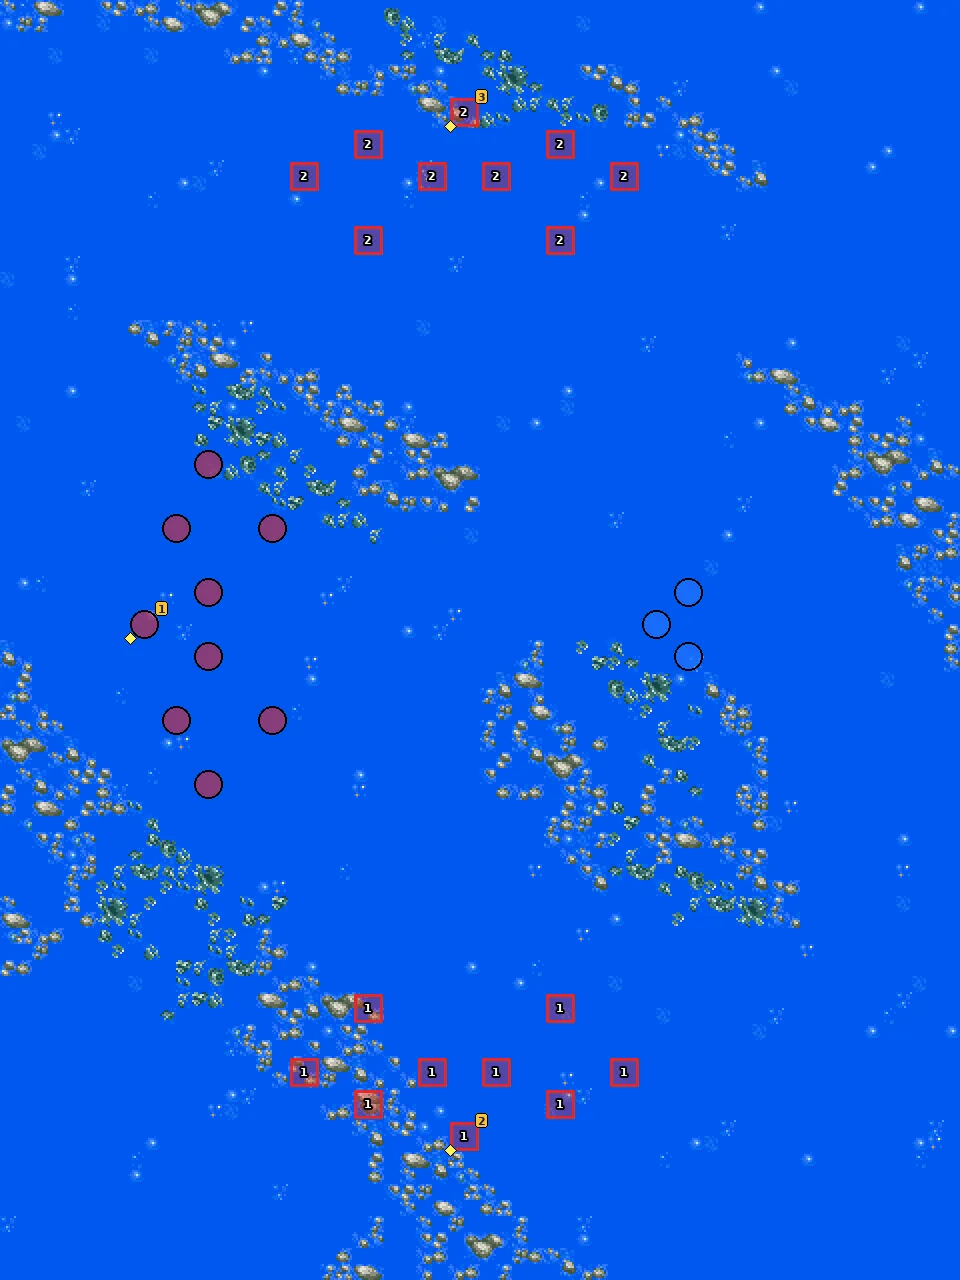
- 1Wave 1 — 6 or fewer enemies left
- 2Wave 2 — 6 or fewer enemies left
Named enemies & parts
| Pilot | Unit | Part | Appears | |
|---|---|---|---|---|
| 1 Nesia | Nesia Mothership | Combo +3 | start Retreats at 20% HP | |
| 2 Voider | Voider Mothership | Sup. Atk +3 | wave 1 Retreats at 20% HP | |
| 3 Kabuto | Kabuto Mothership | Combo +1 | wave 2 Retreats at 20% HP |
New units & pilots
First time each one fights on your side on this route, during the map or right after it. Purple = only if the condition in brackets is met.
- Treize Khushrenada
- Tallgeese II
- Zechs Merquise
💬 Battle conversations in this map (3)
These pairs have their own lines when they fight each other. “Talk command” means moving next to the unit and choosing Talk; the Secret Units page says which ones matter.
- Nesia vs Daltanious
- Voider vs Daltanious
- Kabuto vs Daltanious
Pretty Devil
📜 プリティデビル
Part 1
Amuro finally gets the ν Gundam, and the Gishin Empire tries to take Takeru away.
Part 2
Walkthrough
- MainPart 1 is a story scene: Takeru is caught and leaves the map.
- MainPart 2. Sortie and defend the fleet. At 5 enemies left more Varauta arrive with Basara. Any allied battleship is the defeat condition.
- TipGigil retreats when defeated. Gamlin and Basara have lines with him.
- TipAmuro moves to the ν Gundam before the map. Takeru and the Gaiyar leave for now.
🗺️ Battle map, part 1
Circles are units on the map at the start (red enemy, blue ally, green guest). Squares with a number are reinforcement waves. Yellow tags number the named enemies in the table below, and a yellow diamond marks an enemy that carries a part. Positions are Joshua’s version; Lim’s map is the same unless the walkthrough says otherwise. Tap the map to open it full size.
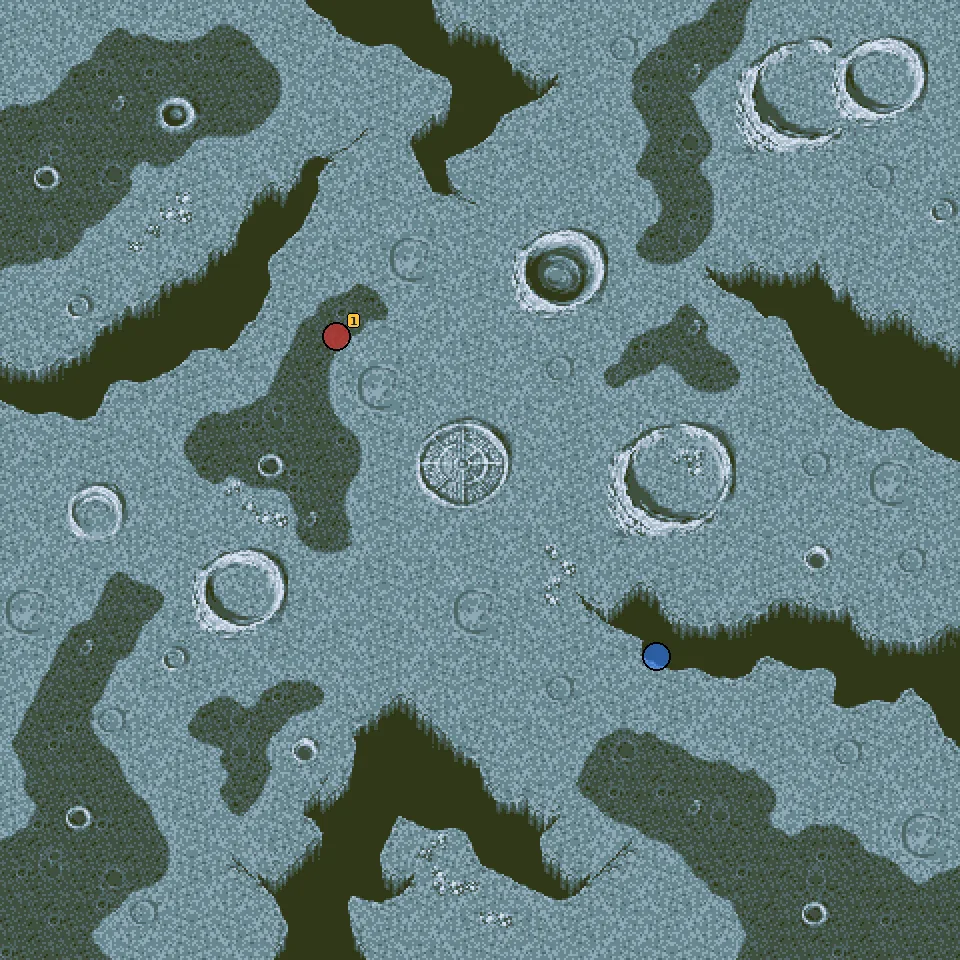
🗺️ Battle map, part 2
Circles are units on the map at the start (red enemy, blue ally, green guest). Squares with a number are reinforcement waves. Yellow tags number the named enemies in the table below, and a yellow diamond marks an enemy that carries a part. Positions are Joshua’s version; Lim’s map is the same unless the walkthrough says otherwise. Tap the map to open it full size.
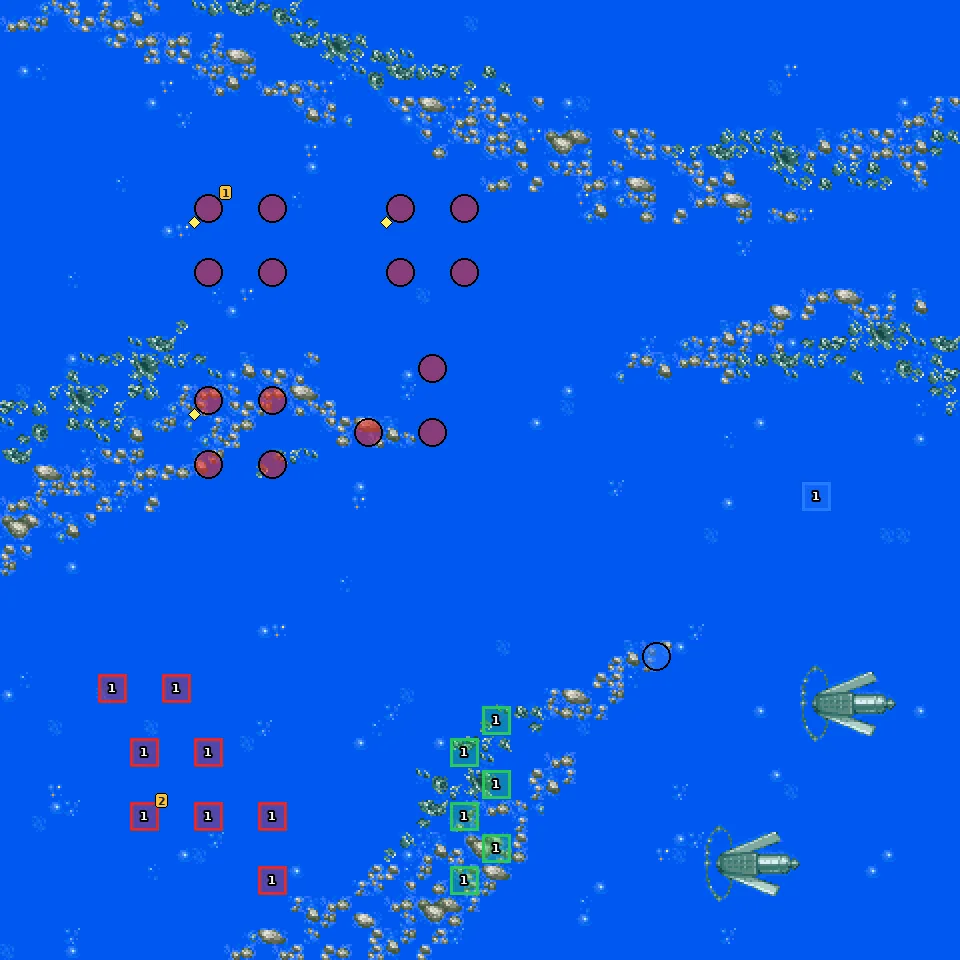
- 1Wave 1 — 5 or fewer enemies left
Named enemies & parts
| Pilot | Unit | Part | Appears | |
|---|---|---|---|---|
| 1 Balen | Vacuum | — | start | |
| 1 Gigil | Fz-109F Elgerzorn | Hybrid Armor | start Leaves the map when beaten | |
| 2 Sivil | Sivil | — | wave 1 Leaves the map when beaten |
Parts on regular enemies: Propellant Tank ×2.
New units & pilots
First time each one fights on your side on this route, during the map or right after it. Purple = only if the condition in brackets is met.
- ν Gundam
- Gaiyar
- Basara Nekki
- VF-19 Kai Fire Valkyrie F
💬 Battle conversations in this map (2)
These pairs have their own lines when they fight each other. “Talk command” means moving next to the unit and choosing Talk; the Secret Units page says which ones matter.
- Gamlin Kizaki vs Gigil
- Basara Nekki vs Gigil
Its Name Is “Ruin”
📜 その名は“破滅”
Down on Earth the Ruina strike for the first time, and a quiet stable hand named Daisuke shows who he really is.
⏳ Don’t miss in this map
- Part on a retreating enemy: Aquila carries Evasion +5 details
Full list across the game: Missables.
Walkthrough
- MainWipe out the Invaders; then a second wave with Aquila (Fortis Ala) arrives. Any allied battleship is the defeat condition.
- WarningAquila retreats at 20% HP. Koji, Tetsuya and your hero have lines with him.
- TipAt 5 enemies left (or one turn later) Grendizer joins. Ryoma appears in this map as well.
🗺️ Battle map
Circles are units on the map at the start (red enemy, blue ally, green guest). Squares with a number are reinforcement waves. Yellow tags number the named enemies in the table below, and a yellow diamond marks an enemy that carries a part. Positions are Joshua’s version; Lim’s map is the same unless the walkthrough says otherwise. Tap the map to open it full size.
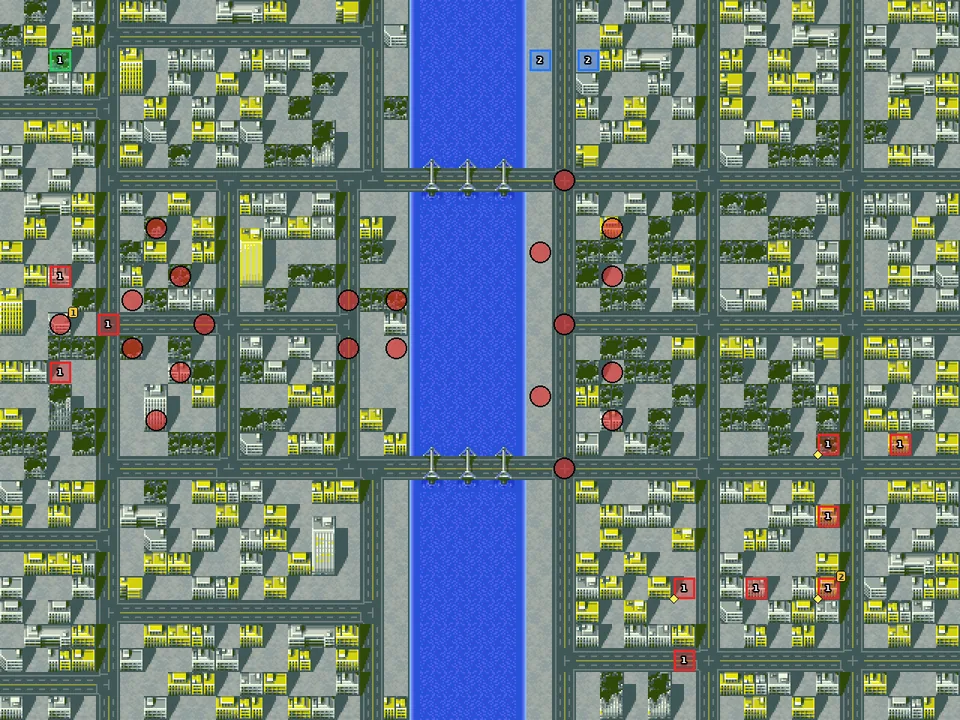
- 1Wave 1 — all enemies defeated
- 2Wave 2 — 5 or fewer enemies left or 1 turn(s) later
Named enemies & parts
| Pilot | Unit | Part | Appears | |
|---|---|---|---|---|
| 1 Dr. Saotome | Metal Beast | — | start Leaves the map when beaten | |
| 2 Aquila | Fortis Ala | Evasion +5 | wave 1 Retreats at 20% HP |
Parts on regular enemies: Repair Kit ×2.
New units & pilots
First time each one fights on your side on this route, during the map or right after it. Purple = only if the condition in brackets is met.
- Grendizer MS
- Duke Fleed
- Grendizer
- Hikaru Makiba
- Marine Spazer
💬 Battle conversations in this map (3)
These pairs have their own lines when they fight each other. “Talk command” means moving next to the unit and choosing Talk; the Secret Units page says which ones matter.
- Koji Kabuto vs Aquila
- Tetsuya Tsurugi vs Aquila
- your hero vs Aquila
The Dreaded Space Sickness
📜 恐怖の宇宙病
Added later in the map: Defeat: An allied ship is destroyed; Defeat: Bemborg Gurzon is destroyed; Defeat: Takeru is destroyed.
A strange ‘space disease’ spreads, Beck tries to seize a power plant, and Takeru returns as God Mars.
Walkthrough
- MainPart one: stop Beck. Defeat conditions are losing every ally and any enemy entering the power plant. Roger has lines with Beck and the Eel.
- TipAt 5 enemies left (or turn 3) the main group sorties and Trowa shows up; then Kabuto, Kacchi and the Bemborg Gurzon arrive.
- WarningFrom the second wave on, Takeru and the Bemborg Gurzon must not be destroyed. Kill everything except the Bemborg first, then finish it.
- TipTakeru has lines with Kacchi and Kabuto, Duke with Kabuto. After the map Trowa joins with the Heavyarms Kai.
🗺️ Battle map
Circles are units on the map at the start (red enemy, blue ally, green guest). Squares with a number are reinforcement waves. Yellow tags number the named enemies in the table below, and a yellow diamond marks an enemy that carries a part. Positions are Joshua’s version; Lim’s map is the same unless the walkthrough says otherwise. Tap the map to open it full size.
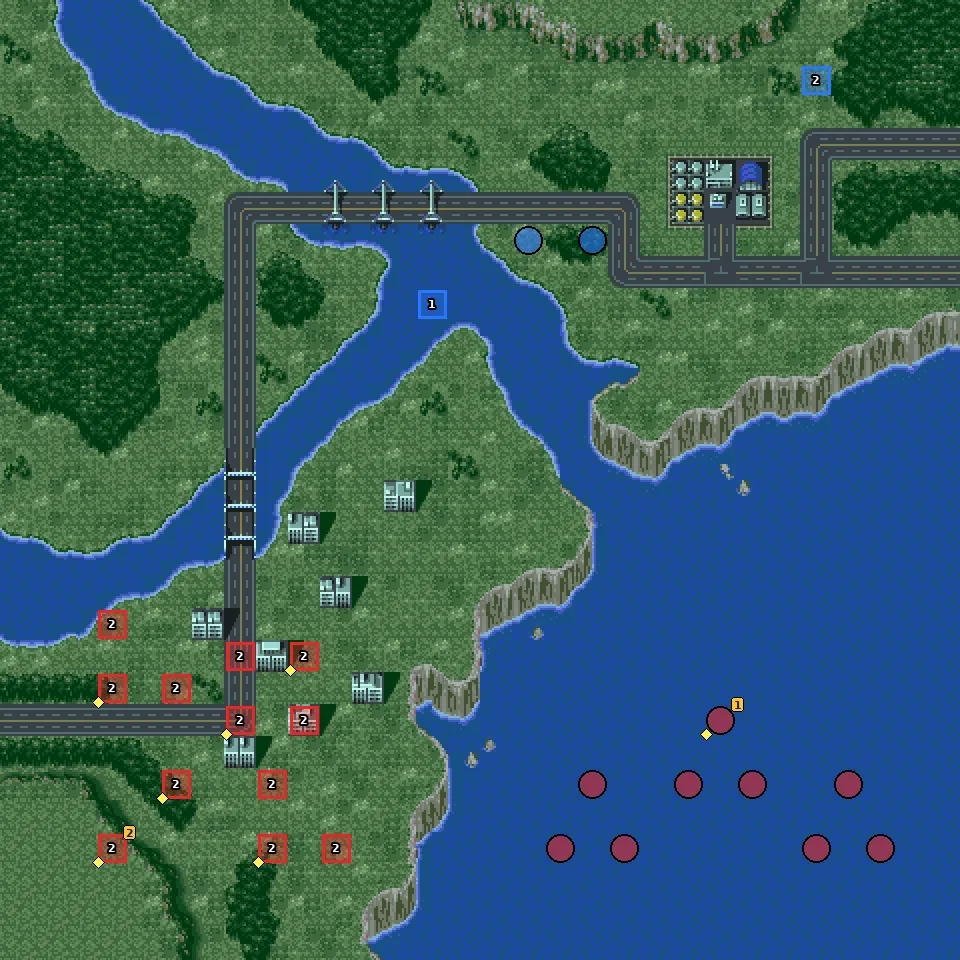
- 1Wave 1 — 5 or fewer enemies left or turn 3
- 2Wave 2 — all enemies defeated
Named enemies & parts
| Pilot | Unit | Part | Appears | |
|---|---|---|---|---|
| 1 Beck | Beck Victory Deluxe | Mega Booster | start Leaves the map when beaten | |
| 2 Kabuto | Kabuto Mothership | Counter | wave 2 |
Parts on regular enemies: Minovsky Craft, Repair Kit ×3, Sup. Def +3.
New units & pilots
First time each one fights on your side on this route, during the map or right after it. Purple = only if the condition in brackets is met.
- Gundam Heavyarms Kai
- Trowa Barton
- Schwarz
- Stelvar
- Roger Smith
- R. Dorothy Wayneright
- Big O
- Yamazaki
- Dr. Shikishima
- Tower
💬 Battle conversations in this map (5)
These pairs have their own lines when they fight each other. “Talk command” means moving next to the unit and choosing Talk; the Secret Units page says which ones matter.
- Roger Smith vs Beck
- Roger Smith vs Eel
- Takeru Myojin vs Kacchi
- Takeru Myojin vs Kabuto
- Duke Fleed vs Kabuto
Ice Doll Glacies (Joshua) / Winds of Fate (Lim)
📜 アイスドール グラキエース / 運命の風
Added later in the map: Defeat: is destroyed; Defeat: Takeru is destroyed.
The Ruina’s ice-cold pilot steps onto the battlefield. Joshua plays Ice Doll Glacies; Lim plays Winds of Fate on the same map with a different rival.
⏳ Don’t miss in this map
- Joshua: when Glacies appears, move Joshua next to her and use Talk (説得). This is step 1 of recruiting her (it sets the flag the game checks in Spell of Life and Death).
- Lim: after Ventus appears and 5 or fewer enemies are left, a menu asks what to do. Choose Listen to him (the second option). Refusing ends his recruitment here.
Full list across the game: Missables.
Walkthrough
- MainClear BESPA first (Duker, Renda, Pippinieden, Rupe). At 5 enemies left or on turn 4 the Ruina appear with Ignis, then more Ruina come in steps (8 and 4 enemies left). Your battleship and, from the Ruina’s arrival, your hero are defeat conditions.
- WarningRenda carries an ECM Jammer and Rupe a Weapon Breaker. Ignis retreats when beaten; Koji, Tetsuya and your hero have lines with him.
- SecretJoshua: when Glacies appears, move Joshua next to her and use Talk (説得). This is step 1 of recruiting her (it sets the flag the game checks in Spell of Life and Death).
- SecretLim: after Ventus appears and 5 or fewer enemies are left, a menu asks what to do. Choose Listen to him (the second option). Refusing ends his recruitment here.
- TipAfter the map Ryoma joins with the Black Getter, and Grace Maria joins with the Drill Spazer (Grendizer gets the Double/Drill Spazer combinations).
🗺️ Battle map
Circles are units on the map at the start (red enemy, blue ally, green guest). Squares with a number are reinforcement waves. Yellow tags number the named enemies in the table below, and a yellow diamond marks an enemy that carries a part. Positions are Joshua’s version; Lim’s map is the same unless the walkthrough says otherwise. Tap the map to open it full size.
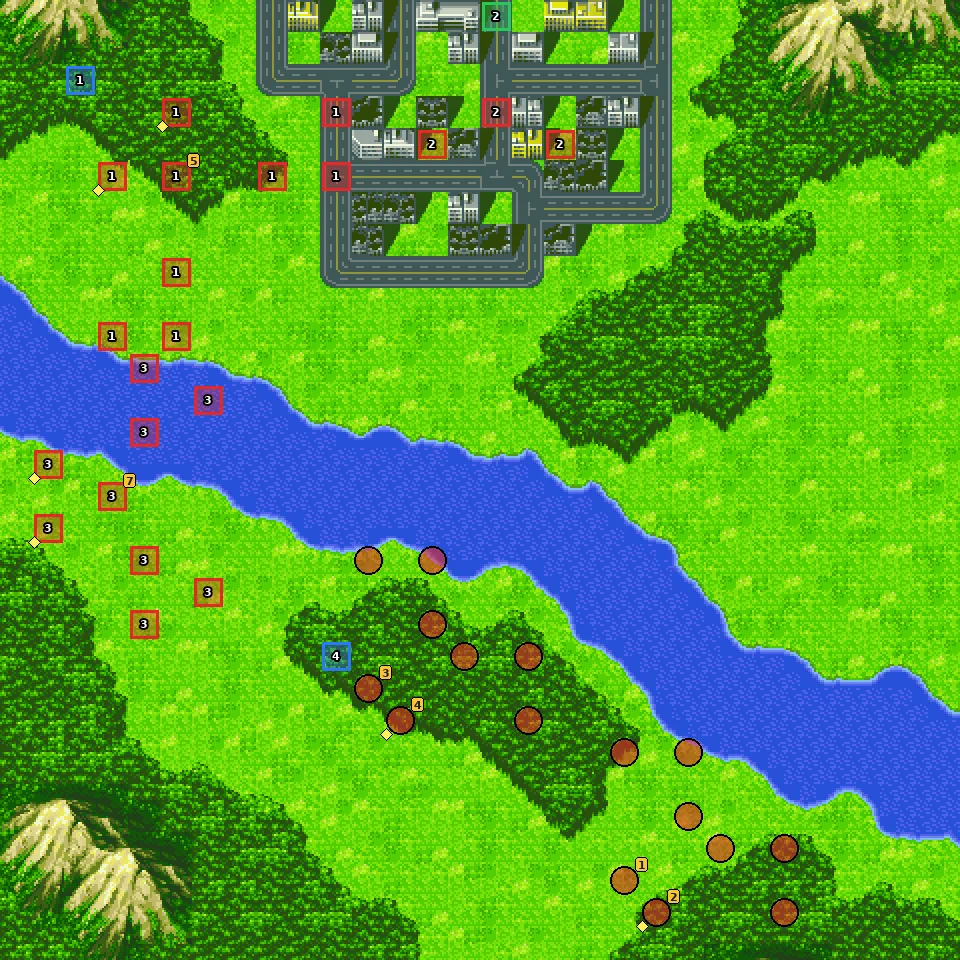
- 1Wave 1 — 5 or fewer enemies left or turn 4
- 2Wave 2 — 8 or fewer enemies left
- 3Wave 3 — 4 or fewer enemies left
- 4Wave 4 — all enemies defeated
Named enemies & parts
| Pilot | Unit | Part | Appears | |
|---|---|---|---|---|
| 1 Duker Iq | Gallickson | — | start | |
| 2 Renda de Paloma | Gallickson | ECM Jammer | start | |
| 3 Arbeo Pippinieden | Memmedorza | — | start | |
| 4 Rupe Cineau | Memmedorza | Weapon Breaker | start | |
| 5 Ignis | Impetus | — | wave 1 Leaves the map when beaten | |
| 6 Glacies | Fabularis | — | wave 3 Leaves the map when beaten | |
| 7 Glacies | Fabularis | — | wave 3 Leaves the map when beaten |
Parts on regular enemies: Repair Kit ×6.
New units & pilots
First time each one fights on your side on this route, during the map or right after it. Purple = only if the condition in brackets is met.
- Grace Maria Fleed
- Drill Spazer
- Double Spazer
- Grendizer DS
- Grendizer WS
- Black Getter
💬 Battle conversations in this map (5)
These pairs have their own lines when they fight each other. “Talk command” means moving next to the unit and choosing Talk; the Secret Units page says which ones matter.
- Koji Kabuto vs Ignis
- Tetsuya Tsurugi vs Ignis
- your hero vs Ignis
- your hero vs Glacies
- your hero → Glacies (Talk command)
Advent! Evil God of the South Seas!!
📜 降臨! 南海を断つ邪神!!
Part 1
Added later in the map: Defeat: Takeru is destroyed.
Shin Dragon awakens in the southern seas, and Dr. Saotome’s Invaders gather around it.
Part 2
Added later in the map: Defeat: Shin Getter is destroyed.
Walkthrough
- MainPart 1. Defeat conditions: your battleship, Shin Getter and Black Getter. At 5 enemies left a second Invader group arrives.
- MainPart 2. Saotome is fused with Shin Dragon. He carries a Bio-Sensor. Damage Guvava to move the story on; at 5 enemies left Go’s team changes and Shin Getter-1 gets its Change Attack again.
- TipShin Dragon regenerates and comes back as a Metal Beast Dragon (one of them carries a Hit +10 part). When the last group falls Shin Getter-1 learns Stoner Sunshine.
- TipAfter the map the Tower crew leave the roster for a while.
🗺️ Battle map, part 1
Circles are units on the map at the start (red enemy, blue ally, green guest). Squares with a number are reinforcement waves. Yellow tags number the named enemies in the table below, and a yellow diamond marks an enemy that carries a part. Positions are Joshua’s version; Lim’s map is the same unless the walkthrough says otherwise. Tap the map to open it full size.
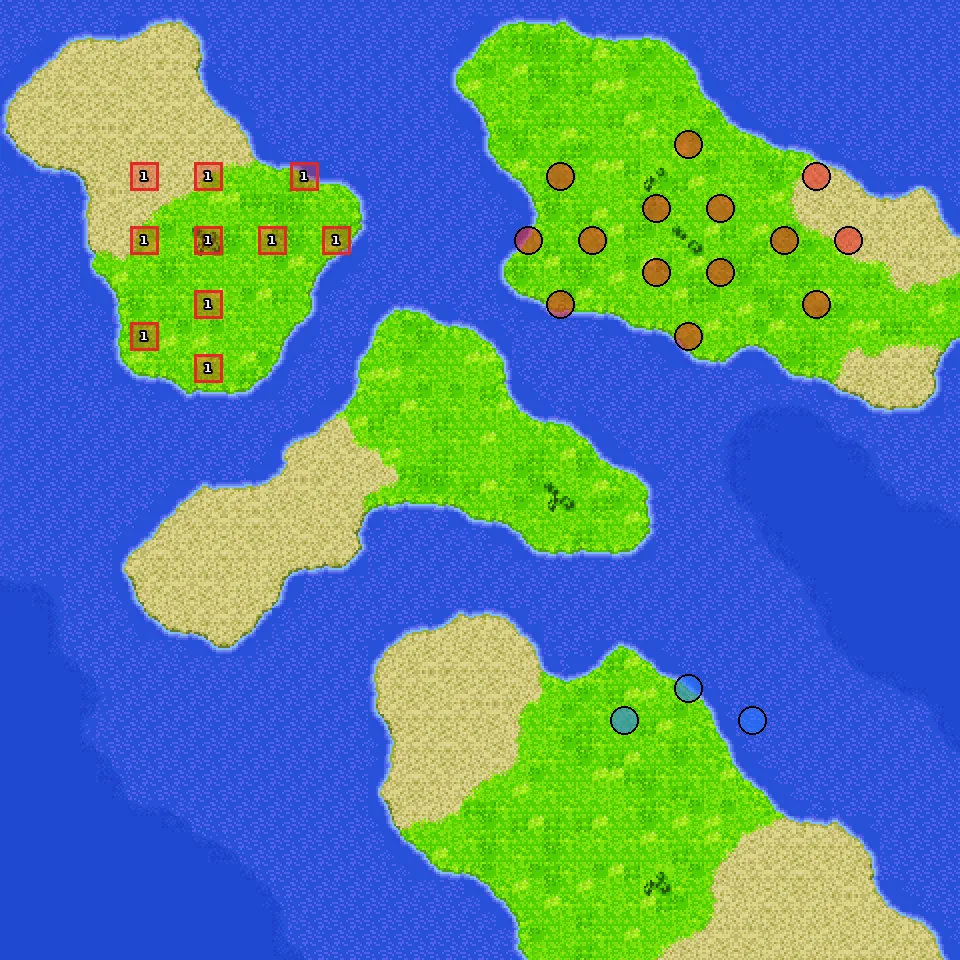
- 1Wave 1 — 5 or fewer enemies left
🗺️ Battle map, part 2
Circles are units on the map at the start (red enemy, blue ally, green guest). Squares with a number are reinforcement waves. Yellow tags number the named enemies in the table below, and a yellow diamond marks an enemy that carries a part. Positions are Joshua’s version; Lim’s map is the same unless the walkthrough says otherwise. Tap the map to open it full size.
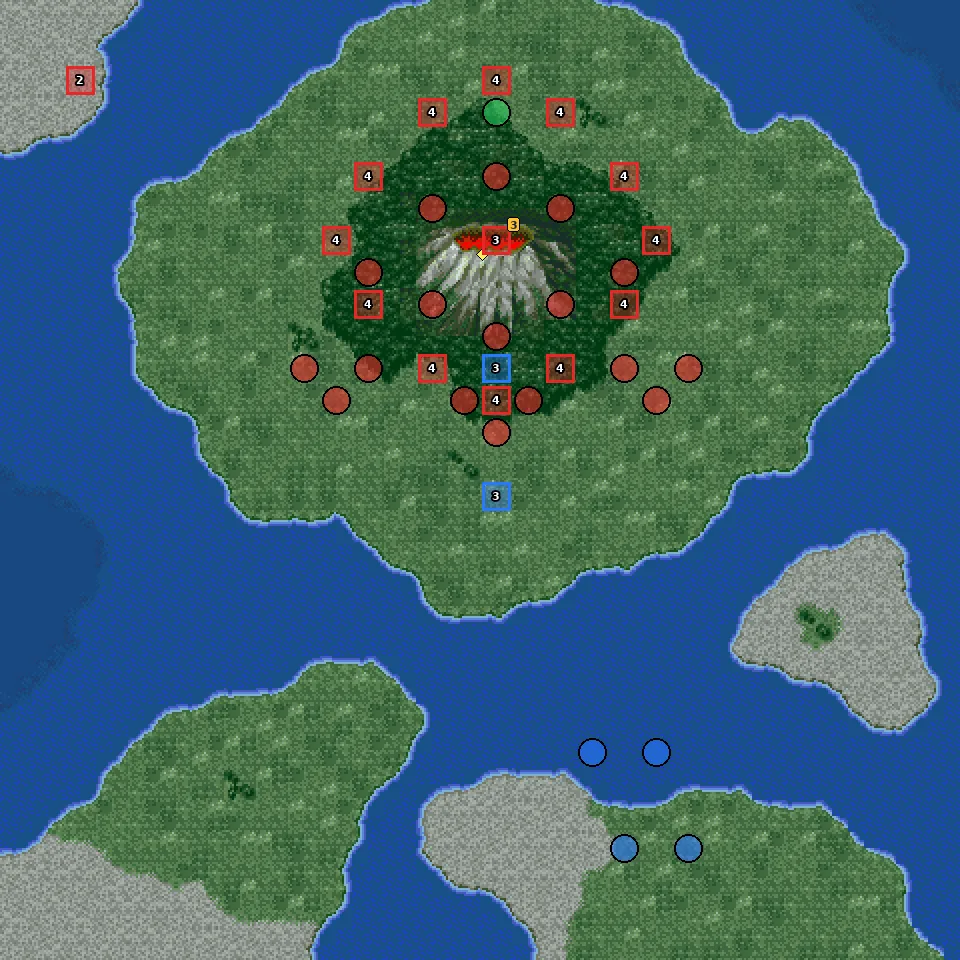
- 1Wave 1 — 5 or fewer enemies left
- 2Wave 2 — Guvava damaged
- 3Wave 3 — all enemies defeated
- 4Wave 4 — 5 or fewer enemies left or Guvava damaged
Named enemies & parts
| Pilot | Unit | Part | Appears | |
|---|---|---|---|---|
| 1 Dr. Saotome | Shin Dragon | Bio-Sensor | start | |
| 2 Dr. Saotome | Metal Beast Dragon | Hit +10 | wave 4 | |
| 3 Dr. Saotome | Metal Beast Dragon | — | wave 3 |
Raid! The Gishin Vega Fleet
📜 強襲! ギシン星間帝国ベガ艦隊
Added later in the map: Defeat: Takeru is destroyed.
The Gishin Empire’s Vega fleet strikes. Grendizer meets its old enemies, and Takeru faces Zuul’s officers.
Walkthrough
- MainDefeat conditions: your battleship and Grendizer.
- TipCaptain Blacky carries a Prevail +1 skill part and Ghoul a Chobham Armor. Both retreat when beaten. Takeru, Duke and Daltanious all have lines with them.
- WarningRoute choice after the map: Go to Jupiter (with the Getter team, Schwarz, Gamlin, Basara and Battle 7) or join the Kailasa-Giri operation (with Amuro, Char, Bright, Kamille, the Gundams and the Cosmo Crusher). Jupiter gives the Gundam Mk-III; Kailasa-Giri gives Amuro the ν Gundam HWS if he has 50+ kills. You can’t get both.
🗺️ Battle map
Circles are units on the map at the start (red enemy, blue ally, green guest). Squares with a number are reinforcement waves. Yellow tags number the named enemies in the table below, and a yellow diamond marks an enemy that carries a part. Positions are Joshua’s version; Lim’s map is the same unless the walkthrough says otherwise. Tap the map to open it full size.
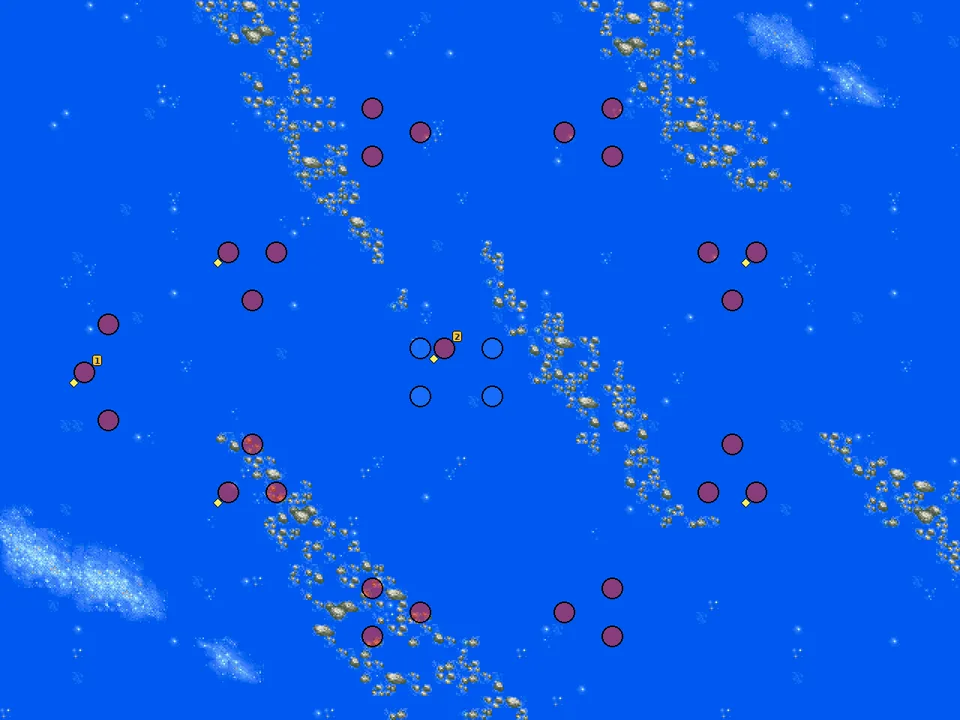
Named enemies & parts
| Pilot | Unit | Part | Appears | |
|---|---|---|---|---|
| 1 Captain Blacky | Motherbahn | Prevail +1 | start Leaves the map when beaten | |
| 2 Ghoul | Guruguru | Chobham Armor | start Leaves the map when beaten |
Parts on regular enemies: Cartridge ×2, Propellant Tank, Repair Kit.
💬 Battle conversations in this map (5)
These pairs have their own lines when they fight each other. “Talk command” means moving next to the unit and choosing Talk; the Secret Units page says which ones matter.
- Takeru Myojin vs Ghoul
- Takeru Myojin vs Captain Blacky
- Duke Fleed vs Captain Blacky
- Captain Blacky vs Daltanious
- Duke Fleed vs Ghoul
Jupiter Mirage
📜 ジュピター・ミラージュ
Part 1
Jupiter route. Near Jupiter the group finds Judau and Roux fighting Invaders, and the true Shin Dragon.
Part 2
Added later in the map: Defeat: Battle 7 is destroyed; Defeat: Shin Getter is destroyed; Defeat: Shin Dragon is destroyed.
Walkthrough
- MainPart 1: a wipe-out with Judau (ZZ Gundam) and Roux (Gundam Mk-III) on your side; both join for good. Go takes the Shin Dragon before the map.
- MainPart 2. Stinger and Cowen’s Invaders. When the first boss falls you sortie; from then on Battle 7, Shin Getter and Shin Dragon are defeat conditions. One turn later (or at 10 enemies left) Basara arrives; at 5 left another wave. Beat Cowen to end it.
- TipTwo skill parts (Sup. Atk +3 and Sup. Atk +1) are on regular enemies here.
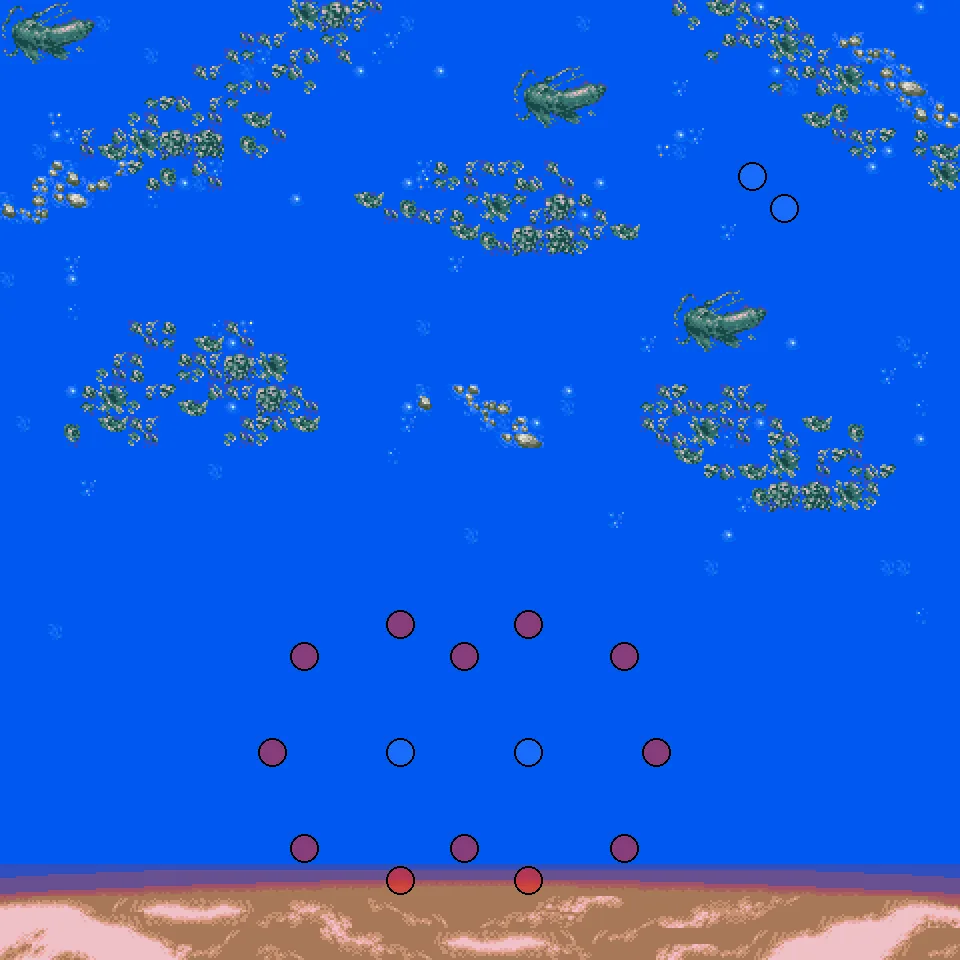
🗺️ Battle map, part 1
Circles are units on the map at the start (red enemy, blue ally, green guest). Squares with a number are reinforcement waves. Yellow tags number the named enemies in the table below, and a yellow diamond marks an enemy that carries a part. Positions are Joshua’s version; Lim’s map is the same unless the walkthrough says otherwise. Tap the map to open it full size.
🗺️ Battle map, part 2
Circles are units on the map at the start (red enemy, blue ally, green guest). Squares with a number are reinforcement waves. Yellow tags number the named enemies in the table below, and a yellow diamond marks an enemy that carries a part. Positions are Joshua’s version; Lim’s map is the same unless the walkthrough says otherwise. Tap the map to open it full size.
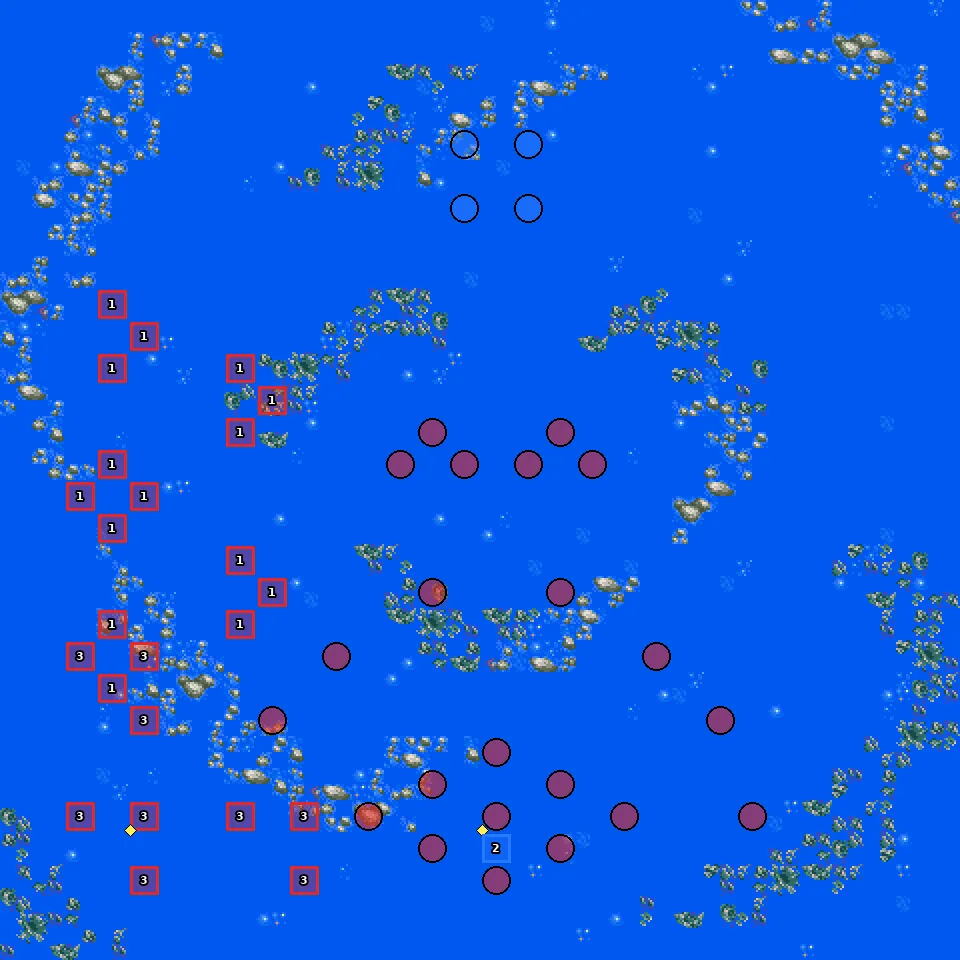
- 1Wave 1 — ??? destroyed
- 2Wave 2 — 1 turn(s) later or 10 or fewer enemies left
- 3Wave 3 — 5 or fewer enemies left
Parts on regular enemies: Sup. Atk +1, Sup. Atk +3.
New units & pilots
First time each one fights on your side on this route, during the map or right after it. Purple = only if the condition in brackets is met.
- Shin Dragon
- Judau Ashta
- ZZ Gundam
- Roux Louka
- Gundam Mk-III
- VF-19 Kai Fire Valkyrie B
Showdown! Mars and Marg
📜 対決! マーズとマーグ
Part 1
Added later in the map: Victory: Defeat all enemies; Defeat: Takeru is destroyed.
Kailasa-Giri route. Marg, Takeru’s brother, is sent against him with a bomb in his body.
Part 2
Walkthrough
- MainPart 1. Victory: defeat every enemy except Marg; Marg must not be destroyed. He starts in one of five places at random.
- TipWhen the control over Marg is broken he leaves the map and the victory condition becomes a normal wipe-out. Nesia’s mothership (with a Sup. Atk +3) arrives later.
- MainPart 2. Chronicle (Contio) attacks on the way to Highland. He retreats when beaten. Marbet and your hero (League Militaire route only) have lines with him.
🗺️ Battle map, part 1
Circles are units on the map at the start (red enemy, blue ally, green guest). Squares with a number are reinforcement waves. Yellow tags number the named enemies in the table below, and a yellow diamond marks an enemy that carries a part. Positions are Joshua’s version; Lim’s map is the same unless the walkthrough says otherwise. Tap the map to open it full size.
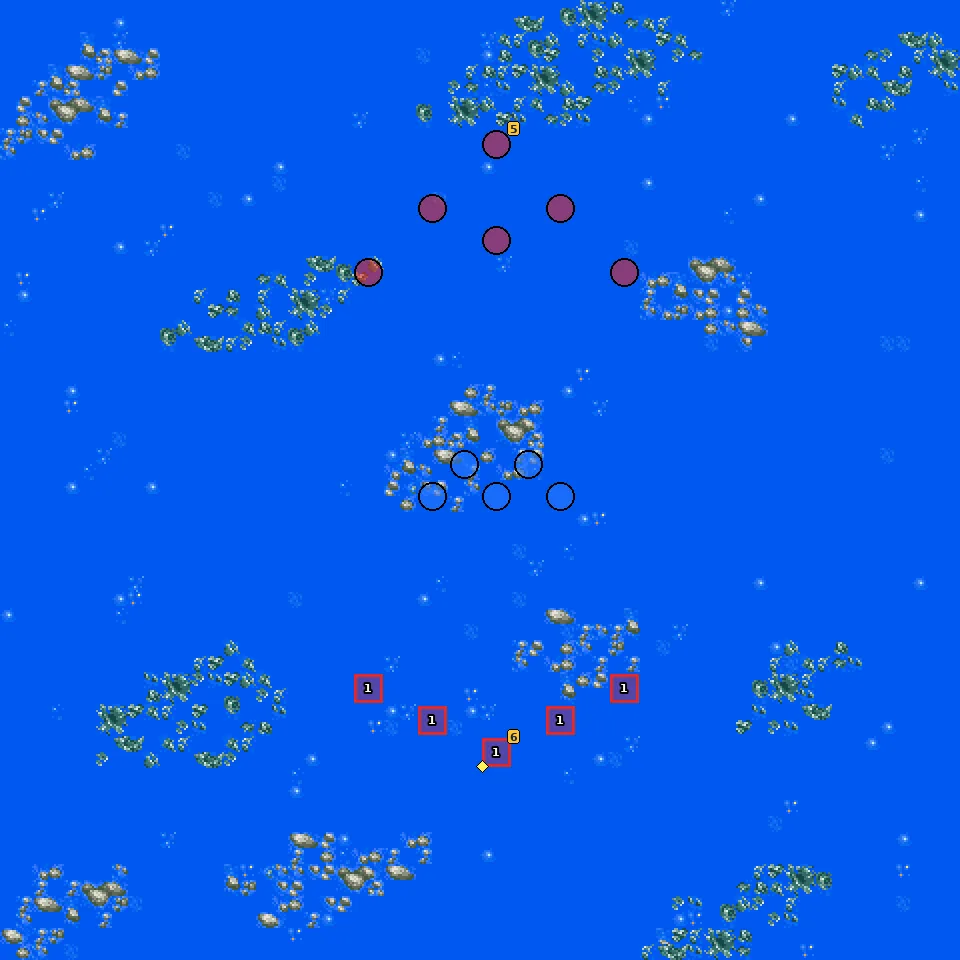
- 1Wave 1 — q12(4 1 4)
🗺️ Battle map, part 2
Circles are units on the map at the start (red enemy, blue ally, green guest). Squares with a number are reinforcement waves. Yellow tags number the named enemies in the table below, and a yellow diamond marks an enemy that carries a part. Positions are Joshua’s version; Lim’s map is the same unless the walkthrough says otherwise. Tap the map to open it full size.
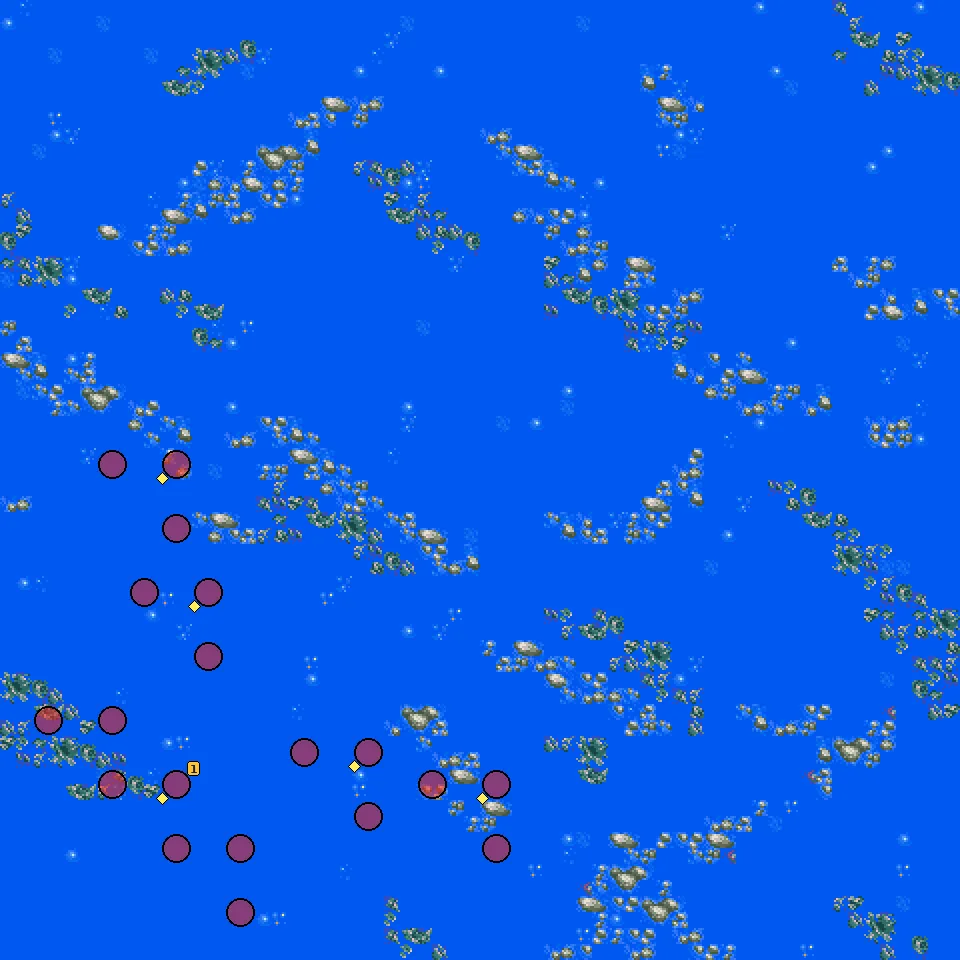
Named enemies & parts
| Pilot | Unit | Part | Appears | |
|---|---|---|---|---|
| 1 Marg | Ganymedes | — | start Leaves the map when beaten | |
| 2 Marg | Ganymedes | — | start Leaves the map when beaten | |
| 3 Marg | Ganymedes | — | start Leaves the map when beaten | |
| 4 Marg | Ganymedes | — | start Leaves the map when beaten | |
| 5 Marg | Ganymedes | — | start Leaves the map when beaten | |
| 6 Nesia | Nesia Mothership | Sup. Atk +3 | wave 1 | |
| 1 Chronicle Asher | Contio | Repair Kit | start Leaves the map when beaten |
Parts on regular enemies: Cartridge, Propellant Tank, Repair Kit ×2.
💬 Battle conversations in this map (2)
These pairs have their own lines when they fight each other. “Talk command” means moving next to the unit and choosing Talk; the Secret Units page says which ones matter.
- Marbet Fingerhat vs Chronicle Asher
- your hero vs Chronicle Asher
Assault on Kailasa-Giri
📜 カイラスギリー攻略戦
Kailasa-Giri route. The assault on BESPA’s giant beam fortress, and Uso’s painful reunion with Katejina.
⏳ Don’t miss in this map
- If Amuro has 50 or more kills when this stage starts, he gets the ν Gundam HWS. The check happens before the map, so the kills must be done by the end of Showdown! Mars and Marg.
- Part on a retreating enemy: Tassilo Vago carries Large Magazine details
Full list across the game: Missables.
Walkthrough
- SecretIf Amuro has 50 or more kills when this stage starts, he gets the ν Gundam HWS. The check happens before the map, so the kills must be done by the end of Showdown! Mars and Marg.
- MainTakeru now flies God Mars (Six Gods Attack added). He is a defeat condition in every map from here on until the bomb in his body is dealt with.
- TipAt 5 enemies left Tassilo (Squid, Large Magazine), Chronicle and Katejina arrive. Tassilo retreats at 20% HP; beating him ends the map. Godwald, Pippinieden, Rupe and Goze Barl all carry parts.
🗺️ Battle map
Circles are units on the map at the start (red enemy, blue ally, green guest). Squares with a number are reinforcement waves. Yellow tags number the named enemies in the table below, and a yellow diamond marks an enemy that carries a part. Positions are Joshua’s version; Lim’s map is the same unless the walkthrough says otherwise. Tap the map to open it full size.
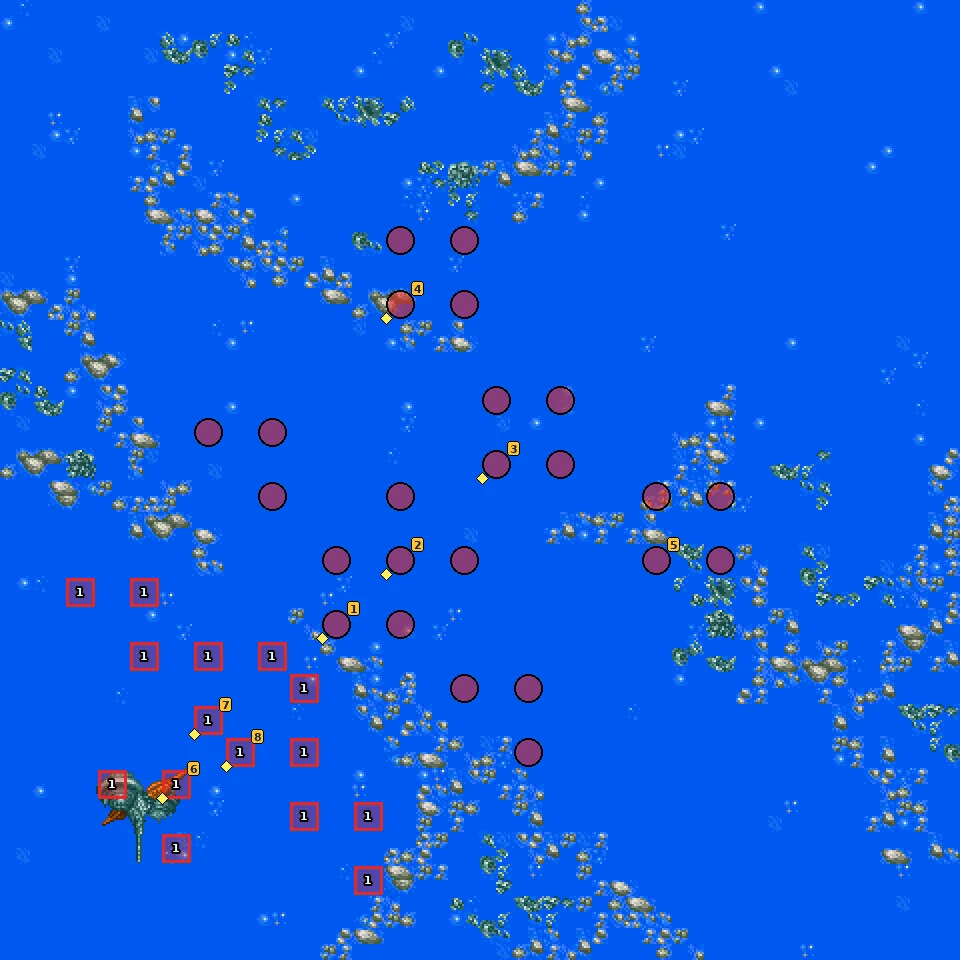
- 1Wave 1 — 5 or fewer enemies left
Named enemies & parts
| Pilot | Unit | Part | Appears | |
|---|---|---|---|---|
| 1 Arbeo Pippinieden | Abigor | Propellant Tank | start Leaves the map when beaten | |
| 2 Rupe Cineau | Abigor | Repair Kit | start | |
| 3 Godwald Hein | Abigor | Cartridge | start Leaves the map when beaten | |
| 4 Goze Barl | Abigor | Propellant Tank | start | |
| 5 Bloch | Abigor | — | start | |
| 6 Tassilo Vago | Squid | Large Magazine | wave 1 Retreats at 20% HP | |
| 7 Chronicle Asher | Contio | Propellant Tank | wave 1 Leaves the map when beaten | |
| 8 Katejina Loos | Rig Shokew | Repair Kit | wave 1 Leaves the map when beaten |
New units & pilots
First time each one fights on your side on this route, during the map or right after it. Purple = only if the condition in brackets is met.
- ν Gundam HWS (Amuro Ray has 50+ kills)
- God Mars
💬 Battle conversations in this map (5)
These pairs have their own lines when they fight each other. “Talk command” means moving next to the unit and choosing Talk; the Secret Units page says which ones matter.
- Uso Ewin vs Godwald Hein
- Zechs Merquise vs Godwald Hein
- Uso Ewin vs Chronicle Asher
- Uso Ewin vs Katejina Loos
- your hero vs Katejina Loos
Sentimental, Back to Back
📜 背中ごしのセンチメンタル
Part 1
Both groups meet again. Shogo Yahagi of Megazone 23 falls through space and time into the war, followed by the cold-blooded B.D.
Part 2
Part 3
⏳ Don’t miss in this map
- B.D. + Zame-Zau: in the last part, when 5 or fewer enemies are left, B.D. appears. Bring him down to his retreat line within 3 turns of his arrival. If the 3 turns run out first he just leaves. Success makes him fight on your side in the next stage and join.
Full list across the game: Missables.
Walkthrough
- MainA three-part map built around Shogo (Garland), who is the defeat condition.
- SecretB.D. + Zame-Zau: in the last part, when 5 or fewer enemies are left, B.D. appears. Bring him down to his retreat line within 3 turns of his arrival. If the 3 turns run out first he just leaves. Success makes him fight on your side in the next stage and join.
- TipA Spider Net and an SP +20 skill part are on regular enemies.
🗺️ Battle map, part 1
Circles are units on the map at the start (red enemy, blue ally, green guest). Squares with a number are reinforcement waves. Yellow tags number the named enemies in the table below, and a yellow diamond marks an enemy that carries a part. Positions are Joshua’s version; Lim’s map is the same unless the walkthrough says otherwise. Tap the map to open it full size.
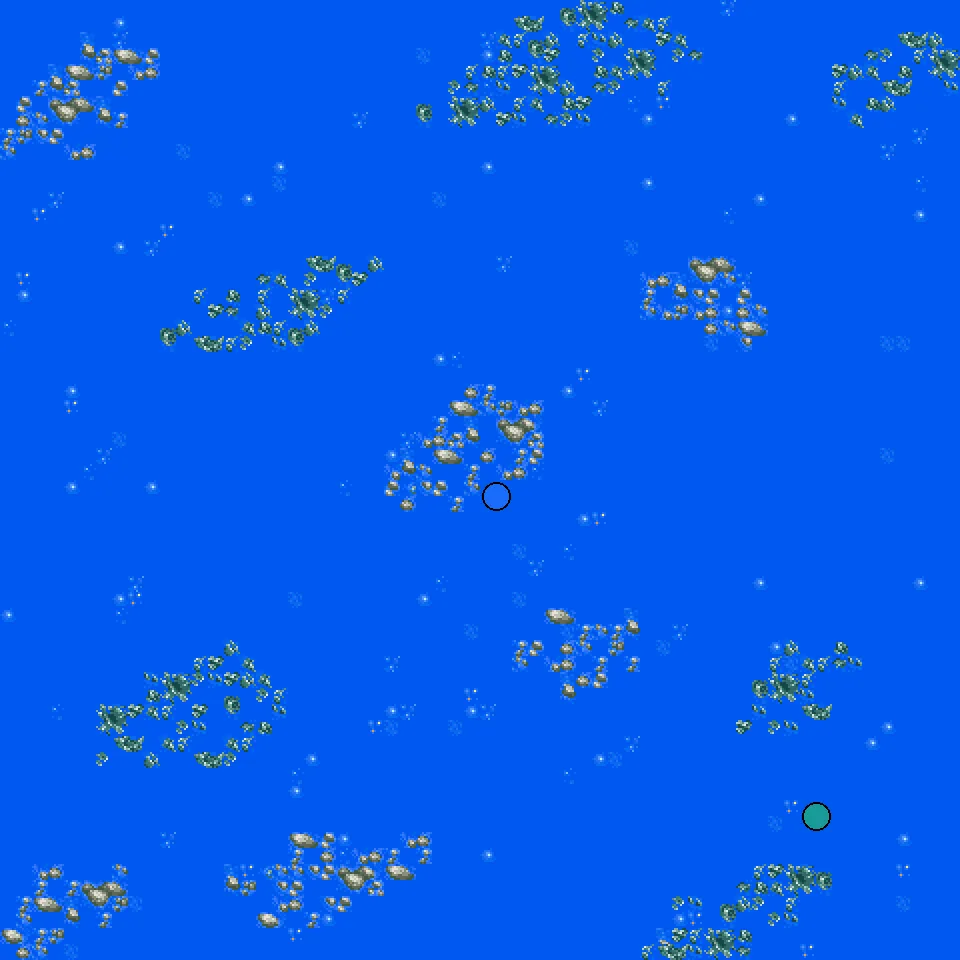
🗺️ Battle map, part 2
Circles are units on the map at the start (red enemy, blue ally, green guest). Squares with a number are reinforcement waves. Yellow tags number the named enemies in the table below, and a yellow diamond marks an enemy that carries a part. Positions are Joshua’s version; Lim’s map is the same unless the walkthrough says otherwise. Tap the map to open it full size.
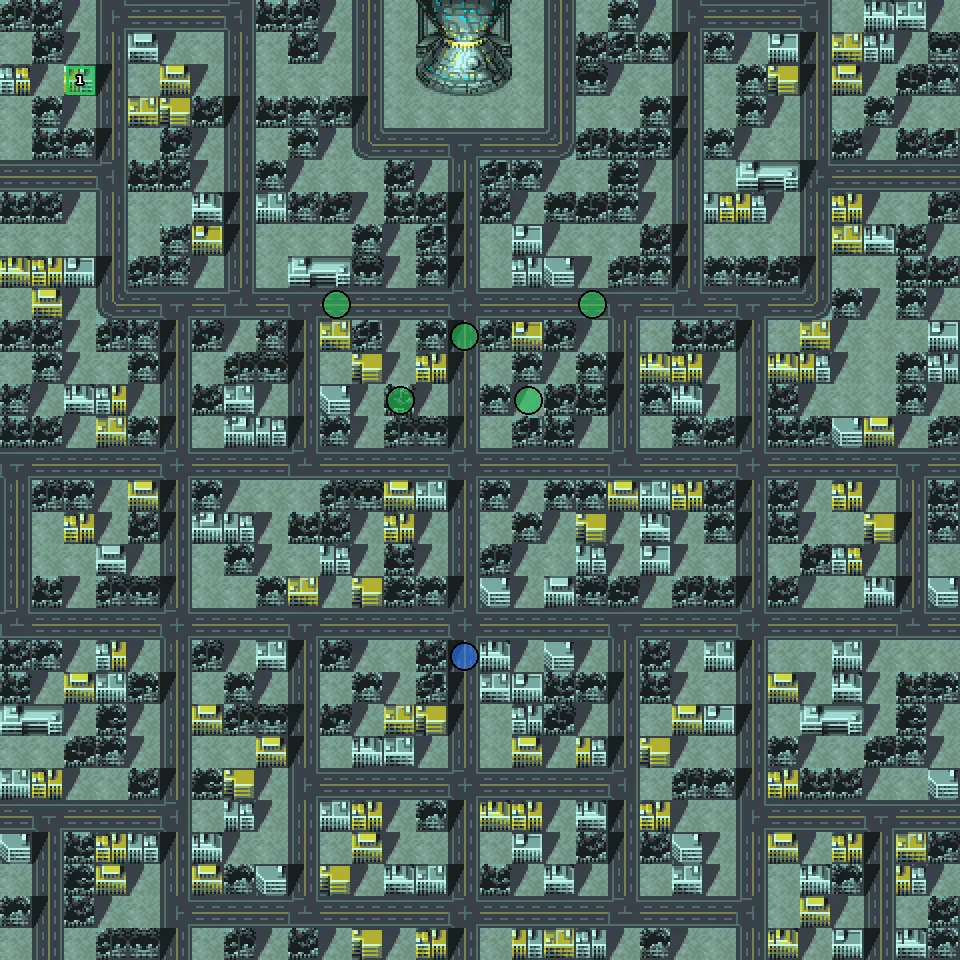
- 1Wave 1 — all enemies defeated
🗺️ Battle map, part 3
Circles are units on the map at the start (red enemy, blue ally, green guest). Squares with a number are reinforcement waves. Yellow tags number the named enemies in the table below, and a yellow diamond marks an enemy that carries a part. Positions are Joshua’s version; Lim’s map is the same unless the walkthrough says otherwise. Tap the map to open it full size.
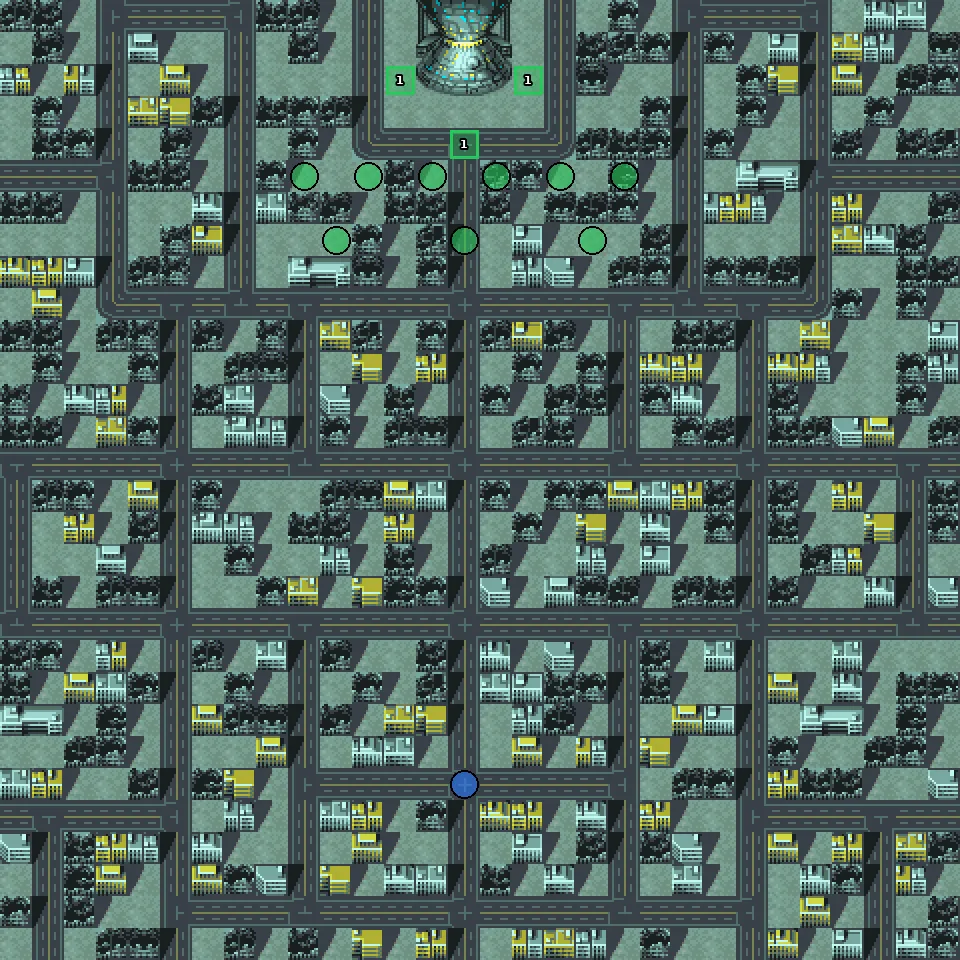
- 1Wave 1 — 5 or fewer enemies left
New units & pilots
First time each one fights on your side on this route, during the map or right after it. Purple = only if the condition in brackets is met.
- Shogo Yahagi
- Garland (MS)
- Garland (MC)
Those from Another Earth
📜 アナザー・アースより来たるもの
A huge ship from another Earth appears, and Emperor Zuul shows himself for the first time.
⏳ Don’t miss in this map
- Part on a retreating enemy: Captain Blacky carries Start Will +5 details
Full list across the game: Missables.
Walkthrough
- MainShogo is still a defeat condition, together with your battleship. Gandal and Blacky retreat at 20% HP; Blacky carries a Start Will +5.
- TipWhen the field is clear, Emperor Zuul appears (with a Psycho Frame). Beating him ends the map.
- TipThe two groups merge before the map: whoever you left at the second route split comes back here, with Judau and Roux if you went to Kailasa-Giri. If you got B.D., he fights for you here.
🗺️ Battle map
Circles are units on the map at the start (red enemy, blue ally, green guest). Squares with a number are reinforcement waves. Yellow tags number the named enemies in the table below, and a yellow diamond marks an enemy that carries a part. Positions are Joshua’s version; Lim’s map is the same unless the walkthrough says otherwise. Tap the map to open it full size.
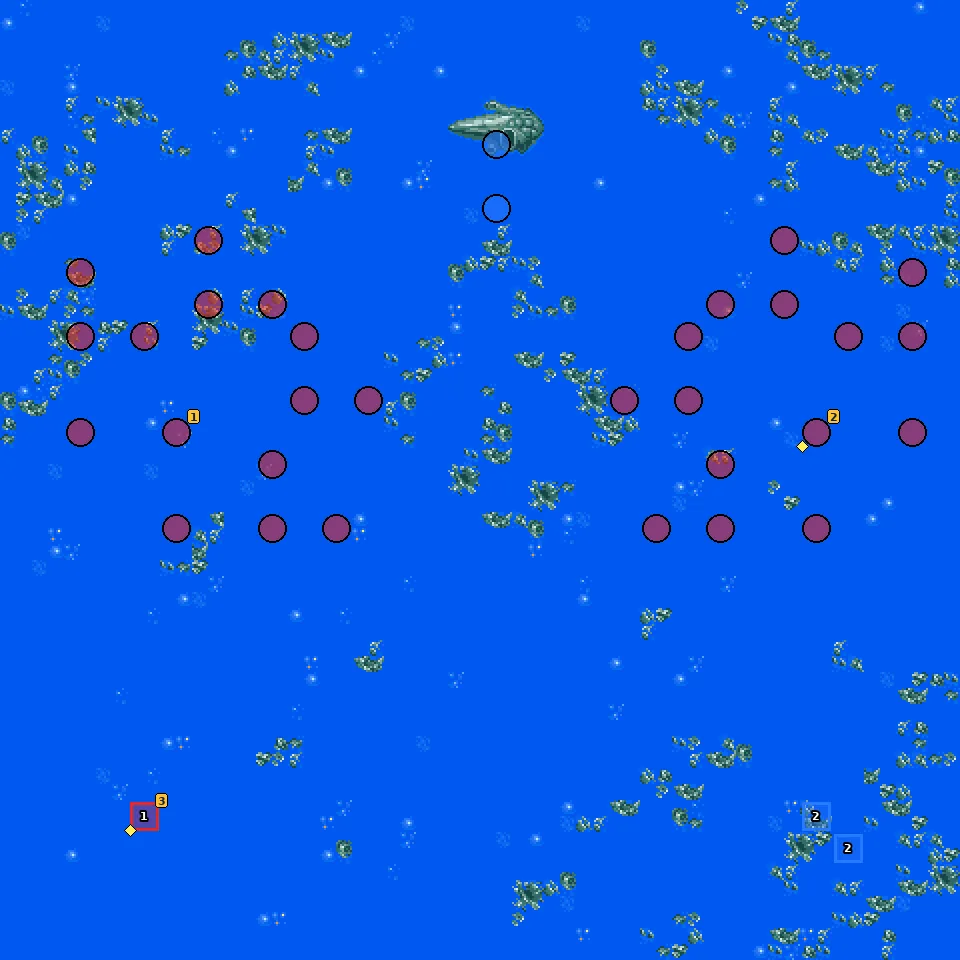
- 1Wave 1 — all enemies defeated
- 2Wave 2 — Emperor Zuul is defeated
Named enemies & parts
| Pilot | Unit | Part | Appears | |
|---|---|---|---|---|
| 1 Commander Gandal | Motherbahn | — | start Retreats at 20% HP | |
| 2 Captain Blacky | Motherbahn | Start Will +5 | start Retreats at 20% HP | |
| 3 Emperor Zuul | Emperor Zuul | Psycho Frame | wave 1 Leaves the map when beaten |
New units & pilots
First time each one fights on your side on this route, during the map or right after it. Purple = only if the condition in brackets is met.
- God Mars (Jupiter route)
- VF-1J Valkyrie F (Kailasa-Giri route, VF-1J picked)
- VF-11C Thunderbolt F (Kailasa-Giri route, VF-11C picked)
- VF-11C FA Thunderbolt (Kailasa-Giri route, VF-11C picked)
- B.D. (B.D. beaten in time)
- Zame-Zau (B.D. beaten in time)
- Judau Ashta (Kailasa-Giri route)
- ZZ Gundam (Kailasa-Giri route)
- Roux Louka (Kailasa-Giri route)
Tiger of the Galaxy
📜 銀河の虎
Gascon, the ‘Tiger of the Galaxy’, and the Zaar fleet attack a colony while Marg leads the Gishin forces.
⏳ Don’t miss in this map
- Marg, step 1: move Takeru next to Marg and use Talk. Do this in every Marg chain stage (here, The Proud Rebel and The Truth Revealed).
Full list across the game: Missables.
Walkthrough
- MainDefeat conditions: Takeru, your battleship, and any enemy entering the colony.
- SecretMarg, step 1: move Takeru next to Marg and use Talk. Do this in every Marg chain stage (here, The Proud Rebel and The Truth Revealed).
- TipLots of parts: Gascon’s robot (Magnet Coating), Klopen (Combo +1), Marg (SP Cost -10%), Rose (Chobham Armor) and Voider (Sup. Atk +3). Klopen comes back in the Destark after his first defeat.
- TipAfter the map the White Ark and both Mass Production ν Gundams arrive, and Docker, Kinryu and Gamlin get VF-19 Excaliburs.
🗺️ Battle map
Circles are units on the map at the start (red enemy, blue ally, green guest). Squares with a number are reinforcement waves. Yellow tags number the named enemies in the table below, and a yellow diamond marks an enemy that carries a part. Positions are Joshua’s version; Lim’s map is the same unless the walkthrough says otherwise. Tap the map to open it full size.
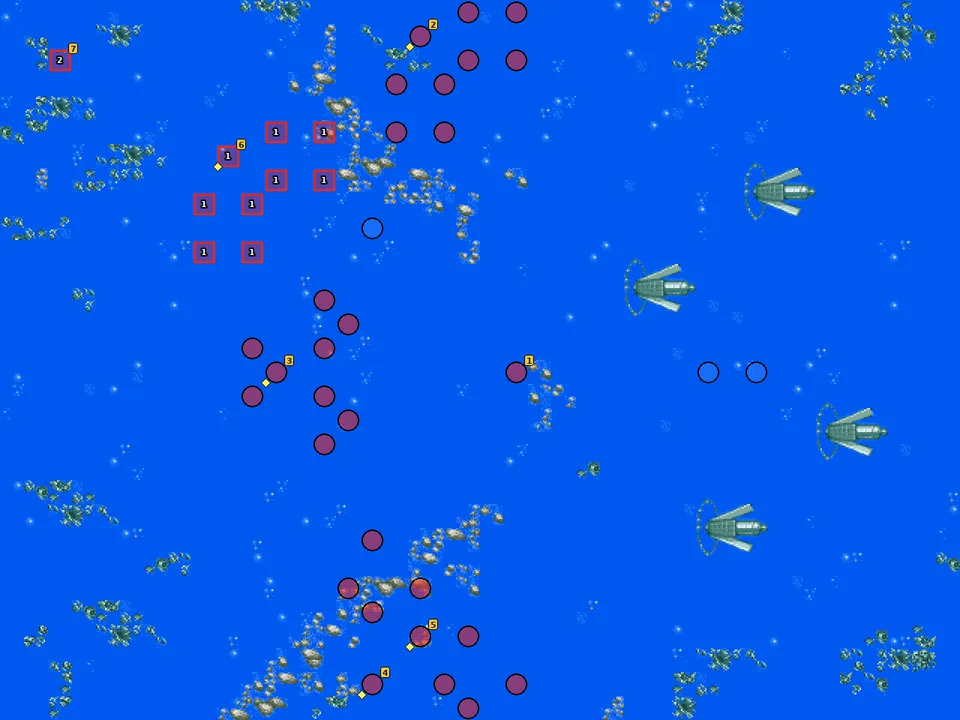
- 1Wave 1 — 5 or fewer enemies left
- 2Wave 2 — Klopen is defeated
Named enemies & parts
| Pilot | Unit | Part | Appears | |
|---|---|---|---|---|
| 1 Gascon | Gascon’s Robot | — | start Leaves the map when beaten | |
| 2 Gascon | Gascon’s Robot | Magnet Coating | start Leaves the map when beaten | |
| 3 Klopen | Mobile Fortress | Combo +1 | start Leaves the map when beaten | |
| 4 Marg | Marg’s Command Ship | SP Cost -10% | start Leaves the map when beaten | |
| 5 Rose | Zeelon | Chobham Armor | start | |
| 6 Voider | Voider Mothership | Sup. Atk +3 | wave 1 | |
| 7 Klopen | Destark 1 | — | wave 2 Leaves the map when beaten |
New units & pilots
First time each one fights on your side on this route, during the map or right after it. Purple = only if the condition in brackets is met.
- White Ark
- Mass-Prod. ν Gundam F
- Mass-Prod. ν Gundam I
- Docker
- VF-19F Excalibur F
- Kinryu
- VF-19S Excalibur F
💬 Battle conversations in this map (3)
These pairs have their own lines when they fight each other. “Talk command” means moving next to the unit and choosing Talk; the Secret Units page says which ones matter.
- Takeru Myojin vs Marg
- Takeru Myojin vs Rose
- Takeru Myojin → Marg (Talk command)
PLANET DANCE
📜 PLANET DANCE
Added later in the map: Defeat: Sound Force is destroyed.
Fire Bomber’s concert turns into a battlefield when the Protodeviln arrive.
⏳ Don’t miss in this map
- Fire Bomber learns its songs here (PLANET DANCE, Totsugeki Love Heart, Holy Lonely Light, Power to the Dream, Try Again). Keep feeding Hilde and Noin kills: the next stage checks their total.
- Part on a retreating enemy: Gavil carries Hi-Perf. Radar details
- Part on a retreating enemy: Glavil carries Skill +20 details
Full list across the game: Missables.
Walkthrough
- MainUso moves to the V2 Gundam. Gigil (Elgerzorn, Hybrid Armor) retreats when beaten.
- MainAfter that the Sound Force (Basara, Mylene, Ray) is a defeat condition, and Gavil and Glavil fold in. Gavil carries a Hi-Perf. Radar and Glavil a Skill +20; both retreat at 20% HP.
- SecretFire Bomber learns its songs here (PLANET DANCE, Totsugeki Love Heart, Holy Lonely Light, Power to the Dream, Try Again). Keep feeding Hilde and Noin kills: the next stage checks their total.
🗺️ Battle map
Circles are units on the map at the start (red enemy, blue ally, green guest). Squares with a number are reinforcement waves. Yellow tags number the named enemies in the table below, and a yellow diamond marks an enemy that carries a part. Positions are Joshua’s version; Lim’s map is the same unless the walkthrough says otherwise. Tap the map to open it full size.
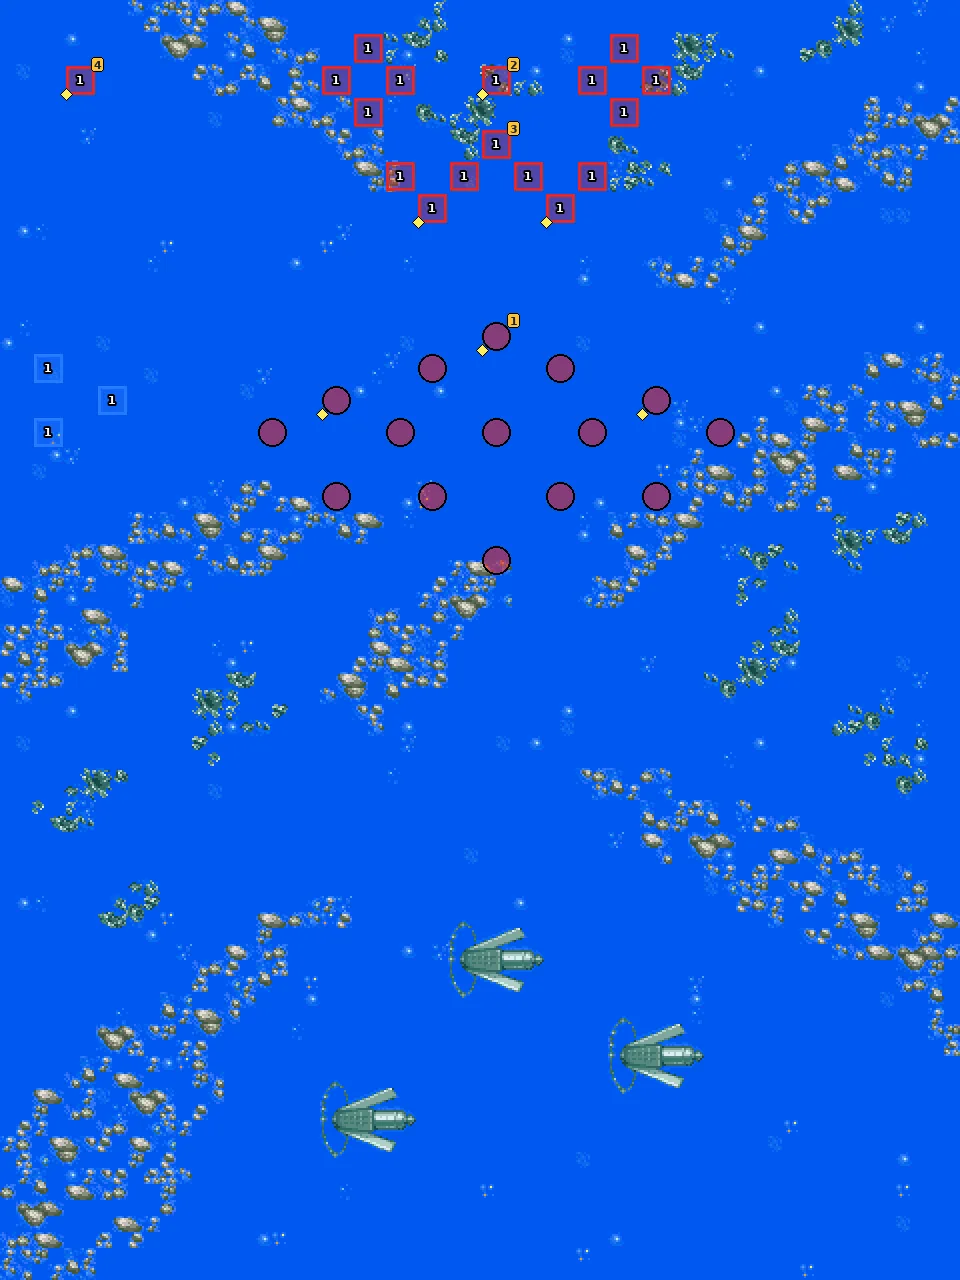
- 1Wave 1 — Gigil is defeated
Named enemies & parts
| Pilot | Unit | Part | Appears | |
|---|---|---|---|---|
| 1 Gigil | Fz-109F Elgerzorn | Hybrid Armor | start Leaves the map when beaten | |
| 2 Gavil | FBz-99G Zaubergeran | Hi-Perf. Radar | wave 1 Retreats at 20% HP | |
| 3 Glavil | Glavil | — | wave 1 Retreats at 20% HP | |
| 4 Glavil | Glavil | Skill +20 | wave 1 Retreats at 20% HP |
Parts on regular enemies: Cartridge ×2, Propellant Tank ×2.
New units & pilots
First time each one fights on your side on this route, during the map or right after it. Purple = only if the condition in brackets is met.
- V2 Gundam
- Veffidas Feaze
- Guvava
- VF-19 Kai Fire Valk. SB
- Nightingale
- Mylene F. Jenius
- VF-11MAXL Kai F
- Ray Lovelock
- VF-17T Kai Nightmare F
💬 Battle conversations in this map (3)
These pairs have their own lines when they fight each other. “Talk command” means moving next to the unit and choosing Talk; the Secret Units page says which ones matter.
- Gamlin Kizaki vs Gavil
- Basara Nekki vs Gavil
- your hero vs Gavil
Commander of the Zaar Fleet
📜 ザール艦隊総司令
Klopen, supreme commander of the Zaar fleet, throws everything at you, with BESPA’s Motorad fleet at his side.
⏳ Don’t miss in this map
- Vayeate / Mercurius: before this map the game adds Noin’s and Hilde’s kills. 10 or more gives the Vayeate, 20 or more gives the Vayeate and the Mercurius (units only; you choose the pilots).
Full list across the game: Missables.
Walkthrough
- SecretVayeate / Mercurius: before this map the game adds Noin’s and Hilde’s kills. 10 or more gives the Vayeate, 20 or more gives the Vayeate and the Mercurius (units only; you choose the pilots).
- MainAt first the Adrastea (Chronicle) must not be sunk. At 10 enemies left the Zaar fleet arrives and the Adrastea is no longer a condition; at 10 again Marg comes in, and Klopen returns in the Destark after his first defeat.
- TipKento and Takeru have lines with every Gishin commander. Katejina (Chobham Armor), Rupe (Learning CP+), Goze Barl (Multi-Sensor) and Bloch (Bio-Sensor) carry parts.
🗺️ Battle map
Circles are units on the map at the start (red enemy, blue ally, green guest). Squares with a number are reinforcement waves. Yellow tags number the named enemies in the table below, and a yellow diamond marks an enemy that carries a part. Positions are Joshua’s version; Lim’s map is the same unless the walkthrough says otherwise. Tap the map to open it full size.
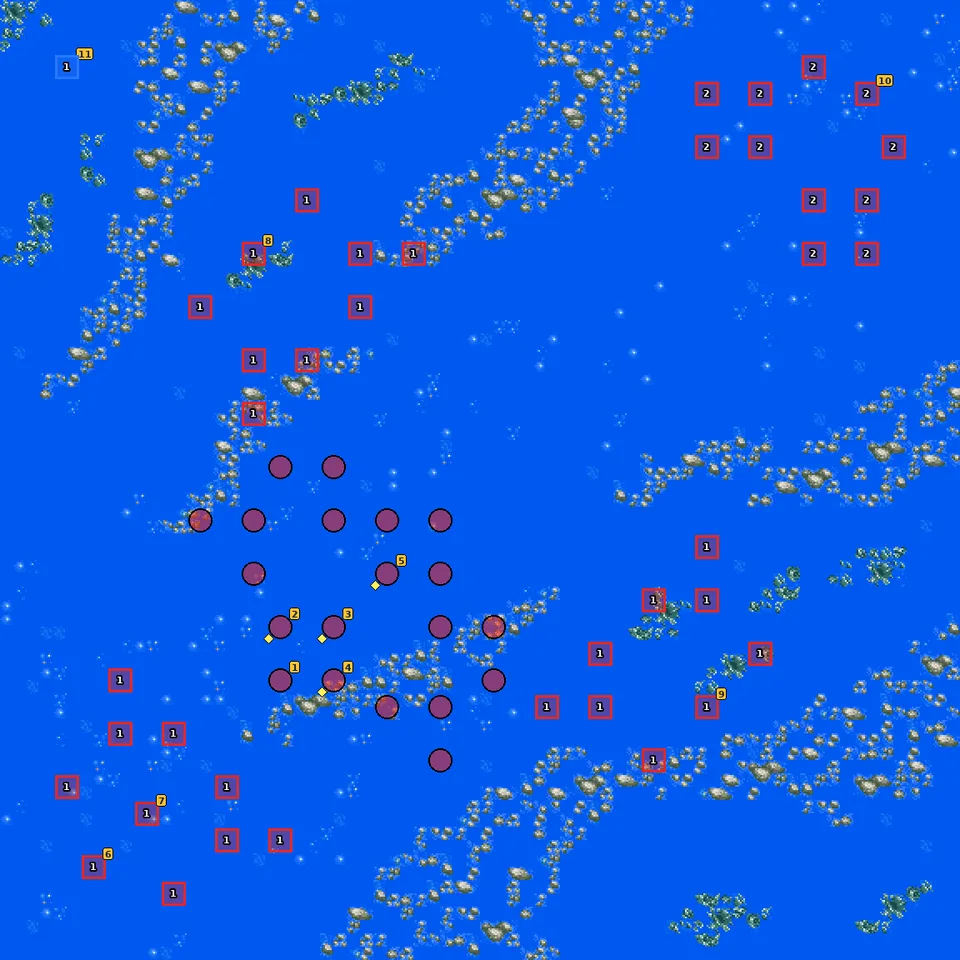
- 1Wave 1 — 10 or fewer enemies left
- 2Wave 2 — 10 or fewer enemies left
- 3Wave 3 — Klopen is defeated
Named enemies & parts
| Pilot | Unit | Part | Appears | |
|---|---|---|---|---|
| 1 Chronicle Asher | Adrastea | — | start | |
| 2 Katejina Loos | Gedlav ER | Chobham Armor | start | |
| 3 Rupe Cineau | Gedlav ER | Learning CP+ | start | |
| 4 Goze Barl | Gedlav ER | Multi-Sensor | start | |
| 5 Bloch | Doggora | Bio-Sensor | start | |
| 6 Klopen | Mobile Fortress | — | wave 1 Retreats at 20% HP | |
| 7 Nesia | Nesia Mothership | — | wave 1 | |
| 8 Voider | Voider Mothership | — | wave 1 | |
| 9 Kabuto | Kabuto Mothership | — | wave 1 | |
| 10 Marg | Marg’s Command Ship | — | wave 2 Leaves the map when beaten | |
| 11 Klopen | Destark 1 | — | wave 3 Retreats at 20% HP |
New units & pilots
First time each one fights on your side on this route, during the map or right after it. Purple = only if the condition in brackets is met.
- Vayeate
- Mercurius
💬 Battle conversations in this map (10)
These pairs have their own lines when they fight each other. “Talk command” means moving next to the unit and choosing Talk; the Secret Units page says which ones matter.
- Uso Ewin vs Katejina Loos
- your hero vs Katejina Loos
- Kento Tate vs Klopen
- Kento Tate vs Nesia
- Kento Tate vs Kabuto
- Kento Tate vs Voider
- Takeru Myojin vs Klopen
- Takeru Myojin vs Voider
- Takeru Myojin vs Nesia
- Takeru Myojin vs Kabuto
Fierce! The Giant Roller Operation!
📜 壮絶! 巨大ローラー作戦!
Added later in the map: Victory: Bring Chronicle’s HP to 20% or less.
BESPA’s land battleships roll toward the towns of Europe in the Giant Roller operation.
Walkthrough
- MainVictory is unusual: bring Duker’s and Pippinieden’s Adrastea to 20% HP or less, then Chronicle’s. Don’t sink them: destroying a battleship near the town counts as failure, as does an Adrastea entering the town or the Tower going down.
- TipWork each Adrastea down with weaker attacks near the end, and keep the town side covered.
- TipRegular enemies carry good parts: Learning CP+, Hovercraft, Magnet Coating, Booster and a Hybrid Armor on Katejina.
🗺️ Battle map
Circles are units on the map at the start (red enemy, blue ally, green guest). Squares with a number are reinforcement waves. Yellow tags number the named enemies in the table below, and a yellow diamond marks an enemy that carries a part. Positions are Joshua’s version; Lim’s map is the same unless the walkthrough says otherwise. Tap the map to open it full size.
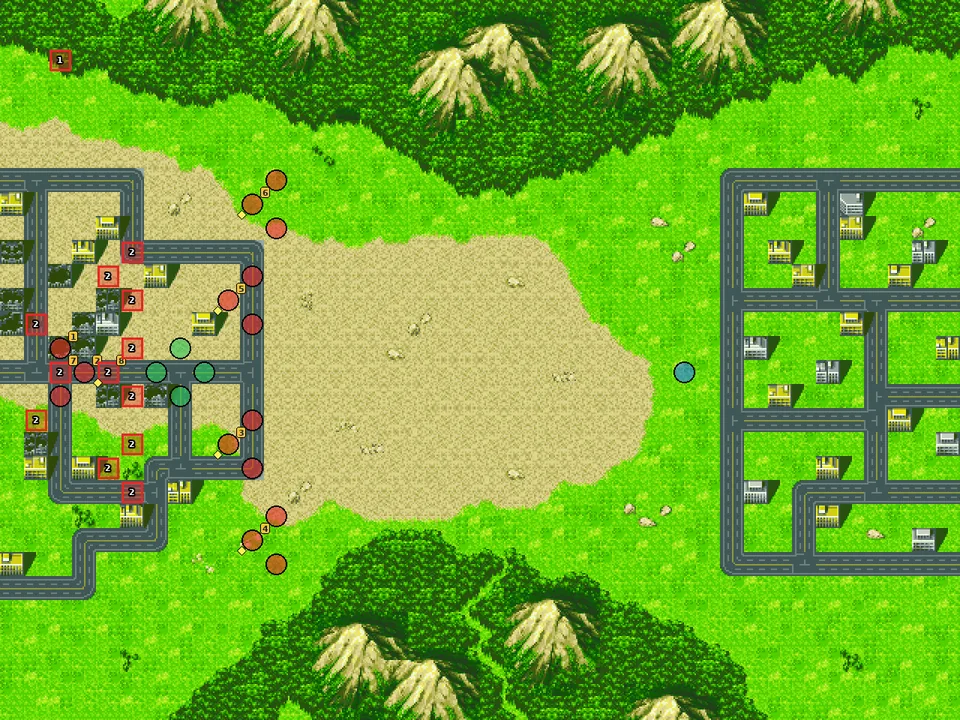
- 1Wave 1 — Duker Iq is defeated
- 2Wave 2 — Arbeo Pippinieden is defeated
- 3Wave 3 — Chronicle Asher is defeated
Named enemies & parts
| Pilot | Unit | Part | Appears | |
|---|---|---|---|---|
| 1 Duker Iq | Adrastea | — | start | |
| 2 Arbeo Pippinieden | Adrastea | — | start | |
| 3 Rupe Cineau | Bruckeng ER | Learning CP+ | start | |
| 4 Goze Barl | Zoloodia ER | Hovercraft | start | |
| 5 Renda de Paloma | Domuttlia | Magnet Coating | start | |
| 6 Bloch | Gedlav ER | Booster | start | |
| 7 Chronicle Asher | Adrastea | — | wave 2 Retreats at 20% HP | |
| 8 Katejina Loos | Gedlav ER | Hybrid Armor | wave 2 |
💬 Battle conversations in this map (5)
These pairs have their own lines when they fight each other. “Talk command” means moving next to the unit and choosing Talk; the Secret Units page says which ones matter.
- Uso Ewin vs Katejina Loos
- Marbet Fingerhat vs Katejina Loos
- Uso Ewin vs Chronicle Asher
- Danji Hiiragi vs Chronicle Asher
- your hero vs Chronicle Asher
The Unheard Requiem
📜 聞こえないレクイエム
Added later in the map: Defeat: Goze Barl is destroyed; Defeat: Uso is destroyed.
A wedding is interrupted, and the war claims one of Uso’s oldest comrades.
Walkthrough
- MainVictory: defeat every enemy except the Adrastea. Defeat: your battleship, the Adrastea, or Uso, Danji or Oliver.
- WarningOliver Inoe leaves the story in this map; it is scripted and can’t be prevented.
- TipThe battle runs in phases (each turn, or at 3 enemies left). In the last phase Goze Barl and Uso are the defeat conditions; Uso has a scene with Katejina.
🗺️ Battle map
Circles are units on the map at the start (red enemy, blue ally, green guest). Squares with a number are reinforcement waves. Yellow tags number the named enemies in the table below, and a yellow diamond marks an enemy that carries a part. Positions are Joshua’s version; Lim’s map is the same unless the walkthrough says otherwise. Tap the map to open it full size.
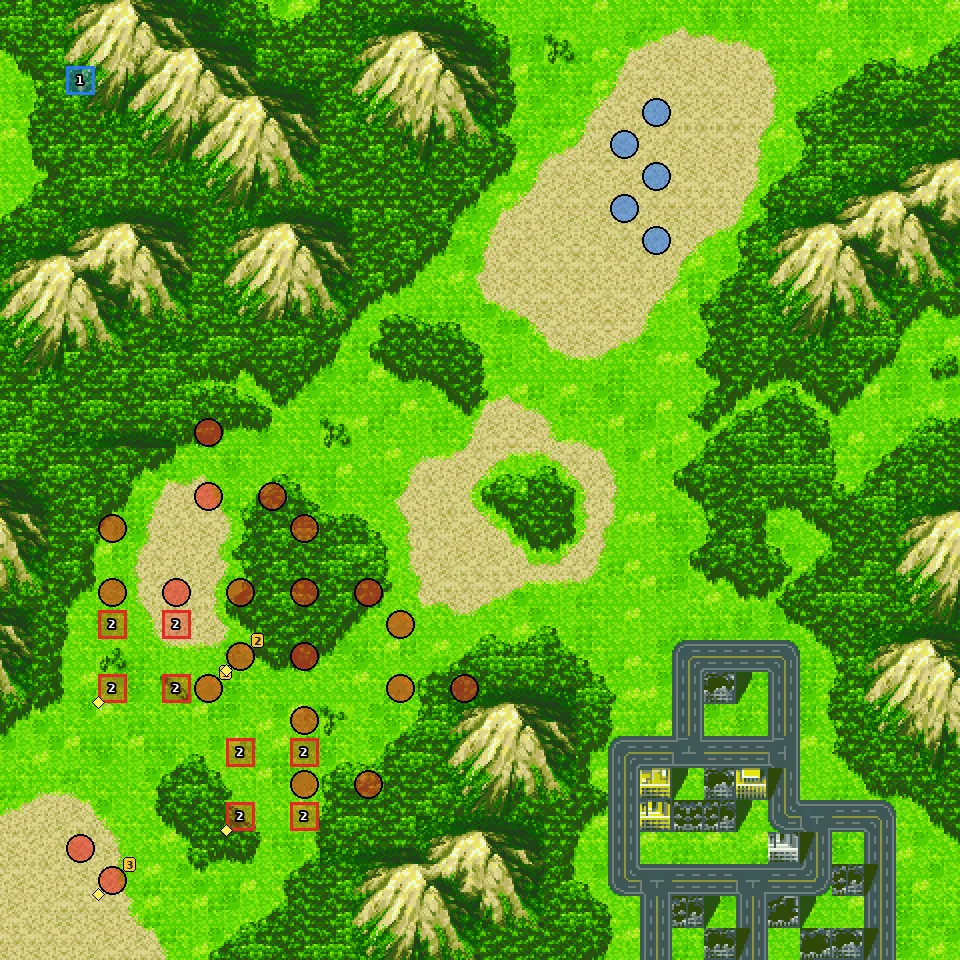
- 1Wave 1 — 1 turn(s) later
- 2Wave 2 — 1 turn(s) later
Named enemies & parts
| Pilot | Unit | Part | Appears | |
|---|---|---|---|---|
| 1 Chronicle Asher | Adrastea | — | start Leaves the map when beaten | |
| 2 Katejina Loos | Zoloodia ER | Repair Kit | start | |
| 3 Goze Barl | Zoloodia ER | Repair Kit | start Leaves the map when beaten |
Parts on regular enemies: Cartridge ×2.
💬 Battle conversations in this map (1)
These pairs have their own lines when they fight each other. “Talk command” means moving next to the unit and choosing Talk; the Secret Units page says which ones matter.
- Uso Ewin vs Katejina Loos
Spell of Life and Death
📜 生と死の呪縛
Added later in the map: Defeat: An allied ship is destroyed; Defeat: is destroyed; Defeat: Beralios is destroyed; Defeat: Takeru is destroyed.
The Ruina strike at the heart of your team, and your hero’s mech is reborn.
⏳ Don’t miss in this map
- Partner, step 2. Joshua: Talk to Glacies again (only works if you talked to her in Ice Doll Glacies). Lim: at 5 enemies left a scene with Ventus starts (only if you listened to him in Winds of Fate). In both cases a menu follows: choose Don’t cut the system (second option) to recruit the partner.
Full list across the game: Missables.
Walkthrough
- MainPhase 1 is a fight against Beck (Chobham Armor) with any ally loss as a defeat. Waves come on turns 2-4 (or at 10, 5 and 3 enemies left), then you sortie.
- MainAfter the sortie: your battleship, your hero and Beralios are defeat conditions. Schwarzwald and Ignis appear.
- SecretPartner, step 2. Joshua: Talk to Glacies again (only works if you talked to her in Ice Doll Glacies). Lim: at 5 enemies left a scene with Ventus starts (only if you listened to him in Winds of Fate). In both cases a menu follows: choose Don’t cut the system (second option) to recruit the partner.
- TipYour hero’s mech is upgraded here (Geant Chevalier or Dea Blanche Neige, depending on the partner state), and Dorothy returns to Roger.
🗺️ Battle map
Circles are units on the map at the start (red enemy, blue ally, green guest). Squares with a number are reinforcement waves. Yellow tags number the named enemies in the table below, and a yellow diamond marks an enemy that carries a part. Positions are Joshua’s version; Lim’s map is the same unless the walkthrough says otherwise. Tap the map to open it full size.
- 1Wave 1 — turn 3 or 5 or fewer enemies left
- 2Wave 2 — turn 4 or 3 or fewer enemies left
- 3Wave 3 — 10 or fewer enemies left
- 4Wave 4 — q0E(19 71 7 19)
Named enemies & parts
| Pilot | Unit | Part | Appears | |
|---|---|---|---|---|
| 1 Beck | Beck Victory Deluxe | Chobham Armor | start Leaves the map when beaten | |
| 2 Ignis | Impetus | Booster | wave 2 Leaves the map when beaten | |
| 3 Schwarzwald | Mummy | — | wave 2 Leaves the map when beaten | |
| 4 Glacies | Fabularis | Magnet Coating | wave 3 Leaves the map when beaten | |
| 5 Glacies | Fabularis | Magnet Coating | wave 3 Leaves the map when beaten |
New units & pilots
First time each one fights on your side on this route, during the map or right after it. Purple = only if the condition in brackets is met.
- Odelo Henrik
- Tomache Massarik
- Geant Chevalier (partner state)
- Dea Blanche Neige (partner state)
💬 Battle conversations in this map (10)
These pairs have their own lines when they fight each other. “Talk command” means moving next to the unit and choosing Talk; the Secret Units page says which ones matter.
- Heero Yuy vs Beck
- Roger Smith vs Beck
- Koji Kabuto vs Ignis
- Tetsuya Tsurugi vs Ignis
- your hero vs Ignis
- Uso Ewin vs Ignis
- Marbet Fingerhat vs Ignis
- Roger Smith vs Schwarzwald
- your hero vs Glacies
- your hero → Glacies (Talk command)
Where Resonating Souls Go (Joshua) / Say Goodbye to Me (Lim)
📜 響きあう魂の行方 / 私に、さよならを
Part 1
Added later in the map: Defeat: is destroyed; Victory: reaches the target area (Lim’s game); Defeat: 10 turns pass (Lim’s game).
The Ruina’s plans come into focus. Joshua plays Where Resonating Souls Go; Lim plays Say Goodbye to Me.
Part 2
⏳ Don’t miss in this map
- Part on a retreating enemy: Contagio carries Mega Booster details
Full list across the game: Missables.
Walkthrough
- MainPart 1: wipe out the enemy. At 10 enemies left Aquila arrives.
- MainPart 2 differs by hero. Joshua: defeat everything; Glacies is the key enemy. Lim: victory is a wipe-out or getting Lim to the target area, and the map is lost after 10 turns.
- WarningContagio retreats at 20% HP in both versions. Two Mega Boosters and a Bio-Sensor are on regular enemies.
- TipAfter the map Ganadur and Strega combine into Fortegigas (in Joshua’s game with Glacies this happens one stage later). If Lim recruited Ventus, he joins with the Studium at the start of the next stage; without a partner your sibling comes back instead.
🗺️ Battle map, part 1
Circles are units on the map at the start (red enemy, blue ally, green guest). Squares with a number are reinforcement waves. Yellow tags number the named enemies in the table below, and a yellow diamond marks an enemy that carries a part. Positions are Joshua’s version; Lim’s map is the same unless the walkthrough says otherwise. Tap the map to open it full size.
- 1Wave 1 — 10 or fewer enemies left
- 2Wave 2 — all enemies defeated
🗺️ Battle map, part 2
Circles are units on the map at the start (red enemy, blue ally, green guest). Squares with a number are reinforcement waves. Yellow tags number the named enemies in the table below, and a yellow diamond marks an enemy that carries a part. Positions are Joshua’s version; Lim’s map is the same unless the walkthrough says otherwise. Tap the map to open it full size.
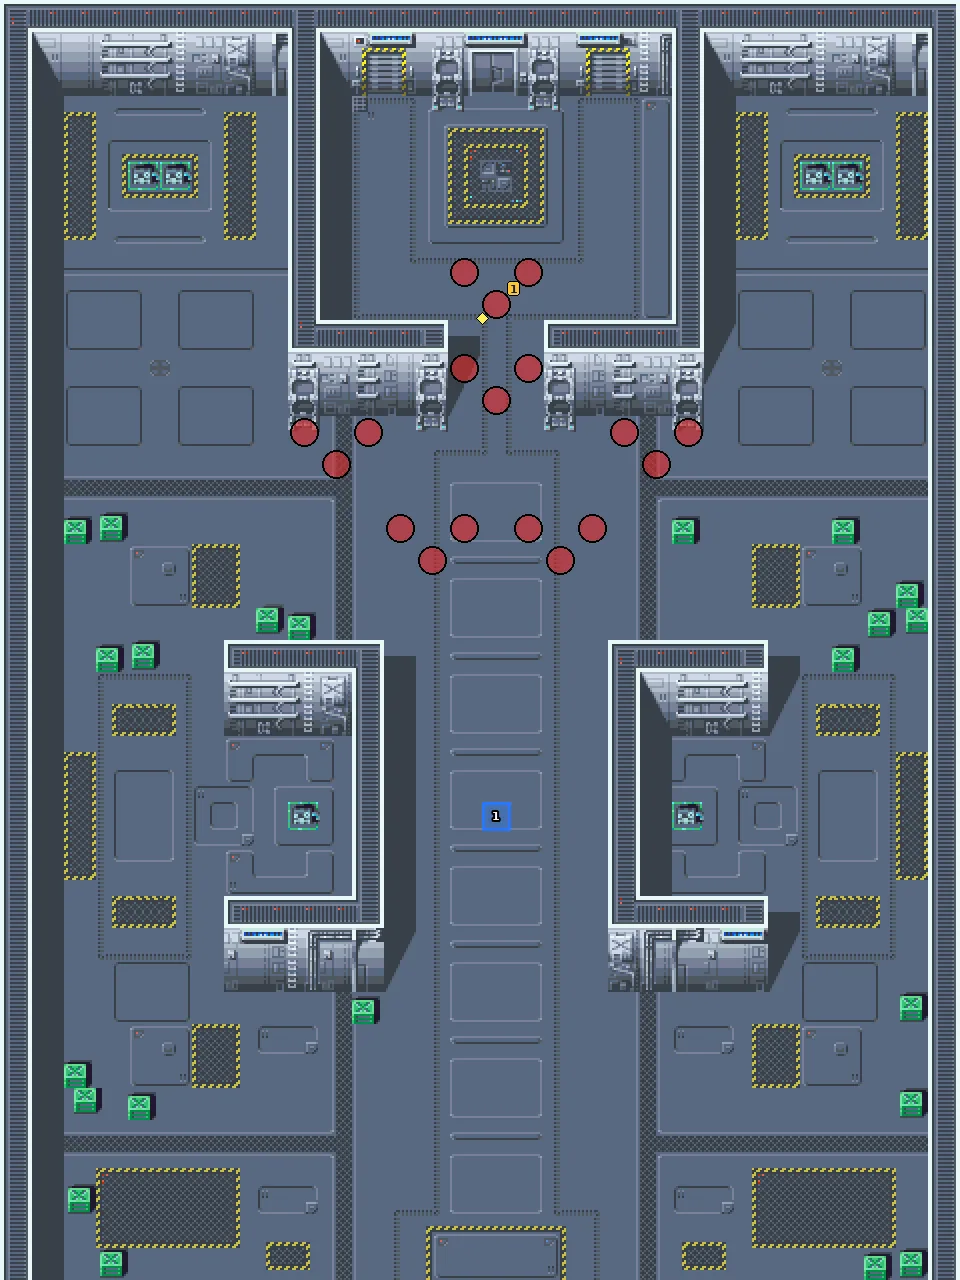
- 1Wave 1 — all enemies defeated
Named enemies & parts
| Pilot | Unit | Part | Appears | |
|---|---|---|---|---|
| 1 Aquila | Fortis Ala | — | wave 1 Leaves the map when beaten | |
| 2 Glacies | Fabularis | Mega Booster | wave 2 Leaves the map when beaten | |
| 1 Contagio | Violaceum | Mega Booster | start Retreats at 20% HP |
New units & pilots
First time each one fights on your side on this route, during the map or right after it. Purple = only if the condition in brackets is met.
- Fortegigas (partner recruited, Lim’s game, partner state)
💬 Battle conversations in this map (1)
These pairs have their own lines when they fight each other. “Talk command” means moving next to the unit and choosing Talk; the Secret Units page says which ones matter.
- your hero vs Glacies
The Proud Rebel
📜 誇り高き反逆者
Added later in the map: Victory: Defeat all enemies but the Adrastea; Defeat: The Adrastea is destroyed.
Kento’s father, the ‘proud rebel’ Klopen, BESPA and the Gishin all collide.
⏳ Don’t miss in this map
- Marg, step 2: when Marg appears (5 enemies left), Talk to him with Takeru. Only counts if you did step 1 in Tiger of the Galaxy.
- Joshua’s partner: if you recruited Glacies, she fights beside Joshua in this map and joins with the Fabularis after it (Fortegigas forms here for Joshua’s route).
- Part on a retreating enemy: Fuala Griffon carries Evasion +10 details
Full list across the game: Missables.
Walkthrough
- SecretMarg, step 2: when Marg appears (5 enemies left), Talk to him with Takeru. Only counts if you did step 1 in Tiger of the Galaxy.
- MainLater BESPA’s Adrastea arrives and the victory condition changes to ‘defeat all except the Adrastea’ until the end, when it must be sunk too.
- SecretJoshua’s partner: if you recruited Glacies, she fights beside Joshua in this map and joins with the Fabularis after it (Fortegigas forms here for Joshua’s route).
- TipFuala (Zanneck, Evasion +10) retreats at 20% HP. Gandal (Hi-Perf. Radar), Blacky (Dual Sensor), Marg (Combo +1), Duker (Learning CP) and Renda (EN Chip) carry parts. Keep feeding Judau and Roux kills now.
🗺️ Battle map
Circles are units on the map at the start (red enemy, blue ally, green guest). Squares with a number are reinforcement waves. Yellow tags number the named enemies in the table below, and a yellow diamond marks an enemy that carries a part. Positions are Joshua’s version; Lim’s map is the same unless the walkthrough says otherwise. Tap the map to open it full size.
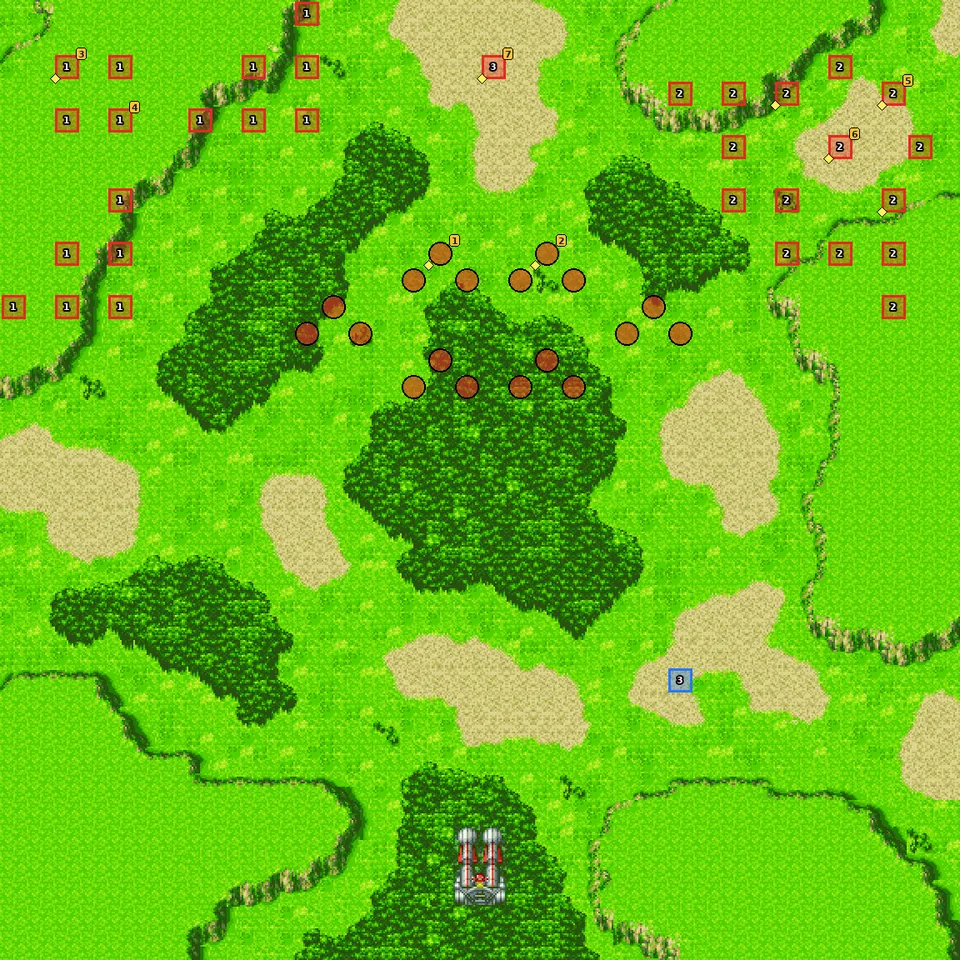
- 1Wave 1 — 5 or fewer enemies left
- 2Wave 2 — all enemies defeated
- 3Wave 3 — 5 or fewer enemies left
Named enemies & parts
| Pilot | Unit | Part | Appears | |
|---|---|---|---|---|
| 1 Commander Gandal | Motherbahn | Hi-Perf. Radar | start Leaves the map when beaten | |
| 2 Captain Blacky | Motherbahn | Dual Sensor | start Leaves the map when beaten | |
| 3 Marg | Marg’s Command Ship | Combo +1 | wave 1 Leaves the map when beaten | |
| 4 Rose | Zeelon | — | wave 1 | |
| 5 Duker Iq | Adrastea | Learning CP | wave 2 Leaves the map when beaten | |
| 6 Renda de Paloma | Domuttlia | EN Chip | wave 2 Leaves the map when beaten | |
| 7 Fuala Griffon | Zanneck | Evasion +10 | wave 3 Retreats at 20% HP |
Parts on regular enemies: Cartridge ×2.
New units & pilots
First time each one fights on your side on this route, during the map or right after it. Purple = only if the condition in brackets is met.
- Ventus (partner recruited, Lim’s game)
- Studium (partner recruited, Lim’s game)
- Glacies (Joshua’s game, partner recruited)
💬 Battle conversations in this map (5)
These pairs have their own lines when they fight each other. “Talk command” means moving next to the unit and choosing Talk; the Secret Units page says which ones matter.
- Duke Fleed vs Commander Gandal
- Duke Fleed vs Captain Blacky
- Takeru Myojin vs Commander Gandal
- Takeru Myojin vs Marg
- Takeru Myojin → Marg (Talk command)
Father and Son on the Battlefield
📜 戦場の父 戦場の子
Part 1
Kento meets his father on the battlefield, and the group splits for the third time.
Part 2
⏳ Don’t miss in this map
- Full Armor ZZ: before the map the game adds Judau’s and Roux’s kills. 40 or more gives Judau the Full Armor ZZ Gundam. Amuro also gets the Hi-ν Gundam and Uso the V2 Assault/Buster parts here.
- Part on a retreating enemy: Gavil carries Apogee Motor details
Full list across the game: Missables.
Walkthrough
- SecretFull Armor ZZ: before the map the game adds Judau’s and Roux’s kills. 40 or more gives Judau the Full Armor ZZ Gundam. Amuro also gets the Hi-ν Gundam and Uso the V2 Assault/Buster parts here.
- MainPart 1: the Sound Force is a defeat condition. Gavil (Apogee Motor) retreats at 30% HP.
- MainPart 2: protect the Minifo and Daltanious. Victory: wipe out the enemy or bring the Minifo next to an allied ship. Kabuto carries a Bio-Sensor.
- WarningRoute choice: Old Helios (Battle 7, Daltanious, God Mars; gives Daltanious’s new attacks and leads to the Marg and bomb secrets) or Angel Halo (Ra Cailum, the Gundams; gives the V2 Assault-Buster, Katejina/Chronicle and Haman).
🗺️ Battle map, part 1
Circles are units on the map at the start (red enemy, blue ally, green guest). Squares with a number are reinforcement waves. Yellow tags number the named enemies in the table below, and a yellow diamond marks an enemy that carries a part. Positions are Joshua’s version; Lim’s map is the same unless the walkthrough says otherwise. Tap the map to open it full size.
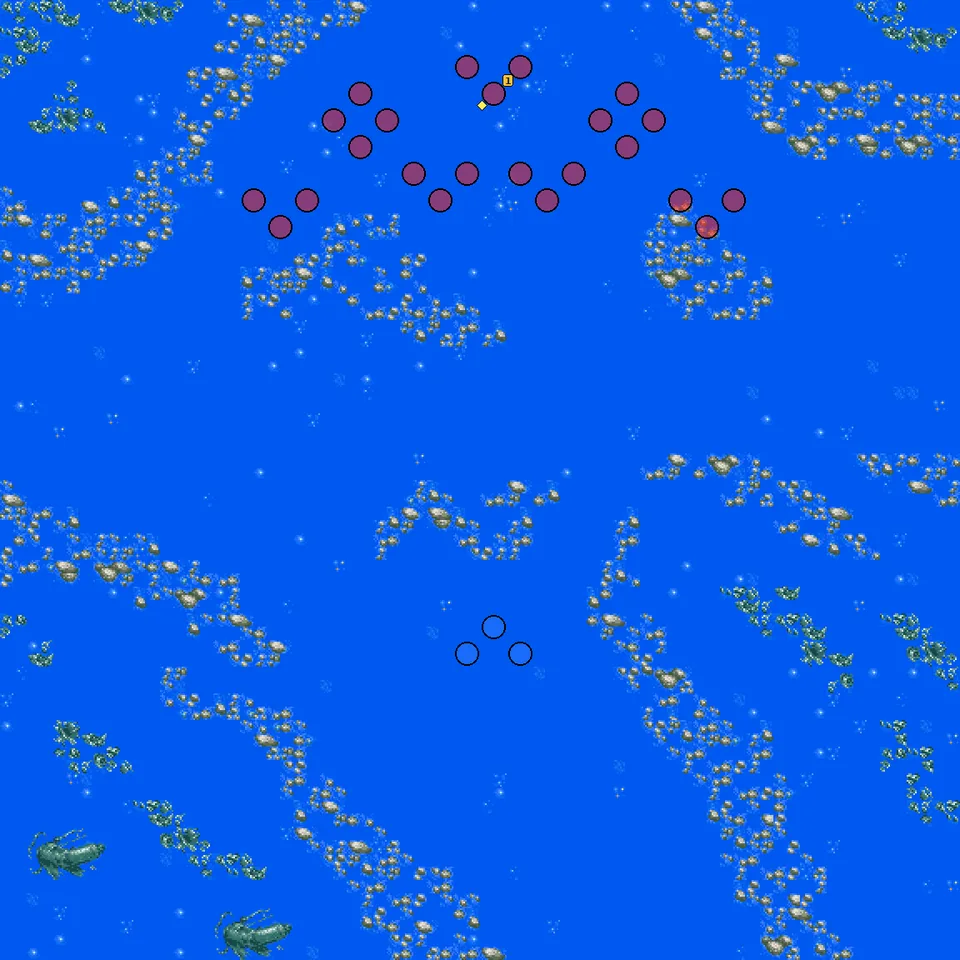
🗺️ Battle map, part 2
Circles are units on the map at the start (red enemy, blue ally, green guest). Squares with a number are reinforcement waves. Yellow tags number the named enemies in the table below, and a yellow diamond marks an enemy that carries a part. Positions are Joshua’s version; Lim’s map is the same unless the walkthrough says otherwise. Tap the map to open it full size.
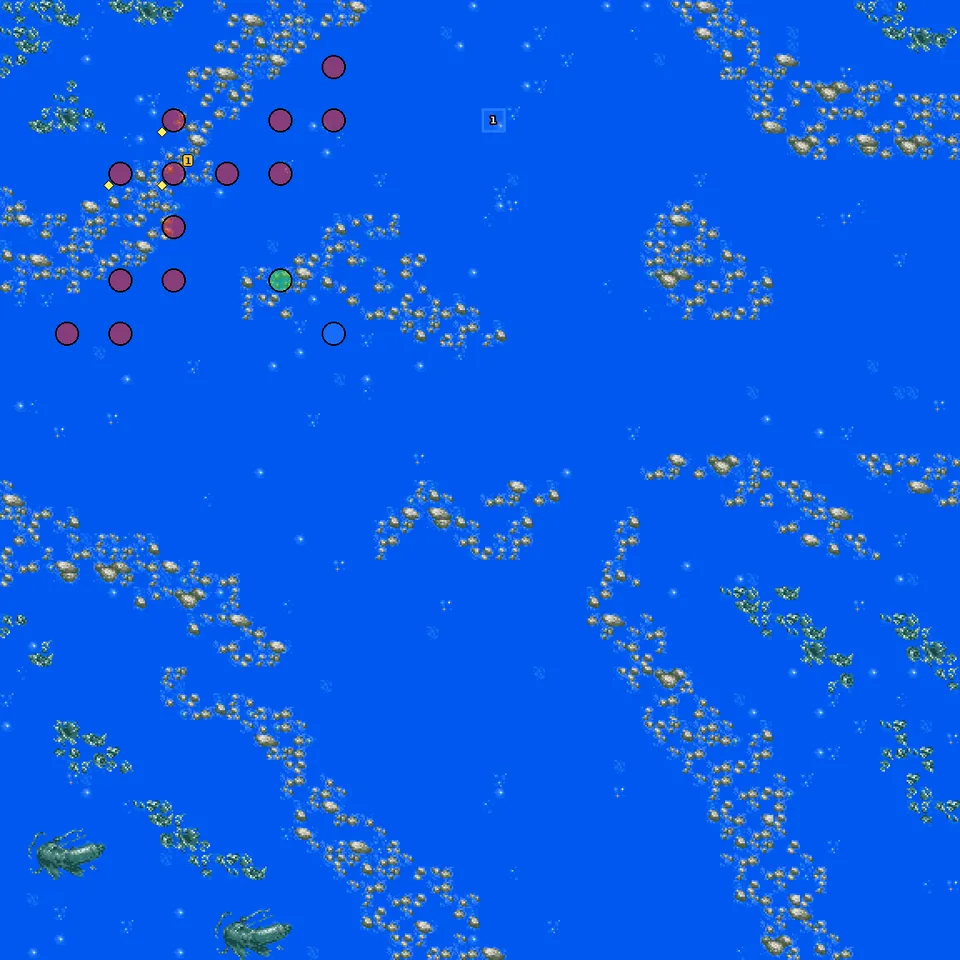
- 1Wave 1 — 2 turn(s) later or 5 or fewer enemies left
Named enemies & parts
| Pilot | Unit | Part | Appears | |
|---|---|---|---|---|
| 1 Gavil | FBz-99G Zaubergeran | Apogee Motor | start Retreats at 30% HP | |
| 1 Kabuto | Kabuto Mothership | Bio-Sensor | start |
Parts on regular enemies: Propellant Tank ×2.
New units & pilots
First time each one fights on your side on this route, during the map or right after it. Purple = only if the condition in brackets is met.
- Full Armor ZZ Gundam
- Hi-ν Gundam
- V2 Assault Gundam
- V2 Buster Gundam
- Fabularis (partner recruited, Joshua’s game)
- VF-11MAXL Kai SB
- VF-17T Kai Nightmare SB
- Gascon
- Gascon’s Robot
The Truth Revealed
📜 暴かれた真実
Part 1
Old Helios route. The truth about Elios and Marg’s real feelings come out.
Part 2
⏳ Don’t miss in this map
- Marg, step 3: Talk to Marg with Takeru (needs steps 1 and 2). Then defeat Marg’s God Mars when he comes back: with step 3 done this completes his recruitment, which happens on the Gishin Empire route.
- Part on a retreating enemy: Voider carries SP +20 details
Full list across the game: Missables.
Walkthrough
- SecretMarg, step 3: Talk to Marg with Takeru (needs steps 1 and 2). Then defeat Marg’s God Mars when he comes back: with step 3 done this completes his recruitment, which happens on the Gishin Empire route.
- MainDefeat conditions: Battle 7 and Takeru; in part 2 also Max, Kento, Danji and Beralios (Daltanious).
- TipMarg’s God Mars carries an S-Adapter, Klopen’s Destark 2 a Chogokin Z, Voider an SP +20, Rose a Prevail +1 and Marg’s ship an Evasion +5.
🗺️ Battle map, part 1
Circles are units on the map at the start (red enemy, blue ally, green guest). Squares with a number are reinforcement waves. Yellow tags number the named enemies in the table below, and a yellow diamond marks an enemy that carries a part. Positions are Joshua’s version; Lim’s map is the same unless the walkthrough says otherwise. Tap the map to open it full size.
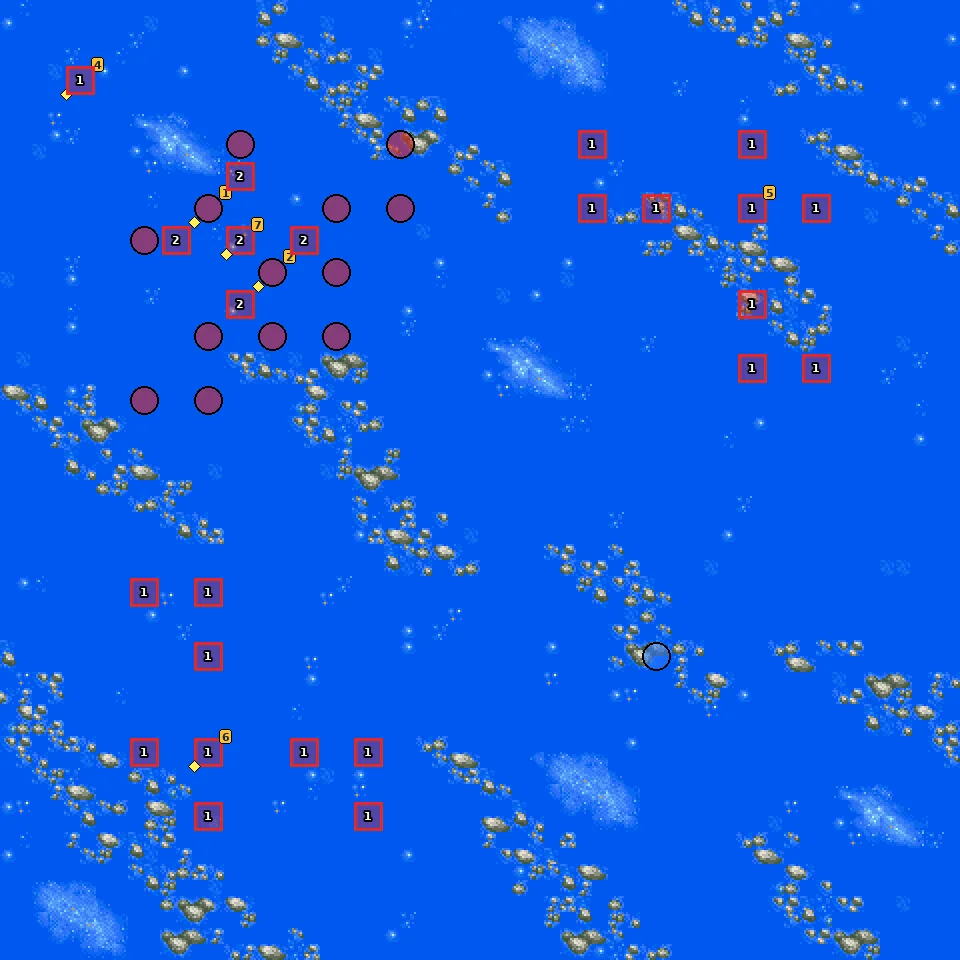
- 1Wave 1 — all enemies defeated
- 2Wave 2 — 5 or fewer enemies left
- 3Wave 3 — Marg is defeated
🗺️ Battle map, part 2
Circles are units on the map at the start (red enemy, blue ally, green guest). Squares with a number are reinforcement waves. Yellow tags number the named enemies in the table below, and a yellow diamond marks an enemy that carries a part. Positions are Joshua’s version; Lim’s map is the same unless the walkthrough says otherwise. Tap the map to open it full size.
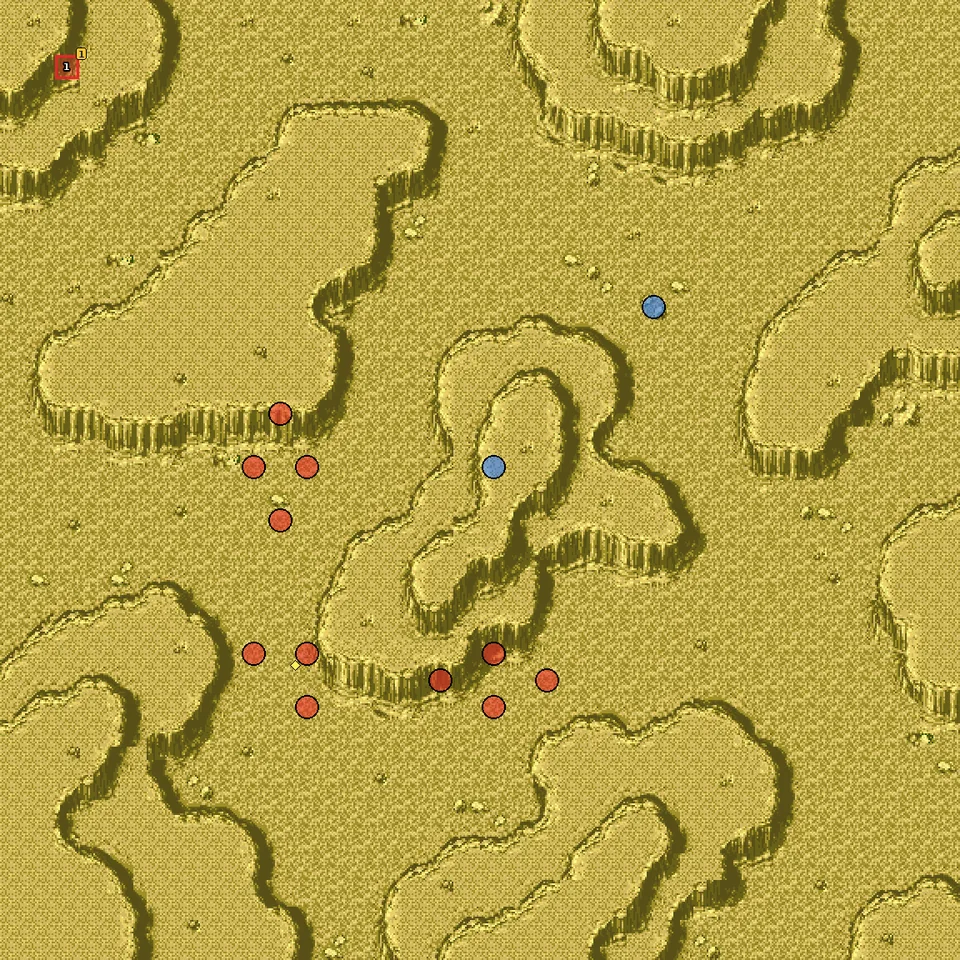
- 1Wave 1 — all enemies defeated
Named enemies & parts
| Pilot | Unit | Part | Appears | |
|---|---|---|---|---|
| 1 Marg | Marg’s Command Ship | Evasion +5 | start Leaves the map when beaten | |
| 2 Rose | Zeelon | Prevail +1 | start | |
| 3 Marg | Gaiyar | — | wave 3 Leaves the map when beaten | |
| 4 Marg | God Mars | S-Adapter | wave 3 Leaves the map when beaten | |
| 5 Nesia | Nesia Mothership | — | wave 1 Leaves the map when beaten | |
| 6 Voider | Voider Mothership | SP +20 | wave 1 Retreats at 20% HP | |
| 7 Klopen | Destark 2 | Chogokin Z | wave 2 Leaves the map when beaten | |
| 1 Klopen | Destark 2 | — | wave 1 Leaves the map when beaten |
Parts on regular enemies: Sup. Atk +2.
New units & pilots
First time each one fights on your side on this route, during the map or right after it. Purple = only if the condition in brackets is met.
- Battle 7 (Attack)
💬 Battle conversations in this map (4)
These pairs have their own lines when they fight each other. “Talk command” means moving next to the unit and choosing Talk; the Secret Units page says which ones matter.
- Takeru Myojin vs Marg
- Takeru Myojin vs Rose
- Kento Tate vs Klopen
- Takeru Myojin → Marg (Talk command)
Klopen the Rebel
📜 反逆のクロッペン
Part 1
Old Helios route. Klopen turns against the Empire, and Daltanious becomes complete.
Part 2
⏳ Don’t miss in this map
- Daltanious learns Cannon Cubic, Flame Attack + Cross Slash and Hyperspace Energy Burst before this map. This route is also what the bomb-removal secret needs later.
Full list across the game: Missables.
Walkthrough
- SecretDaltanious learns Cannon Cubic, Flame Attack + Cross Slash and Hyperspace Energy Burst before this map. This route is also what the bomb-removal secret needs later.
- MainPart 1: Klopen is on your side and must not be destroyed. Part 2: a big Gishin assault with Nesia and Kabuto in mobile fortresses, then their motherships.
- TipGreat parts: Voider (Haro), Rose (Prevail +3), Balen (Mega Generator), Ghoul (Mega Booster), Nesia (Minovsky Drive) and Kabuto (3D Radar).
🗺️ Battle map, part 1
Circles are units on the map at the start (red enemy, blue ally, green guest). Squares with a number are reinforcement waves. Yellow tags number the named enemies in the table below, and a yellow diamond marks an enemy that carries a part. Positions are Joshua’s version; Lim’s map is the same unless the walkthrough says otherwise. Tap the map to open it full size.
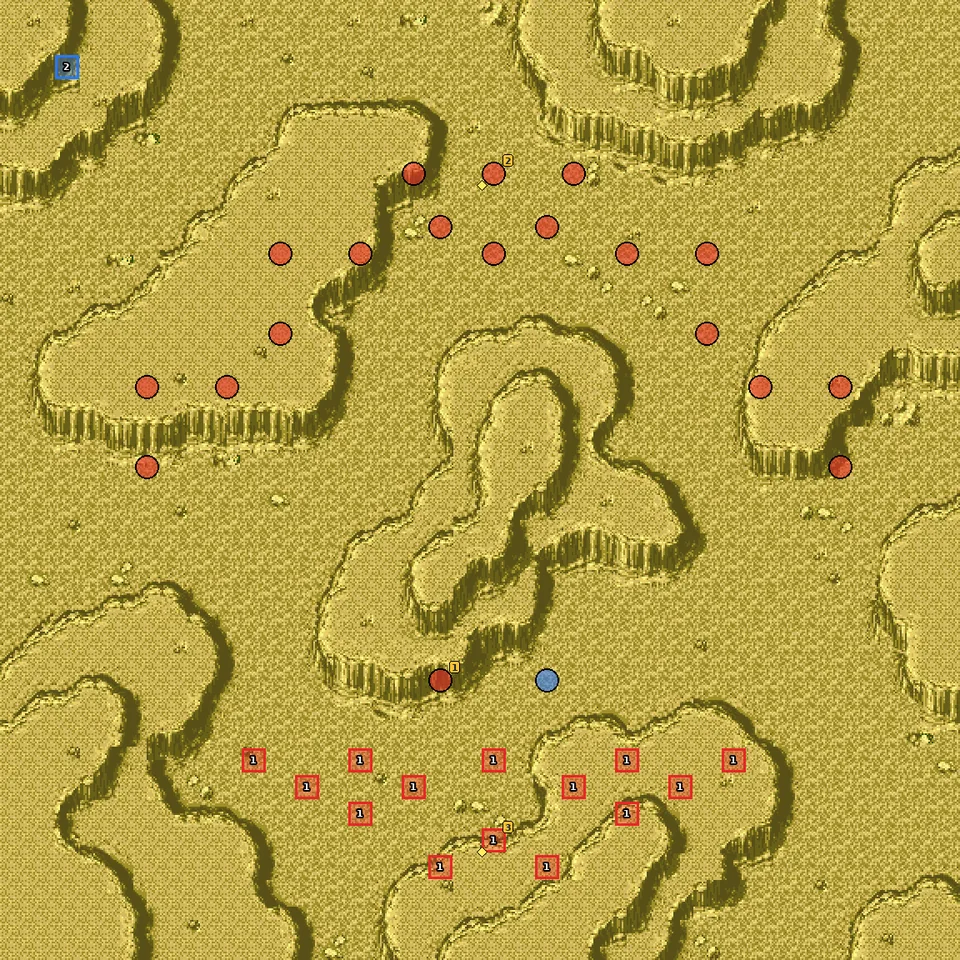
- 1Wave 1 — Voider is defeated
- 2Wave 2 — all enemies defeated
🗺️ Battle map, part 2
Circles are units on the map at the start (red enemy, blue ally, green guest). Squares with a number are reinforcement waves. Yellow tags number the named enemies in the table below, and a yellow diamond marks an enemy that carries a part. Positions are Joshua’s version; Lim’s map is the same unless the walkthrough says otherwise. Tap the map to open it full size.
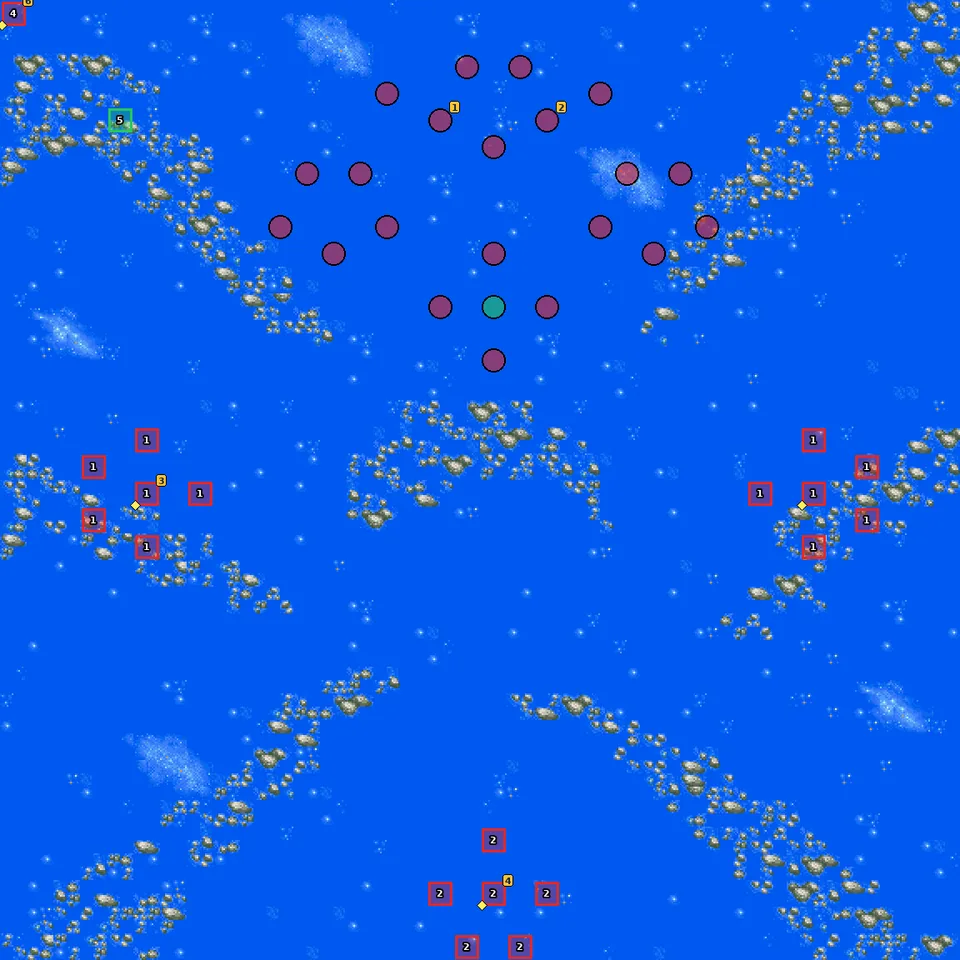
- 1Wave 1 — 10 or fewer enemies left
- 2Wave 2 — 10 or fewer enemies left
- 3Wave 3 — Nesia is defeated
- 4Wave 4 — Kabuto is defeated
- 5Wave 5 — Nesia is defeated or Kabuto is defeated
Named enemies & parts
| Pilot | Unit | Part | Appears | |
|---|---|---|---|---|
| 1 Klopen | Destark 3 | — | start Leaves the map when beaten | |
| 2 Voider | Voider Mothership | Haro | start Leaves the map when beaten | |
| 3 Rose | Zeelon | Prevail +3 | wave 1 Leaves the map when beaten | |
| 1 Nesia | Mobile Fortress | — | start Leaves the map when beaten | |
| 2 Kabuto | Mobile Fortress | — | start Leaves the map when beaten | |
| 3 Balen | Vacuum | Mega Generator | wave 1 | |
| 4 Ghoul | Guruguru | Mega Booster | wave 2 | |
| 5 Nesia | Nesia Mothership | Minovsky Drive | wave 3 Leaves the map when beaten | |
| 6 Kabuto | Kabuto Mothership | 3D Radar | wave 4 Leaves the map when beaten |
Parts on regular enemies: Multi-Sensor.
💬 Battle conversations in this map (12)
These pairs have their own lines when they fight each other. “Talk command” means moving next to the unit and choosing Talk; the Secret Units page says which ones matter.
- Klopen vs Voider
- Klopen vs Rose
- Takeru Myojin vs Rose
- Grace Maria Fleed vs Rose
- Klopen vs Nesia
- Klopen vs Kabuto
- Kento Tate vs Nesia
- Kento Tate vs Kabuto
- Takeru Myojin vs Nesia
- Takeru Myojin vs Kabuto
- Duke Fleed vs Nesia
- Duke Fleed vs Kabuto
Dance with Illusions
📜 幻覚と踊れ
Part 1
Angel Halo route. BESPA’s illusions and the Motorad fleet stand before the Angel Halo.
Part 2
⏳ Don’t miss in this map
- Katejina & Chronicle, step 1: in part 2 do not destroy them. Let them retreat (bring them under 20% HP so they leave) or beat Tassilo while both are still on the map. Killing either outright ends the chain.
- Part on a retreating enemy: Tassilo Vago carries Bio-Sensor details
- Part on a retreating enemy: Chronicle Asher carries Mega Magazine details
- Part on a retreating enemy: Katejina Loos carries Short Circuit details
Full list across the game: Missables.
Walkthrough
- MainPart 1: wipe out the enemy (Ra Cailum is the defeat condition). Pippinieden (Linear Seat), Rupe (Prevail +1), Bloch (S-Adapter) and Fuala (Chogokin Z) carry parts.
- MainPart 2: a menu before the fight lets you call the Sound Force or launch quietly; it only changes when reinforcements come.
- SecretKatejina & Chronicle, step 1: in part 2 do not destroy them. Let them retreat (bring them under 20% HP so they leave) or beat Tassilo while both are still on the map. Killing either outright ends the chain.
- TipChronicle carries a Mega Magazine and Katejina a Short Circuit, but you only get those by destroying them, which breaks the secret.
🗺️ Battle map, part 1
Circles are units on the map at the start (red enemy, blue ally, green guest). Squares with a number are reinforcement waves. Yellow tags number the named enemies in the table below, and a yellow diamond marks an enemy that carries a part. Positions are Joshua’s version; Lim’s map is the same unless the walkthrough says otherwise. Tap the map to open it full size.
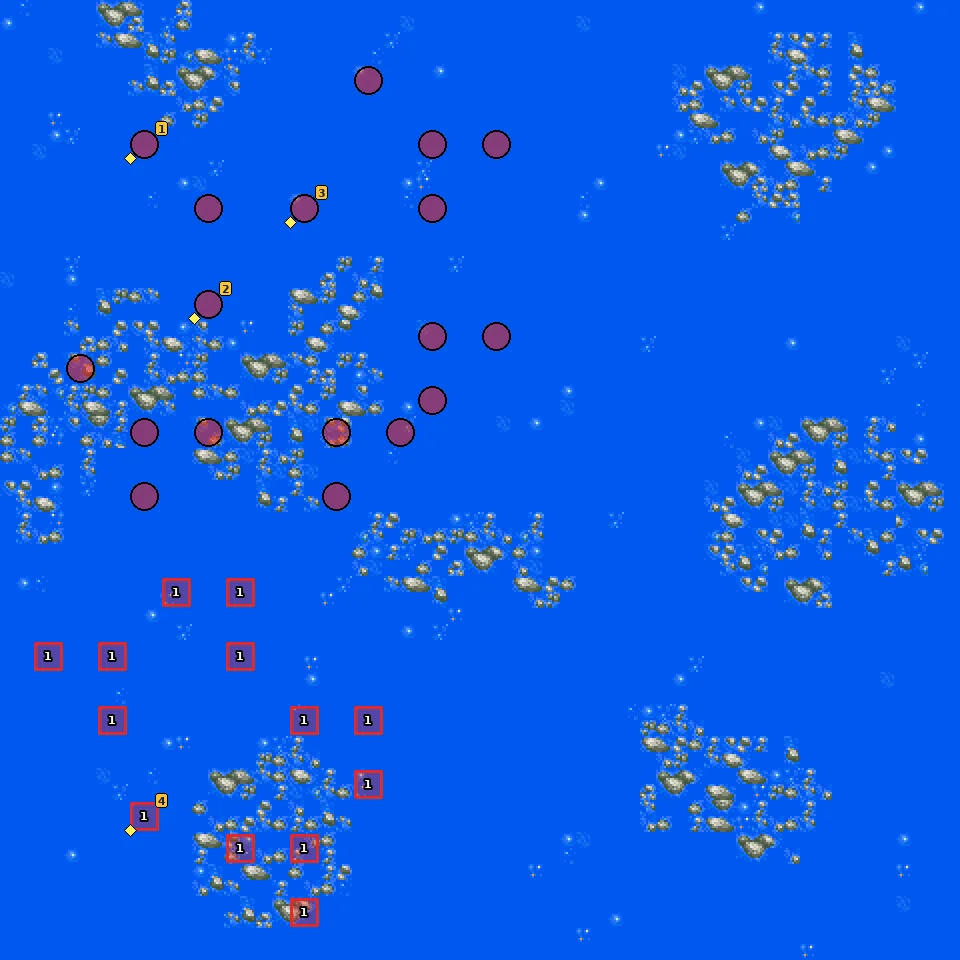
- 1Wave 1 — 5 or fewer enemies left
🗺️ Battle map, part 2
Circles are units on the map at the start (red enemy, blue ally, green guest). Squares with a number are reinforcement waves. Yellow tags number the named enemies in the table below, and a yellow diamond marks an enemy that carries a part. Positions are Joshua’s version; Lim’s map is the same unless the walkthrough says otherwise. Tap the map to open it full size.
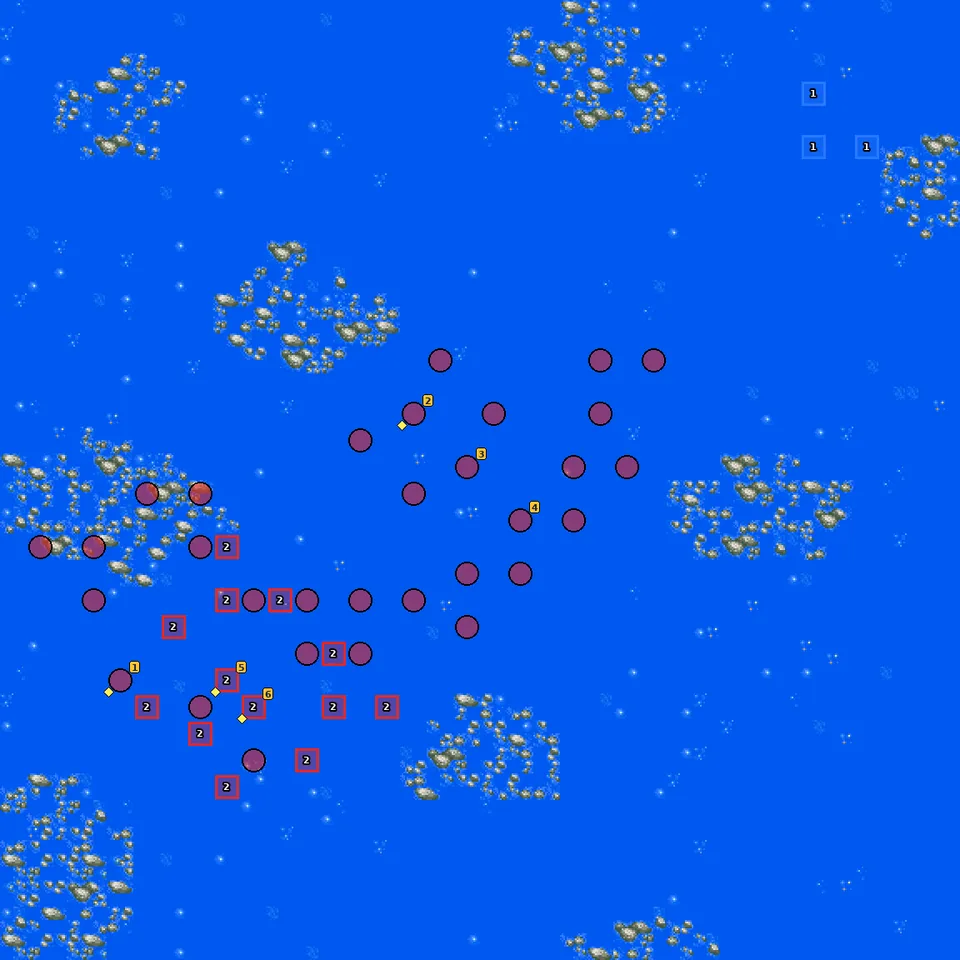
- 1Wave 1 — 3 turn(s) later
- 2Wave 2 — 5 or fewer enemies left
Named enemies & parts
| Pilot | Unit | Part | Appears | |
|---|---|---|---|---|
| 1 Arbeo Pippinieden | Adrastea | Linear Seat | start Leaves the map when beaten | |
| 2 Rupe Cineau | Bruckeng ER | Prevail +1 | start Leaves the map when beaten | |
| 3 Bloch | Doggora | S-Adapter | start Leaves the map when beaten | |
| 4 Fuala Griffon | Zanneck | Chogokin Z | wave 1 Leaves the map when beaten | |
| 1 Fuala Griffon | Zanneck | Chogokin Z | start Leaves the map when beaten | |
| 2 Tassilo Vago | Squid | Bio-Sensor | start Retreats at 20% HP | |
| 3 Fuala Griffon | Zanneck | — | start Leaves the map when beaten | |
| 4 Godwald Hein | Doggora | — | start | |
| 5 Chronicle Asher | Rig Contio | Mega Magazine | wave 2 Retreats at 20% HP | |
| 6 Katejina Loos | Gottrlatan | Short Circuit | wave 2 Retreats at 20% HP |
💬 Battle conversations in this map (7)
These pairs have their own lines when they fight each other. “Talk command” means moving next to the unit and choosing Talk; the Secret Units page says which ones matter.
- Uso Ewin vs Rupe Cineau
- Uso Ewin vs Fuala Griffon
- Amuro Ray vs Fuala Griffon
- Kamille Bidan vs Fuala Griffon
- Judau Ashta vs Fuala Griffon
- Quess Paraya vs Fuala Griffon
- Gyunei Guss vs Fuala Griffon
Angel Halo in Frenzy
📜 狂乱のエンジェル・ハイロゥ
Part 1
Angel Halo route. The final battle for the Angel Halo and for Katejina.
Part 2
⏳ Don’t miss in this map
- Katejina & Chronicle, step 2: in part 1 Uso must fight both Katejina and Chronicle (one battle each).
- Haman Karn: at the start of part 2 the game adds the kills of Amuro, Kamille, Char and Judau. It must be 400 or more, and Kamille, Char and Judau must be on the map and alive when part 2 is cleared. Amuro does not need to be deployed in part 2. Haman joins with the Qubeley after the map.
- Katejina & Chronicle, step 3: after Uso reaches the centre, use Uso’s Talk on Katejina first, then Chronicle. They join on the next route branch.
- Part on a retreating enemy: Chronicle Asher carries Multi-Sensor details
- Part on a retreating enemy: Katejina Loos carries 3D Radar details
Full list across the game: Missables.
Walkthrough
- MainUso gets the V2 Assault-Buster. Part 1: Uso and the Ra Cailum are defeat conditions.
- SecretKatejina & Chronicle, step 2: in part 1 Uso must fight both Katejina and Chronicle (one battle each).
- SecretHaman Karn: at the start of part 2 the game adds the kills of Amuro, Kamille, Char and Judau. It must be 400 or more, and Kamille, Char and Judau must be on the map and alive when part 2 is cleared. Amuro does not need to be deployed in part 2. Haman joins with the Qubeley after the map.
- MainPart 2: get Uso into the centre of the Angel Halo within 5 turns. Then the map continues as a wipe-out.
- SecretKatejina & Chronicle, step 3: after Uso reaches the centre, use Uso’s Talk on Katejina first, then Chronicle. They join on the next route branch.
🗺️ Battle map, part 1
Circles are units on the map at the start (red enemy, blue ally, green guest). Squares with a number are reinforcement waves. Yellow tags number the named enemies in the table below, and a yellow diamond marks an enemy that carries a part. Positions are Joshua’s version; Lim’s map is the same unless the walkthrough says otherwise. Tap the map to open it full size.
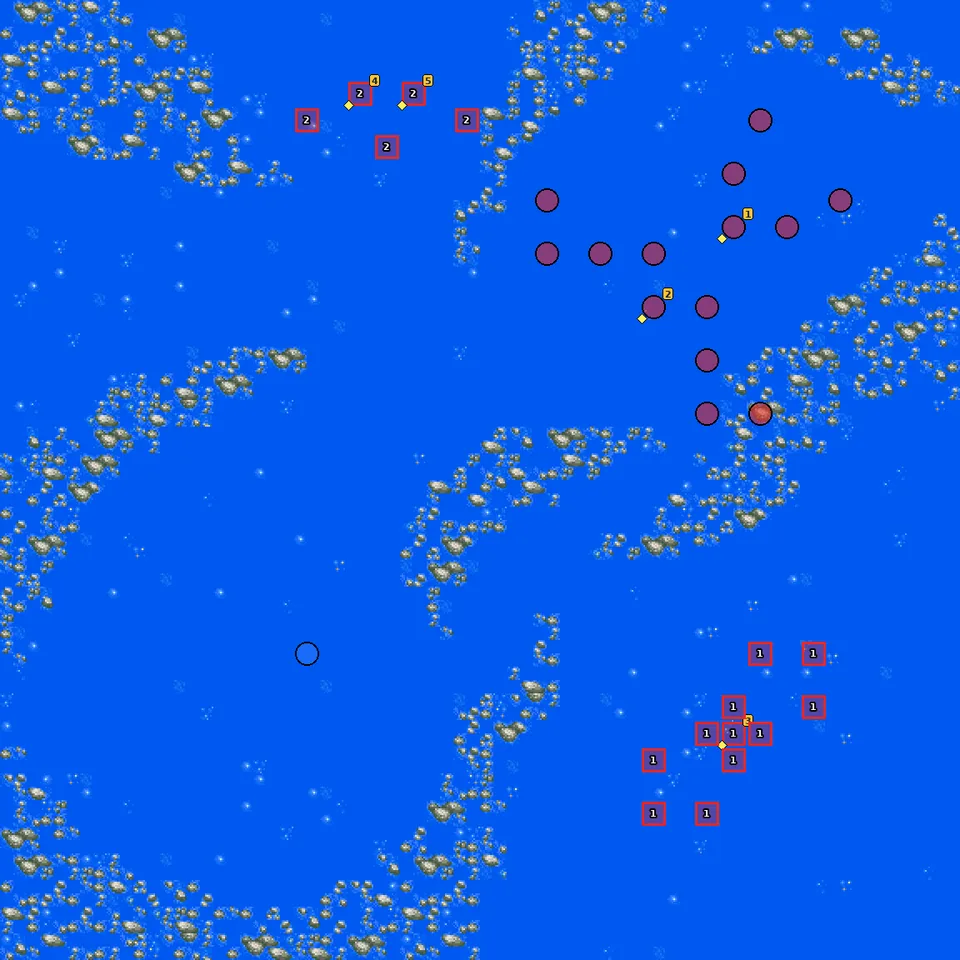
- 1Wave 1 — Fuala Griffon is defeated
- 2Wave 2 — all enemies defeated
🗺️ Battle map, part 2
Circles are units on the map at the start (red enemy, blue ally, green guest). Squares with a number are reinforcement waves. Yellow tags number the named enemies in the table below, and a yellow diamond marks an enemy that carries a part. Positions are Joshua’s version; Lim’s map is the same unless the walkthrough says otherwise. Tap the map to open it full size.
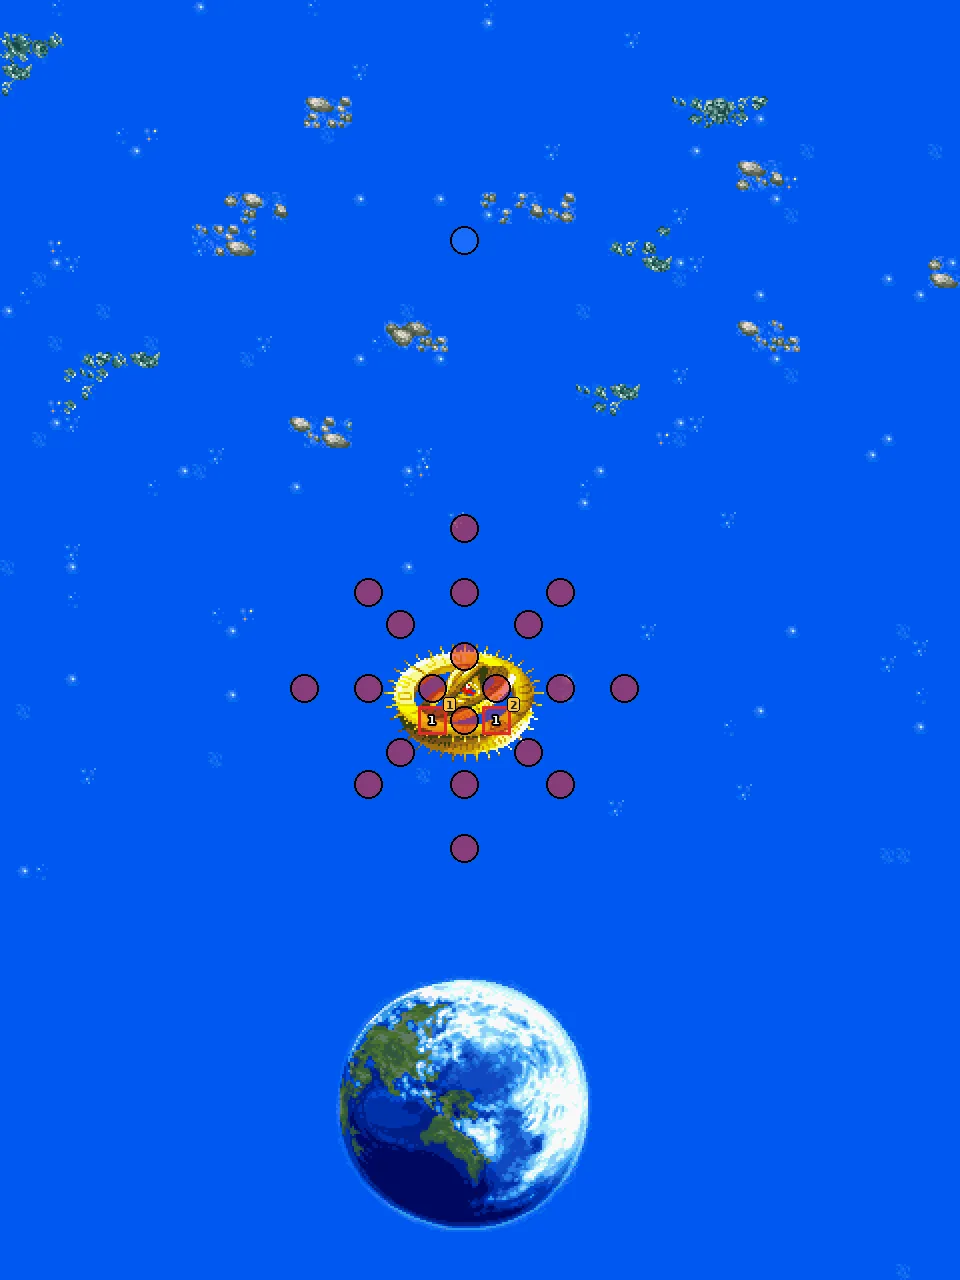
- 1Wave 1 — Uso Ewin reaches the target area
Named enemies & parts
| Pilot | Unit | Part | Appears | |
|---|---|---|---|---|
| 1 Fuala Griffon | Gengaozo | New Chogokin Z | start Leaves the map when beaten | |
| 2 Godwald Hein | Doggora | Mega Generator | start Leaves the map when beaten | |
| 3 Tassilo Vago | Squid | Mega Booster | wave 1 Leaves the map when beaten | |
| 4 Chronicle Asher | Rig Contio | Multi-Sensor | wave 2 Retreats at 20% HP | |
| 5 Katejina Loos | Gottrlatan | 3D Radar | wave 2 Retreats at 20% HP | |
| 1 Chronicle Asher | Rig Contio | — | wave 1 Retreats at 20% HP | |
| 2 Katejina Loos | Gottrlatan | — | wave 1 Retreats at 20% HP |
New units & pilots
First time each one fights on your side on this route, during the map or right after it. Purple = only if the condition in brackets is met.
- V2 Assault-Buster
💬 Battle conversations in this map (12)
These pairs have their own lines when they fight each other. “Talk command” means moving next to the unit and choosing Talk; the Secret Units page says which ones matter.
- Char Aznable vs Fuala Griffon
- Uso Ewin vs Fuala Griffon
- Marbet Fingerhat vs Fuala Griffon
- Zechs Merquise vs Godwald Hein
- Uso Ewin vs Godwald Hein
- Marbet Fingerhat vs Katejina Loos
- Uso Ewin vs Katejina Loos
- Uso Ewin vs Chronicle Asher
- Odelo Henrik vs Katejina Loos
- your hero vs Katejina Loos
- Uso Ewin → Katejina Loos (Talk command)
- Uso Ewin → Chronicle Asher (Talk command)
Emperor of Darkness
📜 暗黒の皇帝
Both groups are back together for Emperor Zuul’s dark offensive.
⏳ Don’t miss in this map
- Rose: when Rose appears, Talk to her with Takeru. If you do, she joins with the Zeelon on the next branch; if you don’t, she joins later as a pilot only (on the Cosmo Crusher).
Full list across the game: Missables.
Walkthrough
- SecretRose: when Rose appears, Talk to her with Takeru. If you do, she joins with the Zeelon on the next branch; if you don’t, she joins later as a pilot only (on the Cosmo Crusher).
- TipThe units you left at the third split come back: the Full Armor ZZ (Judau+Roux 40 kills), the ν Gundam HWS (Kailasa-Giri route, Amuro 50 kills), the Mk-III (Jupiter route) and Haman if you met her condition.
- WarningFinal route choice: Gishin Empire (Takeru’s side; Marg’s recruitment and the bomb removal) or Planet Lux (Macross 7’s side; Gavil, Sivil and the Reaction Weapons).
🗺️ Battle map
Circles are units on the map at the start (red enemy, blue ally, green guest). Squares with a number are reinforcement waves. Yellow tags number the named enemies in the table below, and a yellow diamond marks an enemy that carries a part. Positions are Joshua’s version; Lim’s map is the same unless the walkthrough says otherwise. Tap the map to open it full size.
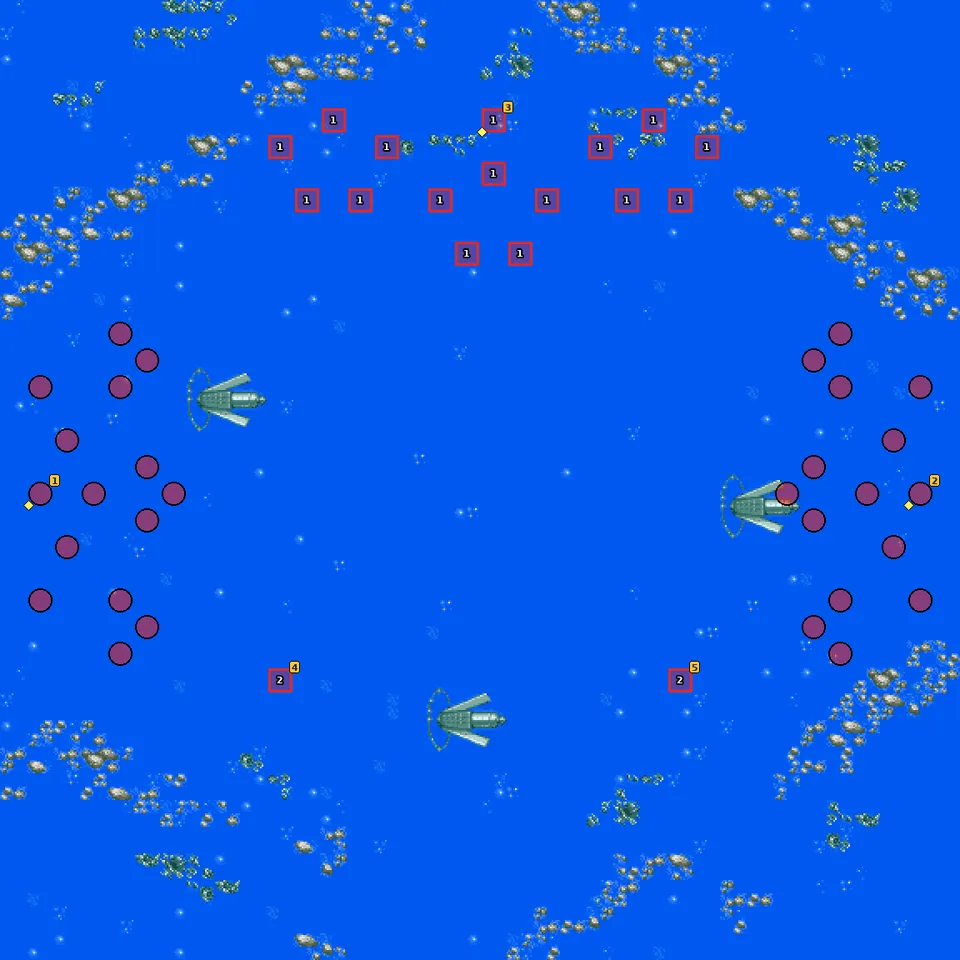
- 1Wave 1 — 5 or fewer enemies left
- 2Wave 2 — all enemies defeated
Named enemies & parts
| Pilot | Unit | Part | Appears | |
|---|---|---|---|---|
| 1 Commander Gandal | Motherbahn | EN Giga Chip | start Leaves the map when beaten | |
| 2 Captain Blacky | Motherbahn | Solar Panel | start | |
| 3 Rose | Zeelon | Start Will +10 | wave 1 Leaves the map when beaten | |
| 4 Emperor Zuul | Emperor Zuul | — | wave 2 Leaves the map when beaten | |
| 5 Klopen | Destark 3 | — | wave 2 Leaves the map when beaten |
New units & pilots
First time each one fights on your side on this route, during the map or right after it. Purple = only if the condition in brackets is met.
- ν Gundam HWS (Old Helios route, Amuro 50+ kills)
- VF-11MAXL Kai B (Old Helios route)
- VF-17T Kai Nightmare B (Old Helios route)
- Haman Karn (Haman condition met)
- Qubeley (Haman condition met)
- Proto Garland (MC)
- Gundam Mk-III (Old Helios route, Jupiter route)
- VF-19 Kai Fire Valkyrie B (Old Helios route)
💬 Battle conversations in this map (5)
These pairs have their own lines when they fight each other. “Talk command” means moving next to the unit and choosing Talk; the Secret Units page says which ones matter.
- Duke Fleed vs Commander Gandal
- Takeru Myojin vs Commander Gandal
- Commander Gandal vs Daltanious
- Takeru Myojin vs Rose
- Takeru Myojin → Rose (Talk command)
Showdown on the Rebel Planet!
📜 反乱惑星の対決!
Gishin Empire route. On a rebel planet, Marg, Rose and Katejina’s new allegiances are tested.
⏳ Don’t miss in this map
- Joins before the map if you met the conditions: Marg (Gaiyar / God Mars), Rose with the Zeelon, Katejina (Gottrlatan) and Chronicle (Rig Contio).
- Part on a retreating enemy: Commander Wahl carries SP Cost -30% details
Full list across the game: Missables.
Walkthrough
- MainA straightforward wipe-out; Commander Wahl (SP Cost -30%) retreats at 20% HP.
- SecretJoins before the map if you met the conditions: Marg (Gaiyar / God Mars), Rose with the Zeelon, Katejina (Gottrlatan) and Chronicle (Rig Contio).
🗺️ Battle map
Circles are units on the map at the start (red enemy, blue ally, green guest). Squares with a number are reinforcement waves. Yellow tags number the named enemies in the table below, and a yellow diamond marks an enemy that carries a part. Positions are Joshua’s version; Lim’s map is the same unless the walkthrough says otherwise. Tap the map to open it full size.
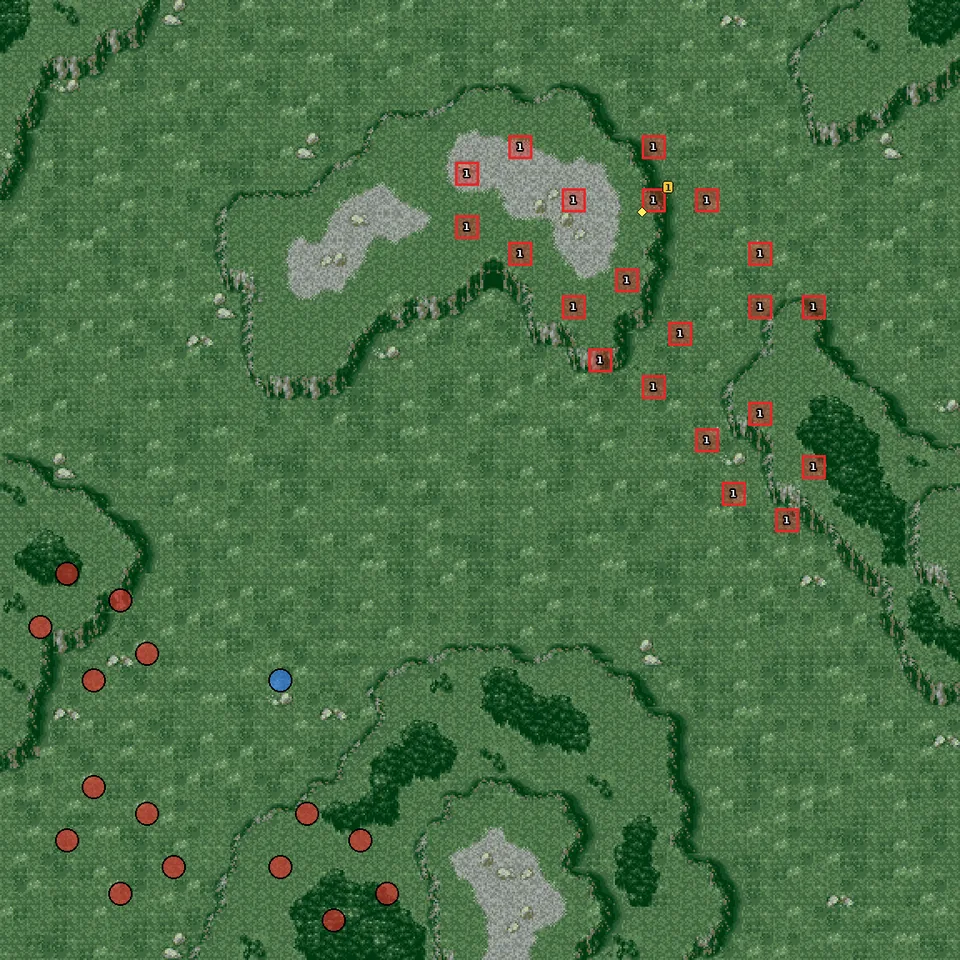
- 1Wave 1 — 5 or fewer enemies left
Named enemies & parts
| Pilot | Unit | Part | Appears | |
|---|---|---|---|---|
| 1 Commander Wahl | Wahl’s Starship | SP Cost -30% | wave 1 Retreats at 20% HP |
New units & pilots
First time each one fights on your side on this route, during the map or right after it. Purple = only if the condition in brackets is met.
- Chronicle Asher (Katejina chain done)
- Rig Contio (Katejina chain done)
- Katejina Loos (Katejina chain done)
- Gottrlatan (Katejina chain done)
- Rose (Rose was talked to)
- Zeelon (Rose was talked to)
- Marg (Marg chain done)
- Shin Dragon
💬 Battle conversations in this map (4)
These pairs have their own lines when they fight each other. “Talk command” means moving next to the unit and choosing Talk; the Secret Units page says which ones matter.
- Takeru Myojin vs Commander Wahl
- Rose vs Commander Wahl
- Marg vs Commander Wahl
- Gascon vs Commander Wahl
Zuul, the Vile Emperor
📜 卑劣な皇帝 ズール
Part 1
Gishin Empire route. Zuul shows how far he will go to keep his throne.
Part 2
⏳ Don’t miss in this map
- Part on a retreating enemy: Commander Wahl carries Large Magazine details
- Part on a retreating enemy: Lady Gandal carries Learning CP+ details
- Part on a retreating enemy: Lady Gandal carries Weapon Breaker details
Full list across the game: Missables.
Walkthrough
- MainPart 1: Wahl (Large Magazine) and Lady Gandal (Learning CP+) retreat at 20% HP; Balen carries a Chogokin Z.
- MainPart 2: Emperor Zuul (Dual Sensor) with Lady Gandal (Weapon Breaker).
- TipIf Marg is with you he has his own line with Zuul.
🗺️ Battle map, part 1
Circles are units on the map at the start (red enemy, blue ally, green guest). Squares with a number are reinforcement waves. Yellow tags number the named enemies in the table below, and a yellow diamond marks an enemy that carries a part. Positions are Joshua’s version; Lim’s map is the same unless the walkthrough says otherwise. Tap the map to open it full size.
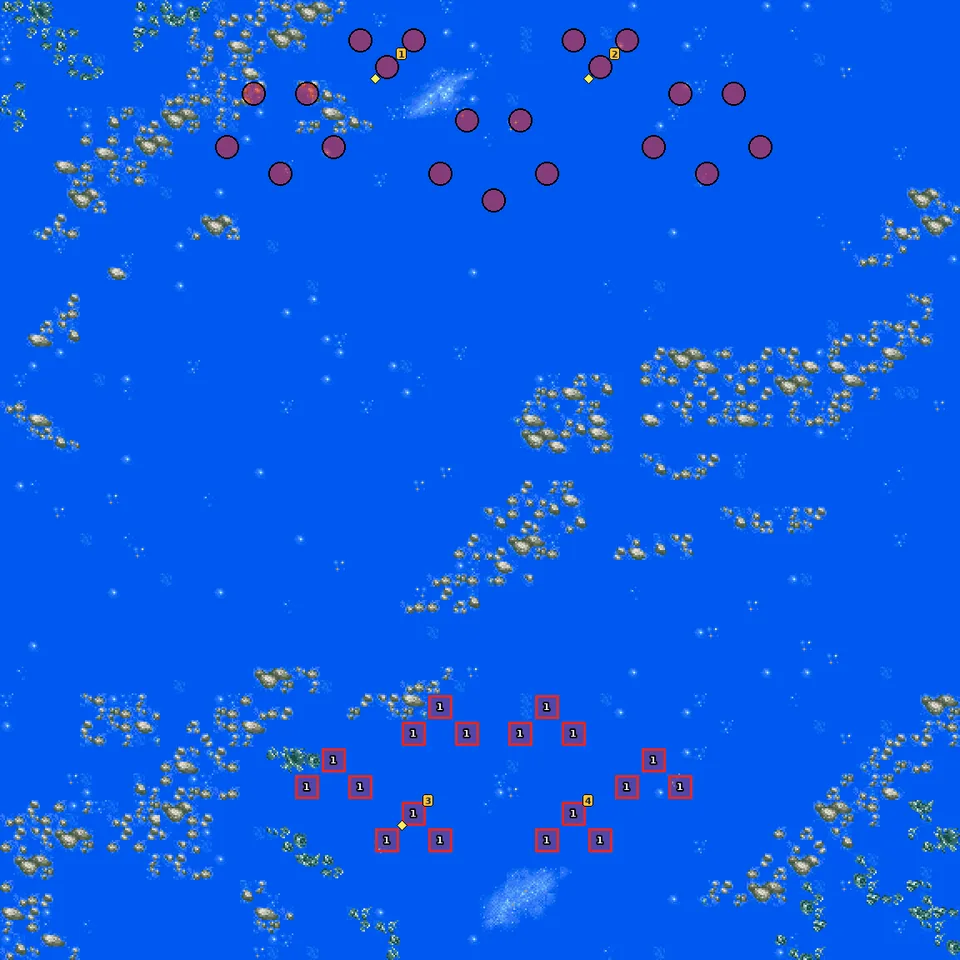
- 1Wave 1 — 5 or fewer enemies left
🗺️ Battle map, part 2
Circles are units on the map at the start (red enemy, blue ally, green guest). Squares with a number are reinforcement waves. Yellow tags number the named enemies in the table below, and a yellow diamond marks an enemy that carries a part. Positions are Joshua’s version; Lim’s map is the same unless the walkthrough says otherwise. Tap the map to open it full size.
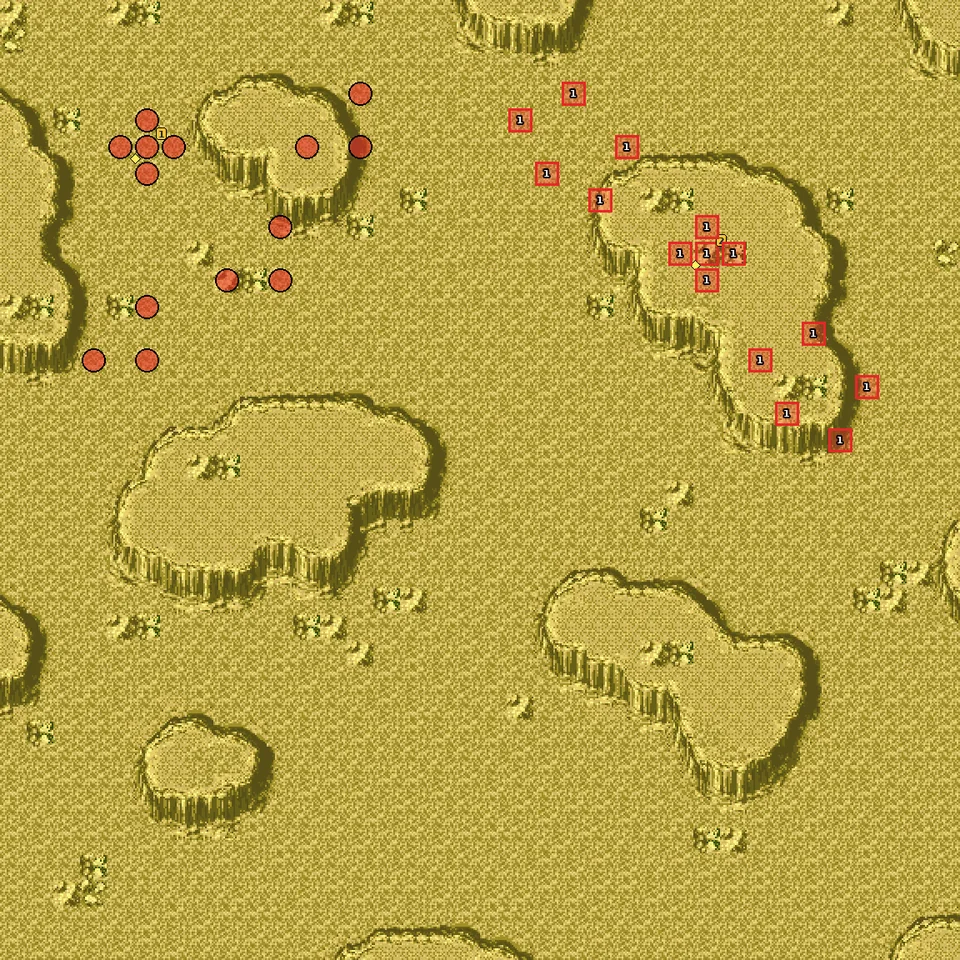
- 1Wave 1 — all enemies defeated
Named enemies & parts
| Pilot | Unit | Part | Appears | |
|---|---|---|---|---|
| 1 Commander Wahl | Wahl’s Starship | Large Magazine | start Retreats at 20% HP | |
| 2 Balen | Vacuum | Chogokin Z | start Leaves the map when beaten | |
| 3 Lady Gandal | Motherbahn | Learning CP+ | wave 1 Retreats at 20% HP | |
| 4 Captain Blacky | Motherbahn | — | wave 1 Leaves the map when beaten | |
| 1 Lady Gandal | Motherbahn | Weapon Breaker | start Retreats at 20% HP | |
| 2 Emperor Zuul | Emperor Zuul | Dual Sensor | wave 1 Leaves the map when beaten |
💬 Battle conversations in this map (7)
These pairs have their own lines when they fight each other. “Talk command” means moving next to the unit and choosing Talk; the Secret Units page says which ones matter.
- Takeru Myojin vs Emperor Zuul
- Rose vs Emperor Zuul
- Kento Tate vs Emperor Zuul
- Duke Fleed vs Emperor Zuul
- Grace Maria Fleed vs Emperor Zuul
- Gascon vs Emperor Zuul
- Marg vs Emperor Zuul
Death Match! Final Battle on Gishin!
📜 死闘! ギシン星最終決戦!
Part 1
Gishin Empire route. The final battle on Gishin against Emperor Zuul and all his forms.
Part 2
⏳ Don’t miss in this map
- Remove the anti-proton bomb: in part 2, when Zuul’s first form is defeated, Kento, Danji and Beralios (Daltanious) must all be on the map, and you must have taken the Old Helios route. Then Zuul does not revive in the usual way, and Takeru stops being a defeat condition in the last three stages.
Full list across the game: Missables.
Walkthrough
- SecretRemove the anti-proton bomb: in part 2, when Zuul’s first form is defeated, Kento, Danji and Beralios (Daltanious) must all be on the map, and you must have taken the Old Helios route. Then Zuul does not revive in the usual way, and Takeru stops being a defeat condition in the last three stages.
- MainZuul comes back several times (each form carries a part: Energy Taker, Mind Taker, Armor Breaker, EN Mega Chip). Gandal (Evasion +10) and Ghoul (ECM Jammer) lead part 1.
- TipThere are many special battle lines with Zuul and his officers; the list is below.
🗺️ Battle map, part 1
Circles are units on the map at the start (red enemy, blue ally, green guest). Squares with a number are reinforcement waves. Yellow tags number the named enemies in the table below, and a yellow diamond marks an enemy that carries a part. Positions are Joshua’s version; Lim’s map is the same unless the walkthrough says otherwise. Tap the map to open it full size.
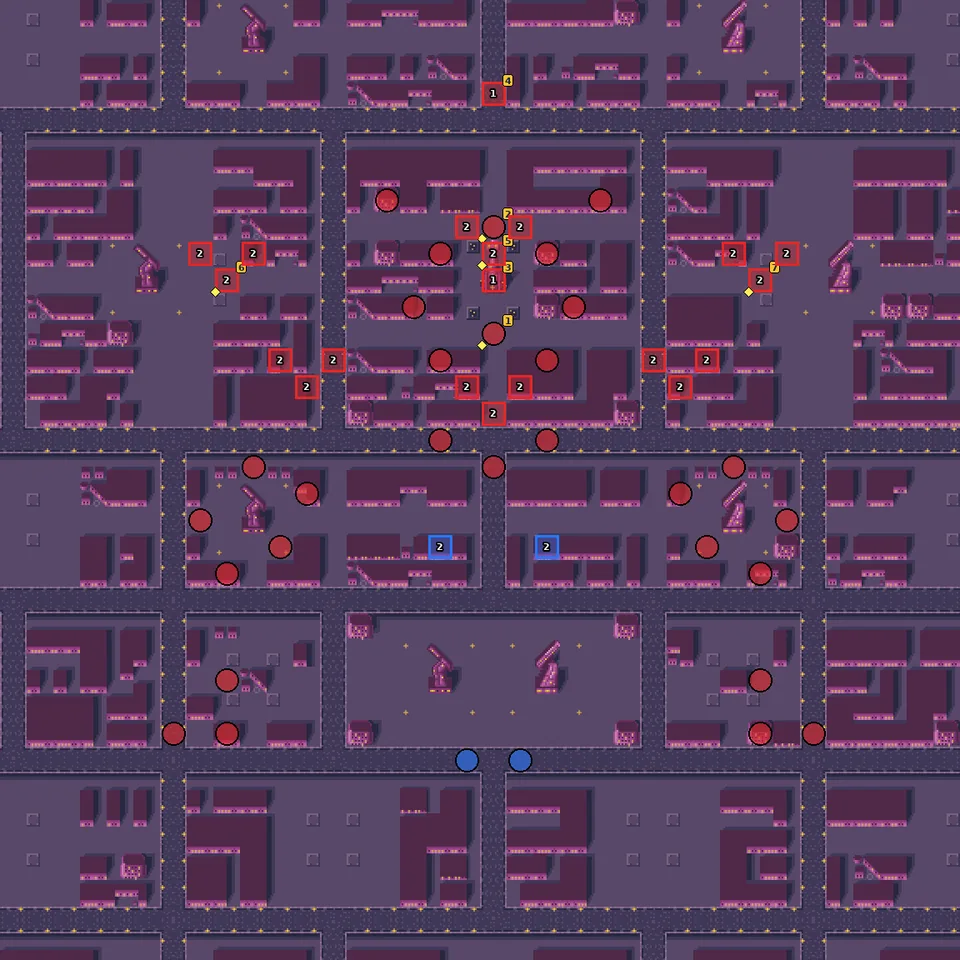
- 1Wave 1 — all enemies defeated
- 2Wave 2 — all enemies defeated
🗺️ Battle map, part 2
Circles are units on the map at the start (red enemy, blue ally, green guest). Squares with a number are reinforcement waves. Yellow tags number the named enemies in the table below, and a yellow diamond marks an enemy that carries a part. Positions are Joshua’s version; Lim’s map is the same unless the walkthrough says otherwise. Tap the map to open it full size.
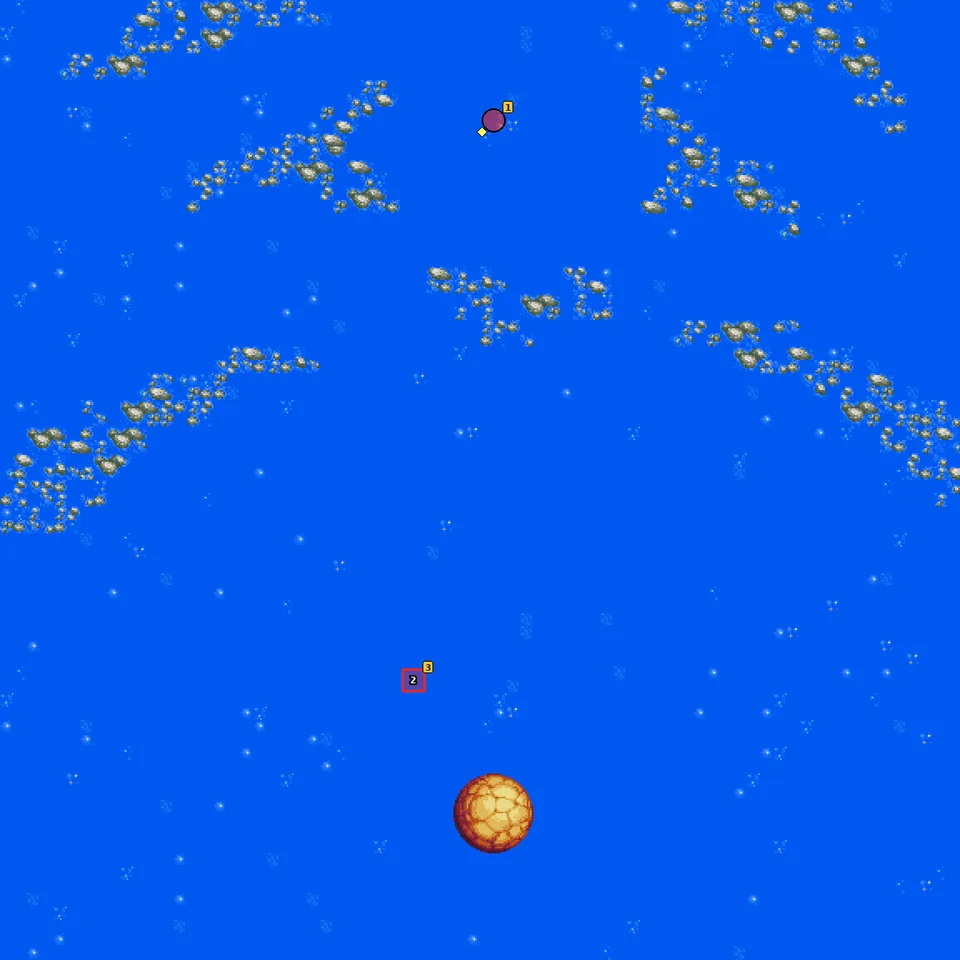
- 1Wave 1 — q0B(2A 1 2A)
- 2Wave 2 — q0B(2B 2 2B)
Named enemies & parts
| Pilot | Unit | Part | Appears | |
|---|---|---|---|---|
| 1 Commander Gandal | Motherbahn | Evasion +10 | start Leaves the map when beaten | |
| 2 Ghoul | Guruguru | ECM Jammer | start Leaves the map when beaten | |
| 3 Emperor Zuul | Emperor Zuul | — | wave 1 Leaves the map when beaten | |
| 4 Commander Wahl | Wahl’s Starship | — | wave 1 Leaves the map when beaten | |
| 5 Emperor Zuul | Emperor Zuul | Energy Taker | wave 2 Leaves the map when beaten | |
| 6 Emperor Zuul | Emperor Zuul | Mind Taker | wave 2 Leaves the map when beaten | |
| 7 Emperor Zuul | Emperor Zuul | Armor Breaker | wave 2 Leaves the map when beaten | |
| 1 Emperor Zuul | Emperor Zuul | EN Mega Chip | start Leaves the map when beaten | |
| 2 Emperor Zuul | Emperor Zuul | — | wave 1 Leaves the map when beaten | |
| 3 Emperor Zuul | Emperor Zuul | — | wave 2 Leaves the map when beaten |
💬 Battle conversations in this map (27)
These pairs have their own lines when they fight each other. “Talk command” means moving next to the unit and choosing Talk; the Secret Units page says which ones matter.
- Duke Fleed vs Commander Gandal
- Takeru Myojin vs Commander Gandal
- Rose vs Commander Gandal
- Commander Gandal vs Daltanious
- Grace Maria Fleed vs Commander Gandal
- your hero vs Commander Gandal
- Takeru Myojin vs Ghoul
- Marg vs Commander Gandal
- Amuro Ray vs Javelin
- Char Aznable vs Javelin
- Takeru Myojin vs Javelin
- Kento Tate vs Javelin
- Duke Fleed vs Javelin
- Grace Maria Fleed vs Javelin
- Judau Ashta vs Javelin
- Kamille Bidan vs Javelin
- Roger Smith vs Javelin
- Go vs Javelin
- Ryoma Nagare vs Javelin
- Shogo Yahagi vs Javelin
- Koji Kabuto vs Javelin
- Tetsuya Tsurugi vs Javelin
- Uso Ewin vs Javelin
- Heero Yuy vs Javelin
- Chang Wufei vs Javelin
- your hero vs Javelin
- Marg vs Javelin
Sivil of the Forbidden Planet
📜 禁断惑星のシビル
Part 1
Added later in the map: Defeat: Basara is destroyed.
Planet Lux route. Macross 7 lands on Planet Lux, where Sivil rests in the forbidden ruins.
Part 2
⏳ Don’t miss in this map
- Part on a retreating enemy: Gavil carries I-Field Barrier details
- Part on a retreating enemy: Bargo carries Learning CP++ details
Full list across the game: Missables.
Walkthrough
- MainPart 1: Battle 7 and Basara are defeat conditions, and no enemy may enter the ruins until the third wave.
- TipGavil comes back in the Gavigula (I-Field Barrier); Bargo (Learning CP++) and Gavil retreat at 20% HP.
- MainPart 2: Geperuniti’s flagship (Combo +1). Katejina and Chronicle join before this stage if you met their condition.
🗺️ Battle map, part 1
Circles are units on the map at the start (red enemy, blue ally, green guest). Squares with a number are reinforcement waves. Yellow tags number the named enemies in the table below, and a yellow diamond marks an enemy that carries a part. Positions are Joshua’s version; Lim’s map is the same unless the walkthrough says otherwise. Tap the map to open it full size.
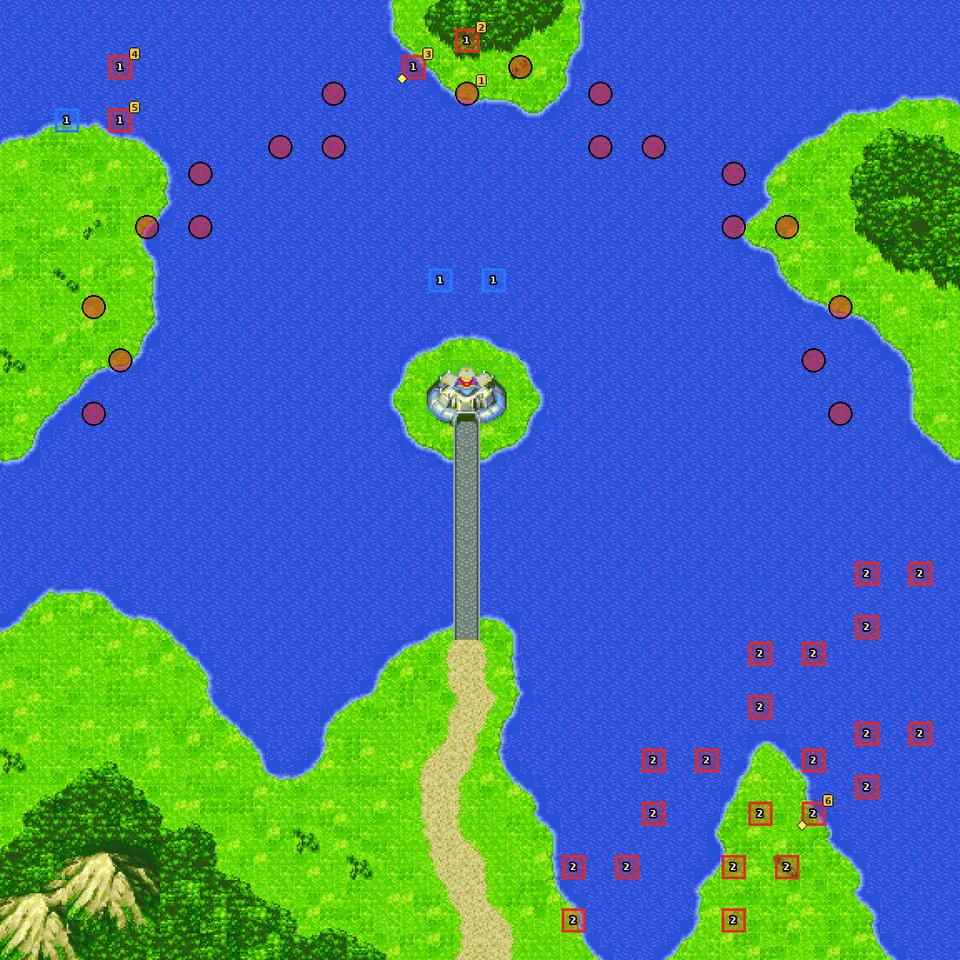
- 1Wave 1 — 5 or fewer enemies left
- 2Wave 2 — Gavil is defeated
🗺️ Battle map, part 2
Circles are units on the map at the start (red enemy, blue ally, green guest). Squares with a number are reinforcement waves. Yellow tags number the named enemies in the table below, and a yellow diamond marks an enemy that carries a part. Positions are Joshua’s version; Lim’s map is the same unless the walkthrough says otherwise. Tap the map to open it full size.
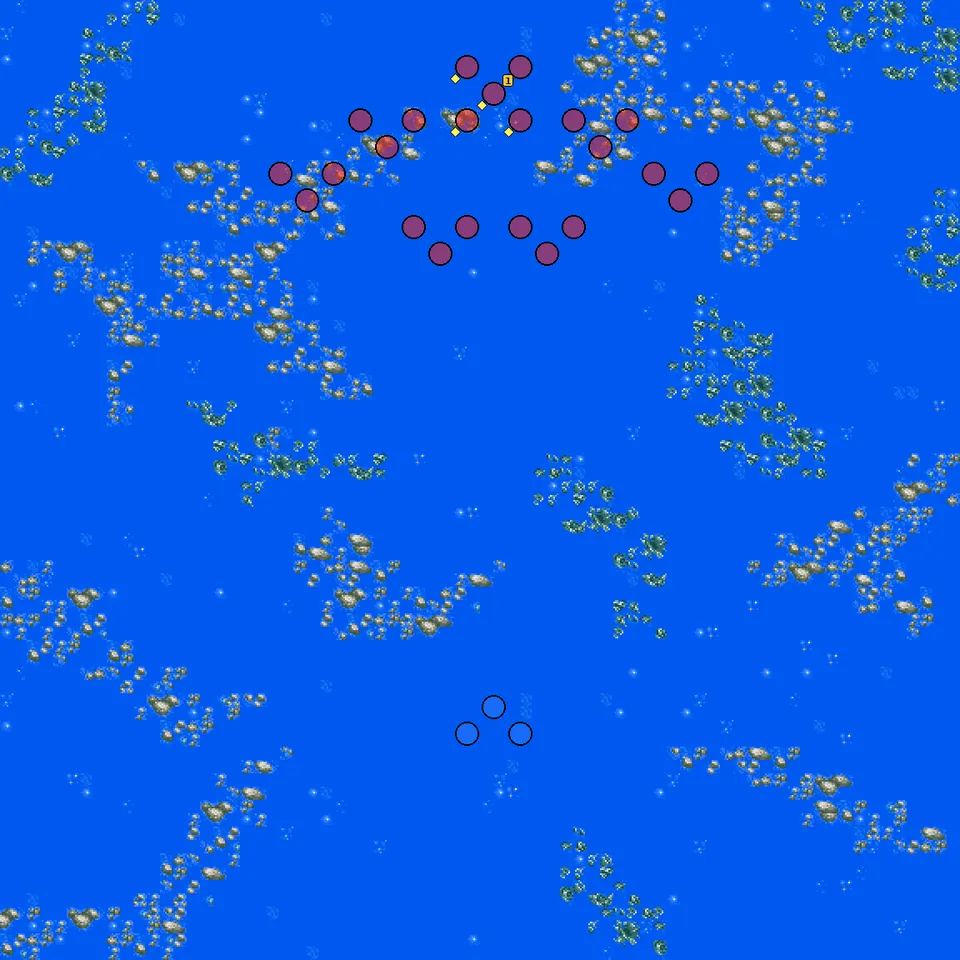
Named enemies & parts
| Pilot | Unit | Part | Appears | |
|---|---|---|---|---|
| 1 Gavil | FBz-99G Zaubergeran | — | start Retreats at 20% HP | |
| 2 Glavil | Glavil | — | wave 1 | |
| 3 Gavil | Gavigula | I-Field Barrier | wave 1 Retreats at 20% HP | |
| 4 Gigil | Fz-109F Elgerzorn | — | wave 1 Leaves the map when beaten | |
| 5 Sivil | Sivil | — | wave 1 Leaves the map when beaten | |
| 6 Bargo | Bargo | Learning CP++ | wave 2 Retreats at 20% HP | |
| 1 Ivano Geperuniti | Fleet Flagship Carrier | Combo +1 | start Leaves the map when beaten |
Parts on regular enemies: Propellant Tank ×4.
New units & pilots
First time each one fights on your side on this route, during the map or right after it. Purple = only if the condition in brackets is met.
- Milia Fallyna Jenius
- Chronicle Asher (Katejina chain done)
- Rig Contio (Katejina chain done)
- Katejina Loos (Katejina chain done)
- Gottrlatan (Katejina chain done)
- Shin Dragon
Desperate Defense
📜 決死の防衛
Planet Lux route. City 7 must hold until the Reaction Weapons are ready.
⏳ Don’t miss in this map
- Before the map every Valkyrie except the Sound Force (VF-11C, VF-17, VF-19S/F, VF-22S, VF-1J) and Battle 7 get Reaction Warheads.
Full list across the game: Missables.
Walkthrough
- SecretBefore the map every Valkyrie except the Sound Force (VF-11C, VF-17, VF-19S/F, VF-22S, VF-1J) and Battle 7 get Reaction Warheads.
- MainDefeat condition: Battle 7. Goram (Dual Sensor) and Zomd (Learning CP+) lead the attack.
🗺️ Battle map
Circles are units on the map at the start (red enemy, blue ally, green guest). Squares with a number are reinforcement waves. Yellow tags number the named enemies in the table below, and a yellow diamond marks an enemy that carries a part. Positions are Joshua’s version; Lim’s map is the same unless the walkthrough says otherwise. Tap the map to open it full size.
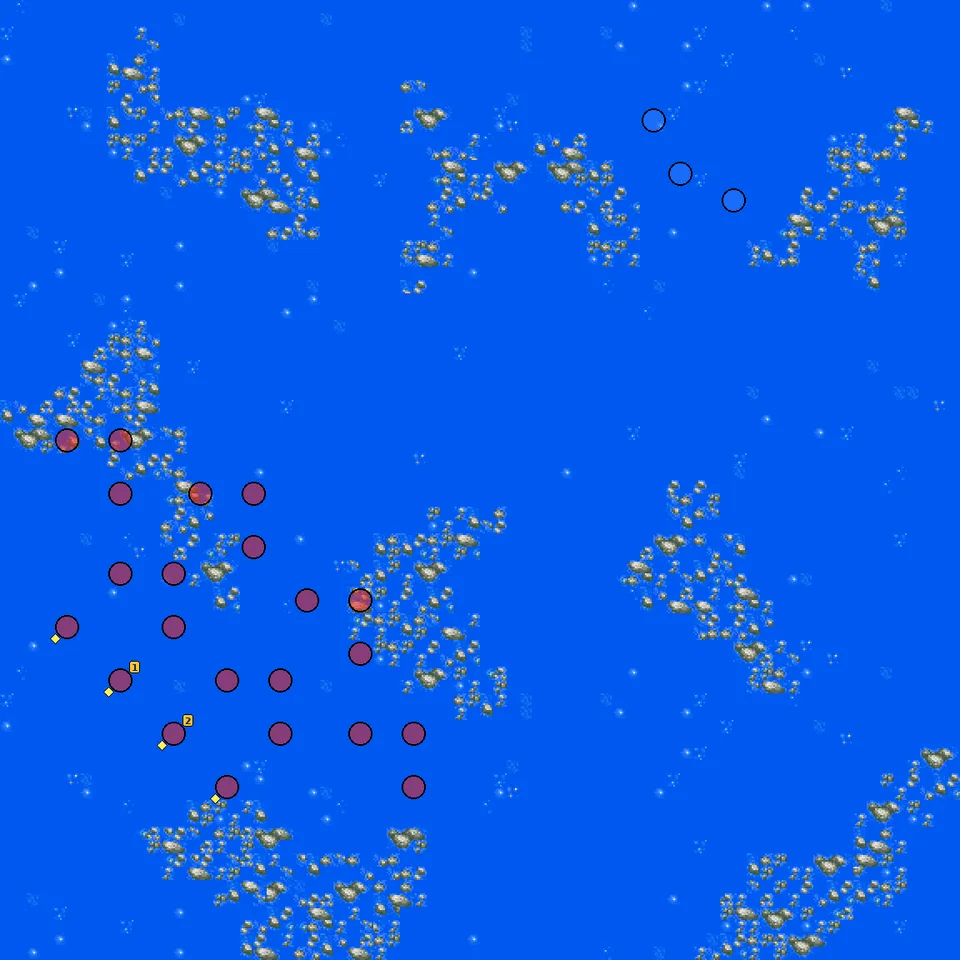
Named enemies & parts
| Pilot | Unit | Part | Appears | |
|---|---|---|---|---|
| 1 Goram | ゴラム | Dual Sensor | start Leaves the map when beaten | |
| 2 Zomd | ゾムド | Learning CP+ | start Leaves the map when beaten |
Parts on regular enemies: Propellant Tank ×2.
New units & pilots
First time each one fights on your side on this route, during the map or right after it. Purple = only if the condition in brackets is met.
- VF-22S Sturmvogel II F
Nightmare Assault
📜 悪夢の突入作戦
Part 1
Planet Lux route. A desperate push into the Protodeviln’s lair; only a few can go in.
Part 2
⏳ Don’t miss in this map
- Gavil, step 1: in part 2, have Gamlin fight Gavil.
Full list across the game: Missables.
Walkthrough
- MainPart 1: Max, Gamlin and the Sound Force are defeat conditions. Victory: wipe out the enemy or get an ally into the target area. Waves come at 8 enemies left.
- SecretGavil, step 1: in part 2, have Gamlin fight Gavil.
- MainPart 2: you can’t use the units you deployed in part 1 (the script checks who sortied). Gavil carries a Chogokin Z in part 2 and a Weapon Breaker in part 1.
🗺️ Battle map, part 1
Circles are units on the map at the start (red enemy, blue ally, green guest). Squares with a number are reinforcement waves. Yellow tags number the named enemies in the table below, and a yellow diamond marks an enemy that carries a part. Positions are Joshua’s version; Lim’s map is the same unless the walkthrough says otherwise. Tap the map to open it full size.
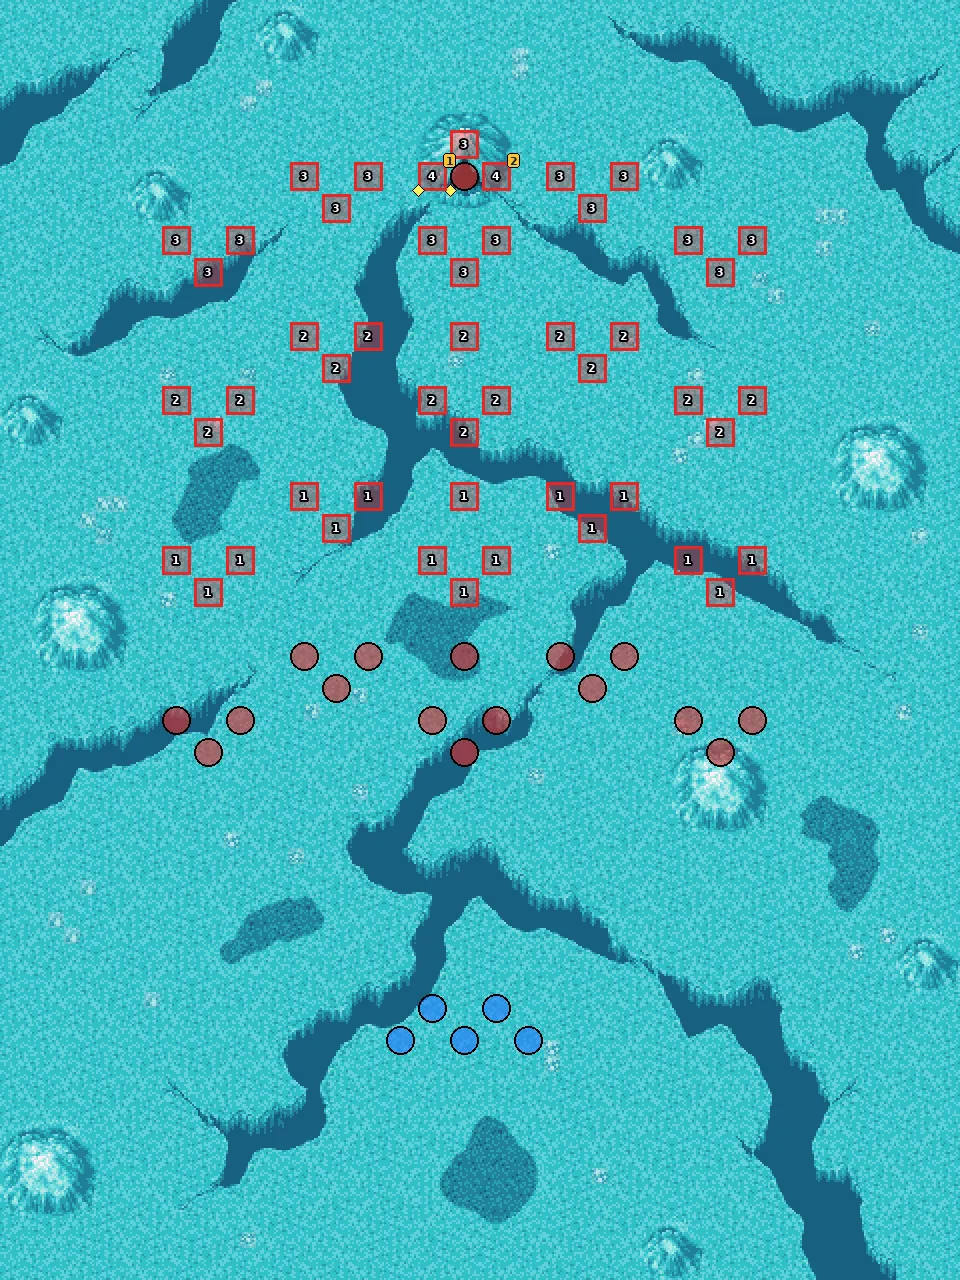
- 1Wave 1 — 8 or fewer enemies left
- 2Wave 2 — 8 or fewer enemies left
- 3Wave 3 — 8 or fewer enemies left
- 4Wave 4 — q12(5 1 5)
🗺️ Battle map, part 2
Circles are units on the map at the start (red enemy, blue ally, green guest). Squares with a number are reinforcement waves. Yellow tags number the named enemies in the table below, and a yellow diamond marks an enemy that carries a part. Positions are Joshua’s version; Lim’s map is the same unless the walkthrough says otherwise. Tap the map to open it full size.
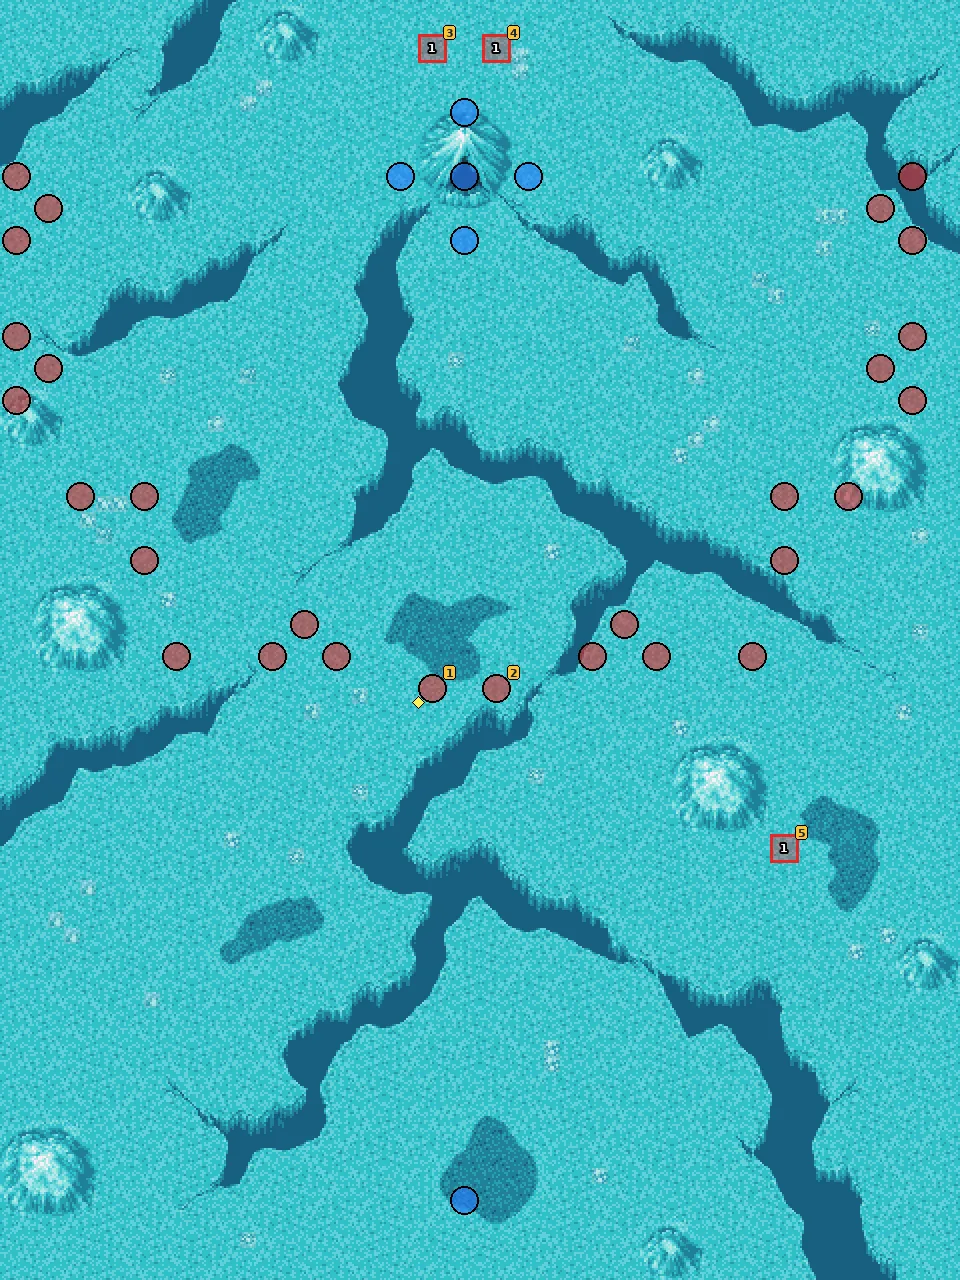
- 1Wave 1 — all enemies defeated
Named enemies & parts
| Pilot | Unit | Part | Appears | |
|---|---|---|---|---|
| 1 Gavil | FBz-99G Zaubergeran | Weapon Breaker | wave 4 Leaves the map when beaten | |
| 2 Glavil | Glavil | — | wave 4 | |
| 1 Gavil | FBz-99G Zaubergeran | Chogokin Z | start Leaves the map when beaten | |
| 2 Glavil | Glavil | — | start | |
| 3 Goram | ゴラム | — | wave 1 Leaves the map when beaten | |
| 4 Zomd | ゾムド | — | wave 1 Leaves the map when beaten | |
| 5 Sivil | Sivil | — | wave 1 |
Parts on regular enemies: Large Magazine.
💬 Battle conversations in this map (1)
These pairs have their own lines when they fight each other. “Talk command” means moving next to the unit and choosing Talk; the Secret Units page says which ones matter.
- Gamlin Kizaki vs Gavil
Let Our Song Ring Across the Stars
📜 響け銀河に オレたちの歌
Added later in the map: Defeat: Basara is destroyed.
Planet Lux route. Fire Bomber’s song against Geperuniti, and the Protodeviln’s last chance.
⏳ Don’t miss in this map
- Gavil, step 2: have Gamlin fight Gavil’s Gavigula. With step 1 done, Gavil joins with the Zaubergeran after the map.
- Sivil: have Basara fight Geperuniti, then Sivil fight Geperuniti, and keep Sivil alive. She joins after the map.
Full list across the game: Missables.
Walkthrough
- MainDefeat conditions: Battle 7, Mylene and later Basara. Waves on turns 3-5 (or at 15, 10 and 5 enemies left).
- SecretGavil, step 2: have Gamlin fight Gavil’s Gavigula. With step 1 done, Gavil joins with the Zaubergeran after the map.
- SecretSivil: have Basara fight Geperuniti, then Sivil fight Geperuniti, and keep Sivil alive. She joins after the map.
- TipGavil carries an EN Mega Chip, the Gavigula an Energy Taker.
🗺️ Battle map
Circles are units on the map at the start (red enemy, blue ally, green guest). Squares with a number are reinforcement waves. Yellow tags number the named enemies in the table below, and a yellow diamond marks an enemy that carries a part. Positions are Joshua’s version; Lim’s map is the same unless the walkthrough says otherwise. Tap the map to open it full size.
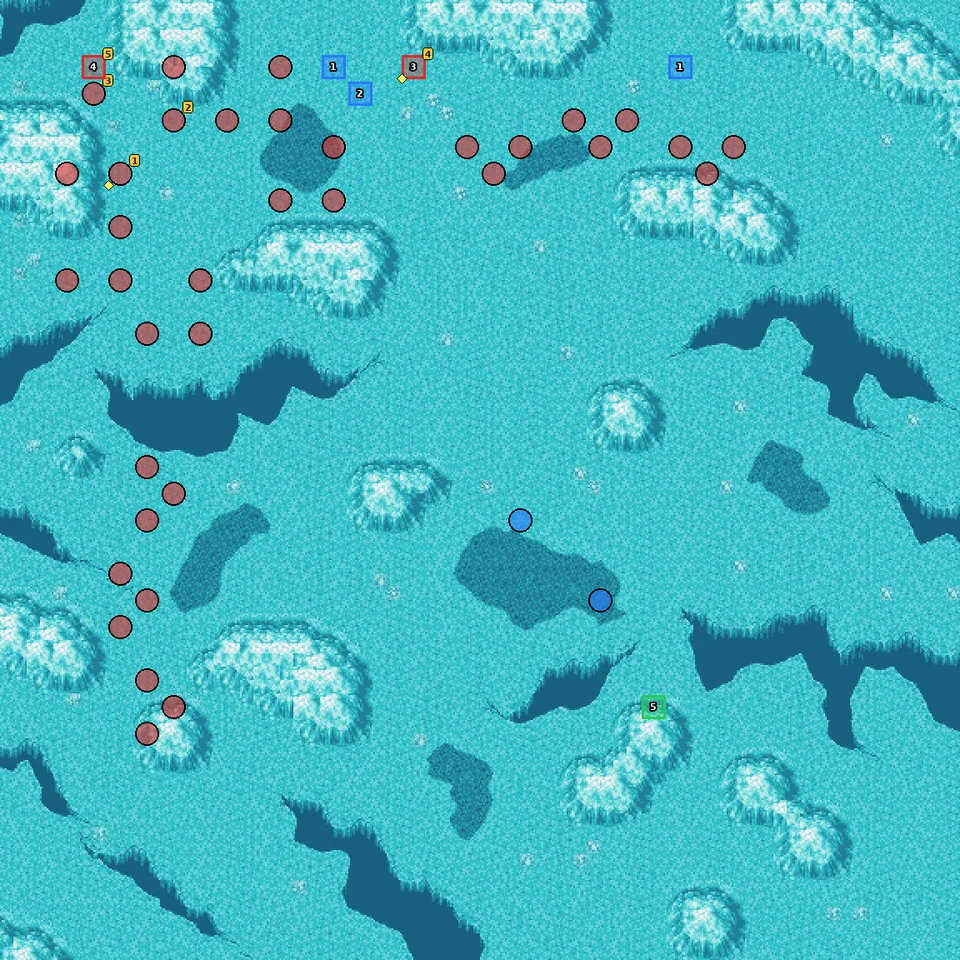
- 1Wave 1 — turn 3 or 15 or fewer enemies left
- 2Wave 2 — turn 5 or 5 or fewer enemies left
- 3Wave 3 — Gavil is defeated
- 4Wave 4 — q0B(7 1 7)
- 5Wave 5 — q0B(8 2 8)
Named enemies & parts
| Pilot | Unit | Part | Appears | |
|---|---|---|---|---|
| 1 Gavil | FBz-99G Zaubergeran | EN Mega Chip | start | |
| 2 Glavil | Glavil | — | start Retreats at 20% HP | |
| 3 Ivano Geperuniti | Gepelnitch | — | start Leaves the map when beaten | |
| 4 Gavil | Gavigula | Energy Taker | wave 3 | |
| 5 Ivano Geperuniti | Gepelnitch | — | wave 4 Leaves the map when beaten |
New units & pilots
First time each one fights on your side on this route, during the map or right after it. Purple = only if the condition in brackets is met.
- Sivil (Sivil condition met)
- Gavil (Gavil condition met)
- FBz-99G Zaubergeran (Gavil condition met)
- Battle 7 (Attack)
💬 Battle conversations in this map (3)
These pairs have their own lines when they fight each other. “Talk command” means moving next to the unit and choosing Talk; the Secret Units page says which ones matter.
- Basara Nekki vs Ivano Geperuniti
- Gamlin Kizaki vs Gavigula
- Sivil vs Ivano Geperuniti
The Meaning of “Ruin”
📜 ”破滅”の意味
Added later in the map: Defeat: Takeru is destroyed (bomb not removed).
The routes meet for the last time. The Ruina reveal what ‘Ruin’ really means.
Walkthrough
- MainDefeat conditions: your battleship and Treize. On turn 2 (or 10 enemies left) the next phase starts.
- MainThen you sortie: Ignis, Umbra and Glacies or Ventus arrive. Takeru is a defeat condition unless you removed the bomb.
- TipEveryone who split off at the last route choice comes back before this map, including Rose (Zeelon), Gavil and Sivil when you got them.
🗺️ Battle map
Circles are units on the map at the start (red enemy, blue ally, green guest). Squares with a number are reinforcement waves. Yellow tags number the named enemies in the table below, and a yellow diamond marks an enemy that carries a part. Positions are Joshua’s version; Lim’s map is the same unless the walkthrough says otherwise. Tap the map to open it full size.
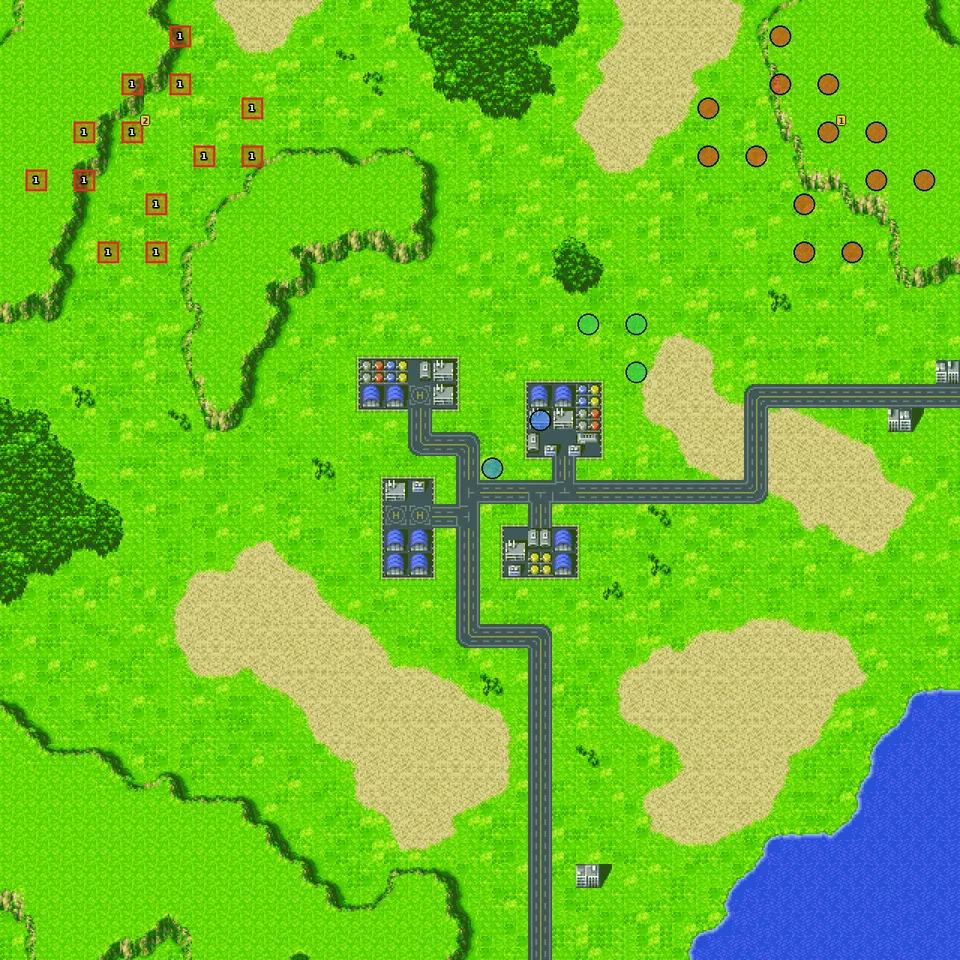
- 1Wave 1 — 10 or fewer enemies left
Named enemies & parts
| Pilot | Unit | Part | Appears | |
|---|---|---|---|---|
| 1 Ignis | Impetus | — | start Leaves the map when beaten | |
| 2 Umbra | Priscus Nox | — | wave 1 Leaves the map when beaten |
New units & pilots
First time each one fights on your side on this route, during the map or right after it. Purple = only if the condition in brackets is met.
- Milia Fallyna Jenius (Gishin Empire route)
- VF-22S Sturmvogel II F (Gishin Empire route)
- Rose (Planet Lux route, Rose was talked to)
- Zeelon (Planet Lux route, Rose was talked to)
💬 Battle conversations in this map (5)
These pairs have their own lines when they fight each other. “Talk command” means moving next to the unit and choosing Talk; the Secret Units page says which ones matter.
- your hero vs Ignis
- Tetsuya Tsurugi vs Ignis
- Koji Kabuto vs Ignis
- Treize Khushrenada vs Ignis
- Char Aznable vs Umbra
Crisis Point
📜 クライシス・ポイント
Part 1
Added later in the map: Defeat: ,; Defeat: 7 turns pass.
At the Crisis Point the Ruina and Schwarzwald make their move.
Part 2
Added later in the map: Defeat: 21 turns pass; Defeat: 28 turns pass; Victory: All allies retreat; Defeat: An ally is destroyed; Defeat: 7 turns pass after all areas are reached.
Walkthrough
- MainPart 1: Schwarzwald (Mummy, Skill +10) returns in the Big Duo (Emergency Rations); Aquila joins later. Wipe them out.
- MainPart 2: your hero or sibling (or partner) must reach four target areas in turn. Each one has a turn limit (7, 14, 21 and 28 turns). Then everyone must retreat from the map within 7 turns; any ally lost is a Game Over.
- TipSeven Super Repair Kits are on regular enemies here. Use them before the final stage.
🗺️ Battle map, part 1
Circles are units on the map at the start (red enemy, blue ally, green guest). Squares with a number are reinforcement waves. Yellow tags number the named enemies in the table below, and a yellow diamond marks an enemy that carries a part. Positions are Joshua’s version; Lim’s map is the same unless the walkthrough says otherwise. Tap the map to open it full size.
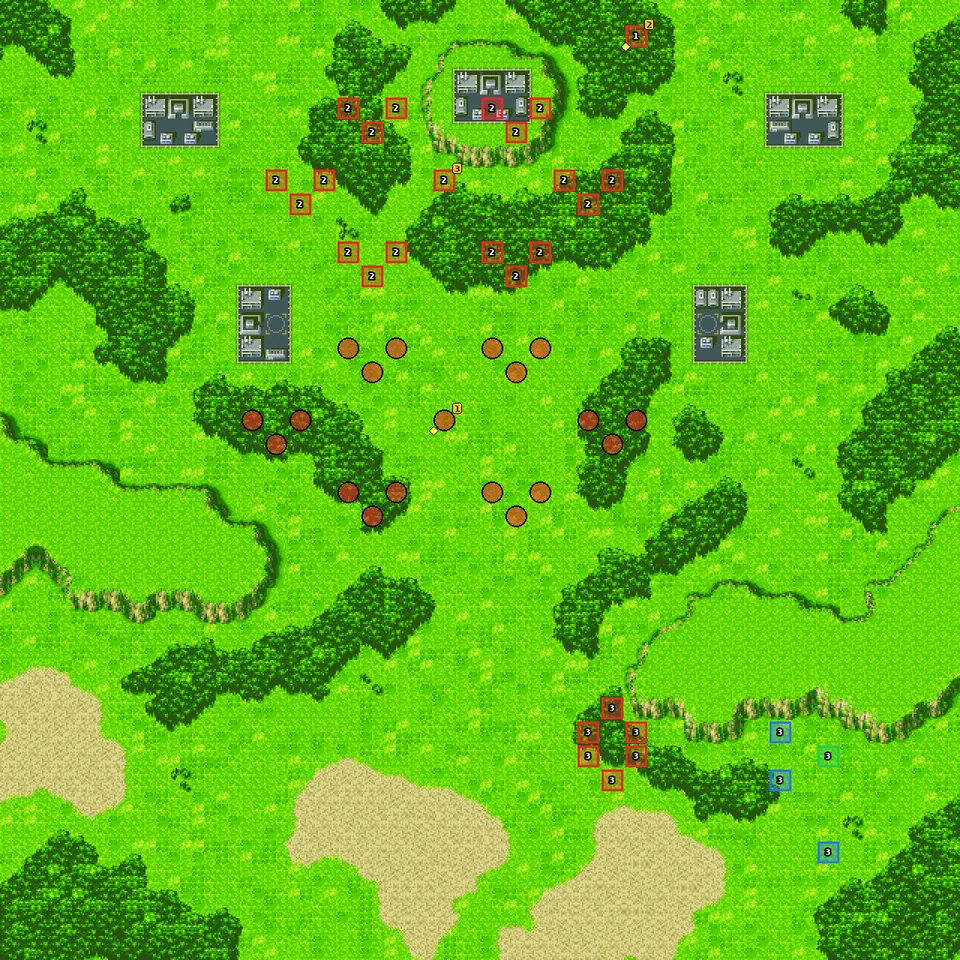
- 1Wave 1 — Schwarzwald is defeated
- 2Wave 2 — 5 or fewer enemies left
- 3Wave 3 — all enemies defeated
🗺️ Battle map, part 2
Circles are units on the map at the start (red enemy, blue ally, green guest). Squares with a number are reinforcement waves. Yellow tags number the named enemies in the table below, and a yellow diamond marks an enemy that carries a part. Positions are Joshua’s version; Lim’s map is the same unless the walkthrough says otherwise. Tap the map to open it full size.
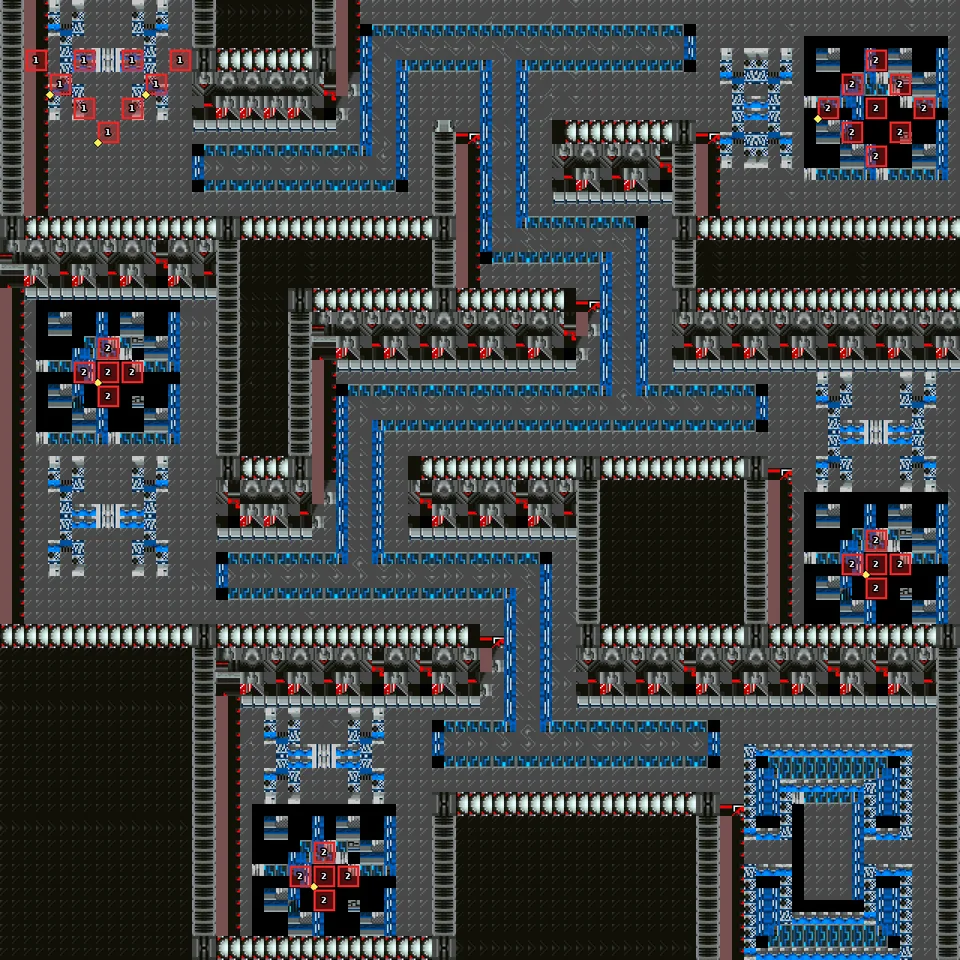
- 1Wave 1 — your hero reaches the target area or your sibling reaches the target area
- 2Wave 2 — 5 or fewer enemies left
Named enemies & parts
| Pilot | Unit | Part | Appears | |
|---|---|---|---|---|
| 1 Schwarzwald | Mummy | Skill +10 | start Leaves the map when beaten | |
| 2 Schwarzwald | Big Duo | Emergency Rations | wave 1 Leaves the map when beaten | |
| 3 Aquila | Fortis Ala | — | wave 2 Leaves the map when beaten |
Parts on regular enemies: Super Repair Kit ×7.
Desire
📜 デザイア
Part 1
The final stage. Perfectio, and the meaning of everything Joshua and Lim have fought for.
Part 2
Added later in the map: Victory: Perfectio is destroyed.
Walkthrough
- MainPart 1: Ignis and Aquila (each with a Super Repair Kit). Wipe them out.
- MainPart 2: Umbra and Contagio, then Perfectio. Victory switches to destroy Perfectio. Your hero, your sibling or partner, and Treize must survive; Takeru too unless you removed the bomb.
- TipThe epilogue changes with your first route (Earth or space), your partner, and the secrets you got (Katejina/Shakti, Glacies or Ventus).
🗺️ Battle map, part 1
Circles are units on the map at the start (red enemy, blue ally, green guest). Squares with a number are reinforcement waves. Yellow tags number the named enemies in the table below, and a yellow diamond marks an enemy that carries a part. Positions are Joshua’s version; Lim’s map is the same unless the walkthrough says otherwise. Tap the map to open it full size.
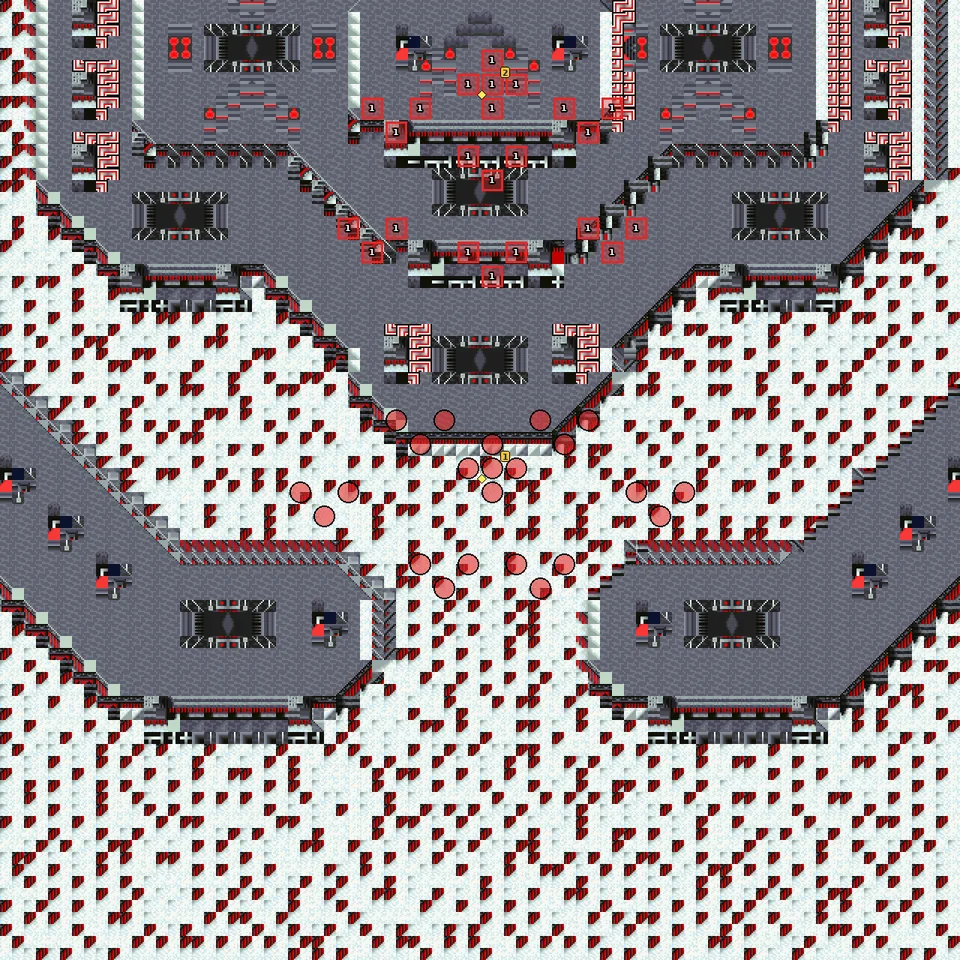
- 1Wave 1 — all enemies defeated
🗺️ Battle map, part 2
Circles are units on the map at the start (red enemy, blue ally, green guest). Squares with a number are reinforcement waves. Yellow tags number the named enemies in the table below, and a yellow diamond marks an enemy that carries a part. Positions are Joshua’s version; Lim’s map is the same unless the walkthrough says otherwise. Tap the map to open it full size.
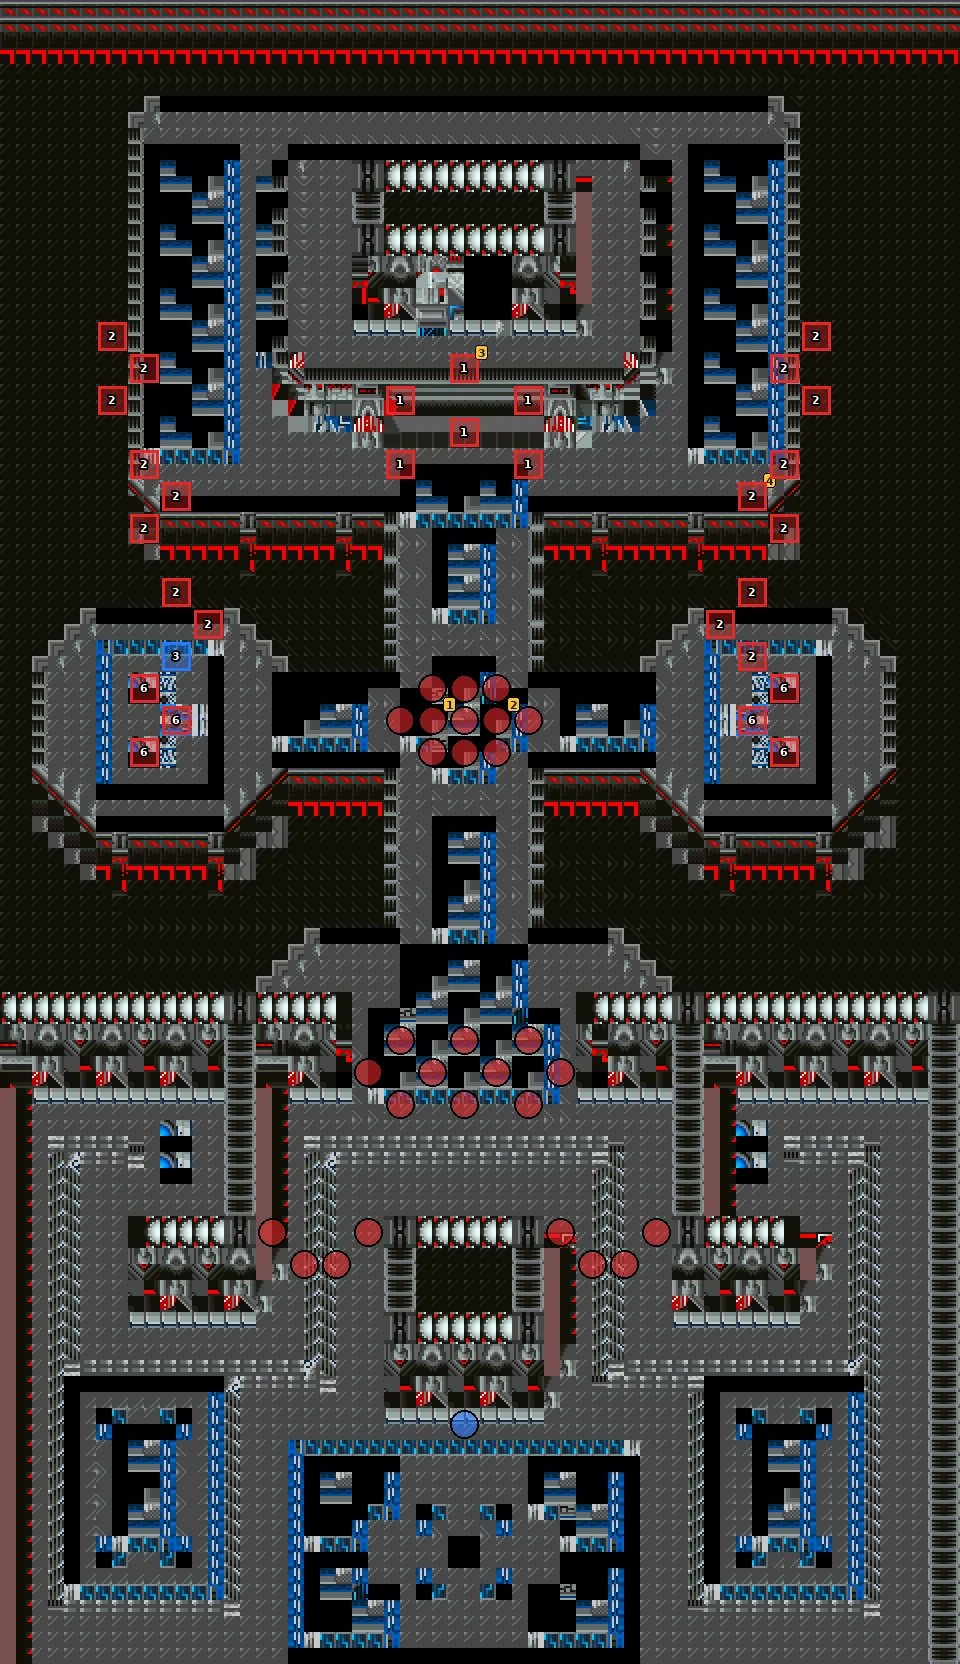
- 1Wave 1 — Umbra is defeated or Contagio is defeated
- 2Wave 2 — Perfectio is defeated
- 3Wave 3 — Perfectio is defeated
- 4Wave 4 — 5 or fewer enemies left
- 5Wave 5 — 5 or fewer enemies left
- 6Wave 6 — 5 or fewer enemies left
Named enemies & parts
| Pilot | Unit | Part | Appears | |
|---|---|---|---|---|
| 1 Ignis | Impetus | Super Repair Kit | start Leaves the map when beaten | |
| 2 Aquila | Fortis Ala | Super Repair Kit | wave 1 Leaves the map when beaten | |
| 1 Umbra | Priscus Nox | — | start Leaves the map when beaten | |
| 2 Contagio | Violaceum | — | start Leaves the map when beaten | |
| 3 Perfectio | Fatum | — | wave 1 Leaves the map when beaten | |
| 4 Perfectio | Fatum | — | wave 2 Leaves the map when beaten |