
GAME TRANSLATE · GBA GUIDE
Super Robot Taisen R
Complete Walkthrough
All 37 stages on all ten branches, with annotated battle maps, every boss part, every secret unit and a warning before anything becomes missable.
Nothing on this page matches your search. Try a shorter word, or clear the box.
Before you start
💿 The patch
This guide uses the names from our English patch: Raul and Fiona Grayden, Laaz and Mizuho, the Excellence and its Frames, and the official English names of every series. Search the page for whatever the game just showed you.
👤 Raul or Fiona
At the start you pick the hero. The story is the same, but many lines change, and the final Excellence differs: Raul gets the Excellence Lightning, Fiona the Excellence Eternal (stage 32).
🔀 Routes
There are 37 stages and 51 scenarios. You choose five times; each choice is a two-option menu at the end of a map. Two choices matter for secrets: stage 1 (Nadesico or Ra Cailum) and stage 21 (only the Colony Drop route has the Ple and Febral checks).
📜 Checked against the game
Every condition here was read from the game’s event script while we translated it: who must shoot down whom, kill counts, turn limits and flags. Where the old GameFAQs guides disagree, the Secret Units page says so.
Route chart
Five times the story asks you where to go next. Each split lasts two stages (five at the start, three at the end), then both groups meet again. The table links to every scenario; the route you pick changes your units, the parts you find and some secrets.
Splits: after stage 1 (Nadesico B / Ra Cailum, stages 2-6), after 12 (Nadesico / Freeden, 13-14), after 15 (Fort Severn / GEAR HQ, 16-17), after 21 (Vega Rescue / Colony Drop, 22-23), after 28 (GEAR HQ / Space, 29-31).
Game systems in one minute
⚙️ The Excellence
Your hero’s mech changes Frames: Striker (melee), Gunner (long range), Cosmodriver (space), Argent Fighter / Head (the base parts), and later the Flyer (air, stage 11) and the Diver (water, stages 13-15). Frames can be swapped in the intermission (Refit) and on the map with Purge Frame.
🧠 Spirit commands
Pilots spend SP on spirits such as Focus (+30% hit and evade for a turn). They are the main tool for hitting bosses hard enough to stop a retreat.
🤝 Support Attack / Defense
Units standing next to each other can join attacks or block for each other. Turn it on or off in the battle forecast (S.Atk / S.Def).
🏃 Retreating bosses
Many named enemies leave the map when their HP falls under a set line, and they take their part with them. To get the part, hit them with an attack strong enough to finish them from above that line (or chain a support attack in the same exchange).
🎯 Kills matter
Kill counts unlock two secret units: Jamil needs 20 by the end of stage 22 (Colony Drop route) for the Febral, and Tsukumo 10 by the end of stage 31 for the Alstroemeria.
🎬 Battle animations
The forecast screen has an Anim toggle: ON plays the full animation, OFF shows the quick map version. Both are translated.
Trial Weapon
📜 トライアル・ウェポン
Added later in the map: Defeat: Any allied warship destroyed.
A weapons test on the Moon turns into a real fight when unknown drones attack the Excellence. Hold out alone until help arrives.
Walkthrough
- MainYou start with only the Excellence. It can swap Frames each turn (Striker, Gunner, Cosmodriver and the Argent parts), so pick the Frame that fits the range of the nearest enemy.
- TipHelp arrives on turn 3, or as soon as you clear the first drones: the Nadesico B with Saburota, and the Ra Cailum with Amuro and Kayra. A second drone wave comes with them.
- MainAfter the battle you choose who protects you. Nadesico B leads to the Nadesico B route (stages 2-6), Ra Cailum to the Ra Cailum route. This choice also changes two secret units much later, see the warning below.
- WarningRoute choice matters at stage 31: the Nadesico B route gives the Black Sarena (High Mobility), the Ra Cailum route gives the normal Black Sarena plus both Mass Production ν Gundams. It also decides which epilogue you see.
🗺️ Battle map
Circles are units on the map at the start (red enemy, blue ally, green guest). Squares with a number are reinforcement waves. Yellow tags number the named enemies in the table below, and a yellow diamond marks a unit that carries a part. Tap the map to open it full size.
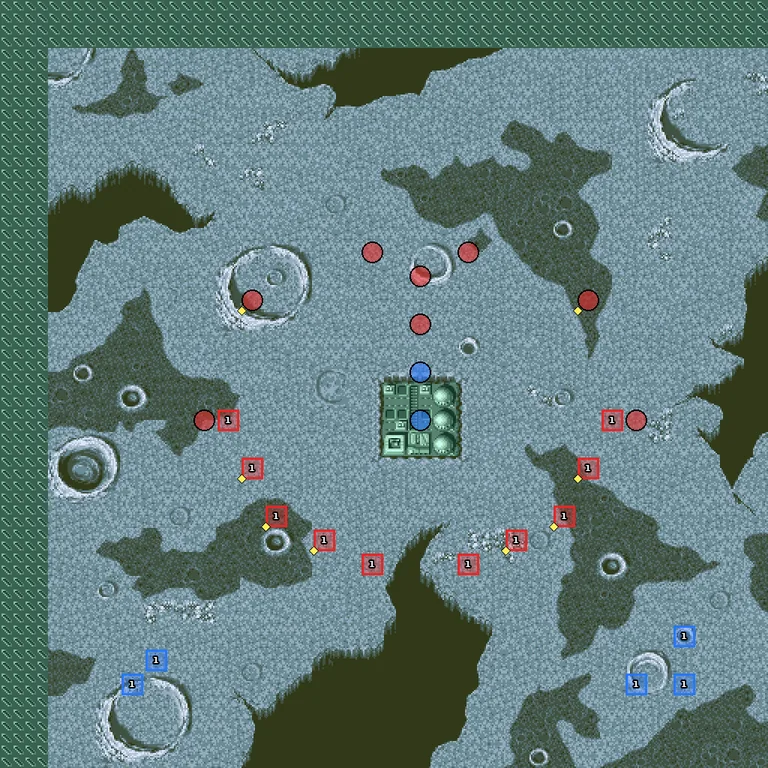
- 1Wave 1 — turn 3, all enemies defeated
Parts on regular enemies: Cartridge ×2, Propellant Tank ×2, Repair Kit ×4.
New units & pilots
First time each one fights on your side on this route, during the map or right after it. Purple = only if you meet the condition.
- Excellence Argent Fighter
- Excellence Argent Head
- Excellence Striker
- Excellence Gunner
- Excellence Cosmodriver
- Ruri Hoshino
- Nadesico B
- Saburota Takasugi
- Super Aestivalis (Saburota)
- Bright Noa
- Ra Cailum
- Amuro Ray
- Re-GZ (BWS)
- Kayra Su
- Jegan
The Martian Successors / Char’s Counterattack
📜 火星の後継者 / 逆襲のシャア
Nadesico B route: The Martian Successors
Added later in the map: Defeat: Akito’s unit destroyed.
The Martian Successors rise up and Ruri’s Nadesico B is caught in the middle. Akito, now in the Black Sarena, shows up with his own agenda.
⏳ Don’t miss in this map
- Part on a retreating enemy: Hokushin carries Booster details
Full list across the game: Missables.
Walkthrough
- MainClear the Successors’ Aestivalis and Stern Kugel. Keep the Nadesico B safe behind your line, it is a defeat condition.
- TipWhen the first wave is gone, Akito (Black Sarena High Mobility) and Hokushin’s squad arrive. Akito’s unit is a defeat condition from that point, so don’t throw him into the Six alone.
- WarningHokushin retreats when his HP gets low. To get his Booster, hit him hard enough to finish him from above his retreat line in one attack.
🗺️ Battle map
Circles are units on the map at the start (red enemy, blue ally, green guest). Squares with a number are reinforcement waves. Yellow tags number the named enemies in the table below, and a yellow diamond marks a unit that carries a part. Tap the map to open it full size.
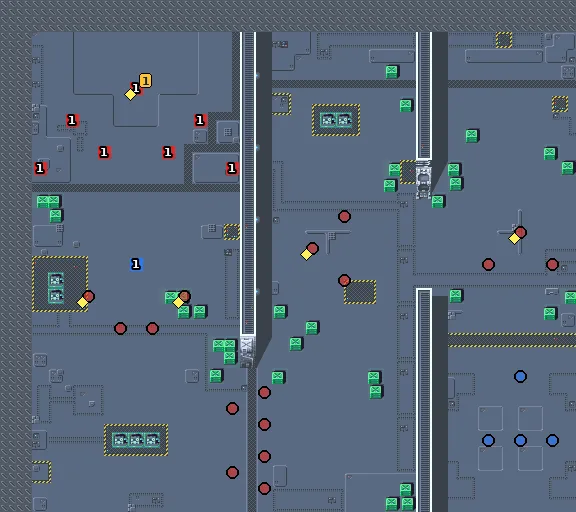
- 1Wave 1 — all enemies defeated
Named enemies & parts
| Pilot | Unit | Part | Appears | |
|---|---|---|---|---|
| 1 Hokushin | Yatenkou | Booster | wave 1: all enemies defeated Retreats when damaged |
Parts on regular enemies: Cartridge, Propellant Tank, Repair Kit ×2.
New units & pilots
First time each one fights on your side on this route, during the map or right after it. Purple = only if you meet the condition.
- Ryoko Subaru
- Aestivalis Custom (Ryoko)
- Akito Tenkawa
- Black Sarena (High Mobility)
💬 Battle conversations in this map (2)
These pairs have their own lines when they fight each other. “Talks to” is a Talk command next to the unit; none of them is needed to win.
- Akito Tenkawa vs Hokushin
- Saburota Takasugi vs Hokushin
Ra Cailum route: Char’s Counterattack
Char’s Neo Zeon is pushing Fifth Luna towards Earth, and Londo Bell has only a handful of mobile suits to stop it.
⏳ Don’t miss in this map
- Part on a retreating enemy: Char Aznable carries Booster details
Full list across the game: Missables.
Walkthrough
- MainVictory: wipe out the enemy, or bring the Ra Cailum to the marked point within 7 turns to demolish Fifth Luna. Reaching the point is the better result.
- WarningIf turn 8 starts before the Ra Cailum gets there, Fifth Luna falls (the script sets the failure flag at the start of turn 8). The story continues, but in the next two stages Kayra flies a Re-GZ instead of the Mass Production ν Gundam (Incom).
- TipChar (Sazabi) arrives on turn 3. He retreats when damaged; he carries a Booster. You don’t need to beat him, only to reach the point.
🗺️ Battle map
Circles are units on the map at the start (red enemy, blue ally, green guest). Squares with a number are reinforcement waves. Yellow tags number the named enemies in the table below, and a yellow diamond marks a unit that carries a part. Tap the map to open it full size.
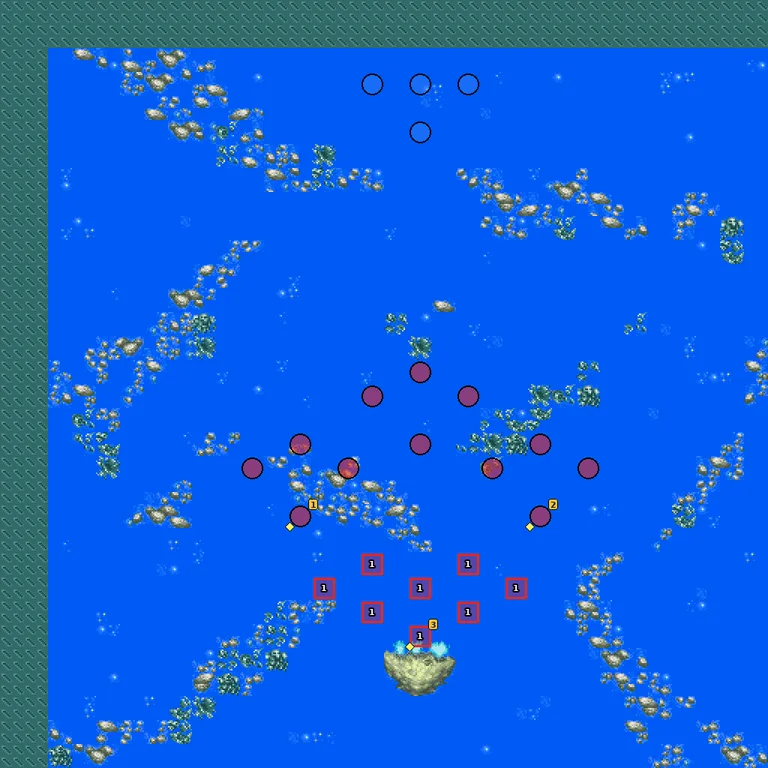
- 1Wave 1 — turn 3
Named enemies & parts
| Pilot | Unit | Part | Appears | |
|---|---|---|---|---|
| 1 Gyunei Guss | Jagd Doga | Propellant Tank | start | |
| 2 Rezin Schnyder | Geara Doga | Cartridge | start | |
| 3 Char Aznable | Sazabi | Booster | wave 1: turn 3 Retreats when damaged |
💬 Battle conversations in this map (2)
These pairs have their own lines when they fight each other. “Talks to” is a Talk command next to the unit; none of them is needed to win.
- Amuro Ray vs Char Aznable
- Amuro Ray vs Gyunei Guss
Recipe for Reunion / ν Gundam
📜 再会のレシピ / Νガンダム
Nadesico B route: Recipe for Reunion
Ruri’s crew regroups with old friends from the original Nadesico while the Successors keep up the pressure.
⏳ Don’t miss in this map
- Part on a retreating enemy: Killer the Butcher carries Hi-Perf. Radar details
Full list across the game: Missables.
Walkthrough
- MainGenichiro (Alstroemeria) and Akito fight on your side here, together with Ryoko, Hikaru and Izumi in their Aestivalis Customs.
- TipHokushin is alone and does not retreat this time. Gang up on him early: he carries a Magnet Coating.
- WarningWhen the field is cleared (or on turn 7), Killer the Butcher appears with Gaizok Mecha Boosts. He retreats when hurt and carries a Hi-Perf. Radar.
🗺️ Battle map
Circles are units on the map at the start (red enemy, blue ally, green guest). Squares with a number are reinforcement waves. Yellow tags number the named enemies in the table below, and a yellow diamond marks a unit that carries a part. Tap the map to open it full size.
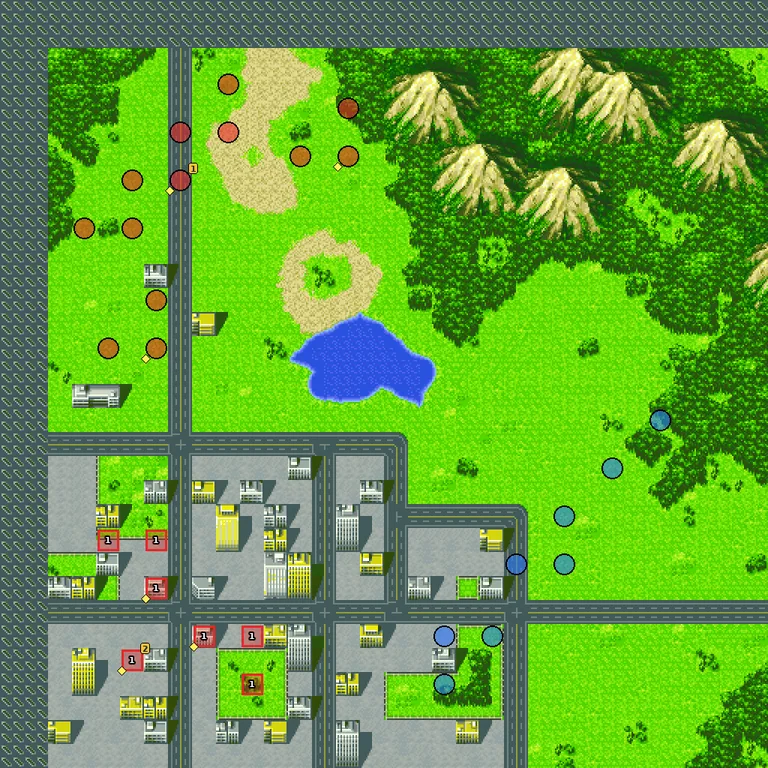
- 1Wave 1 — turn 7, all enemies defeated
Named enemies & parts
| Pilot | Unit | Part | Appears | |
|---|---|---|---|---|
| 1 Hokushin | Yatenkou | Magnet Coating | start | |
| 2 Killer the Butcher | Bandock | Hi-Perf. Radar | wave 1: turn 7, all enemies defeated Retreats when damaged |
Parts on regular enemies: Propellant Tank ×2, Repair Kit ×2.
New units & pilots
First time each one fights on your side on this route, during the map or right after it. Purple = only if you meet the condition.
- Genichiro Tsukiomi
- Alstroemeria
- Hikaru Amano
- Aestivalis Custom (Hikaru)
- Izumi Maki
- Aestivalis Custom (Izumi)
- Nadesico C
💬 Battle conversations in this map (2)
These pairs have their own lines when they fight each other. “Talks to” is a Talk command next to the unit; none of them is needed to win.
- Akito Tenkawa vs Hokushin
- Genichiro Tsukiomi vs Hokushin
Ra Cailum route: ν Gundam
Amuro finally gets the ν Gundam, and Quess runs off to join Char.
⏳ Don’t miss in this map
- Part on a retreating enemy: Quess Paraya carries Hi-Perf. Radar details
- Part on a retreating enemy: Killer the Butcher carries Magnet Coating details
Full list across the game: Missables.
Walkthrough
- MainA straight fight against Gyunei, Rezin and Quess. Quess retreats when hit hard or when 5 enemies are left, which is normal here.
- TipIf you stopped Fifth Luna in stage 2, Kayra flies the Mass Production ν Gundam (Incom) here and in stage 4.
- WarningOn turn 5, or when the field is clear, Killer the Butcher appears with Mecha Boosts. He retreats when damaged.
🗺️ Battle map
Circles are units on the map at the start (red enemy, blue ally, green guest). Squares with a number are reinforcement waves. Yellow tags number the named enemies in the table below, and a yellow diamond marks a unit that carries a part. Tap the map to open it full size.
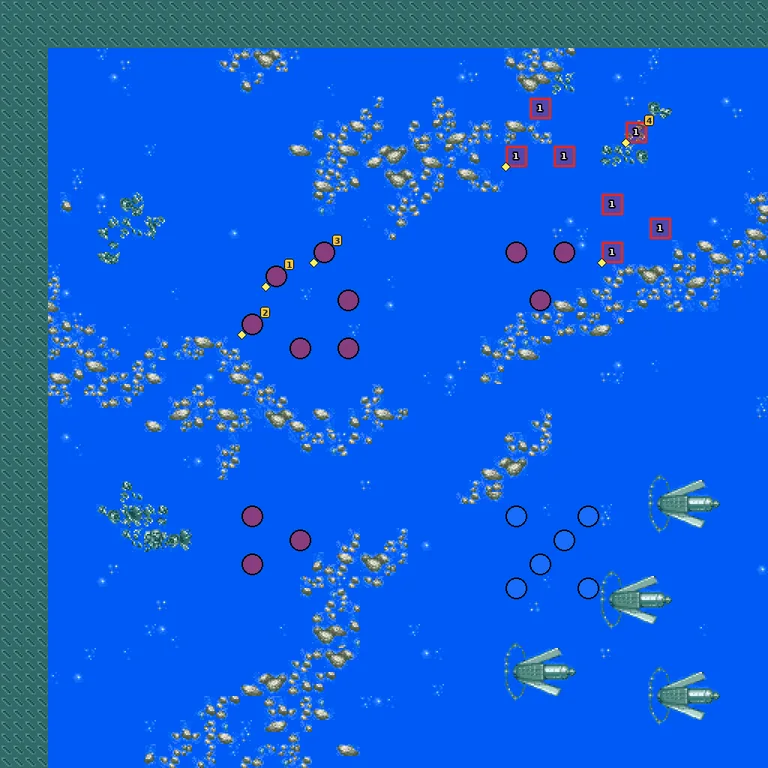
- 1Wave 1 — all enemies defeated, turn 5
Named enemies & parts
| Pilot | Unit | Part | Appears | |
|---|---|---|---|---|
| 1 Rezin Schnyder | Geara Doga | Repair Kit | start | |
| 2 Gyunei Guss | Jagd Doga | Propellant Tank | start | |
| 3 Quess Paraya | Jagd Doga | Hi-Perf. Radar | start Retreats when damaged | |
| 4 Killer the Butcher | Bandock | Magnet Coating | wave 1: all enemies defeated, turn 5 Retreats when damaged |
Parts on regular enemies: Propellant Tank, Repair Kit.
New units & pilots
First time each one fights on your side on this route, during the map or right after it. Purple = only if you meet the condition.
- ν Gundam
- Mass Production ν Gundam (Incom)
- Chan Agi
- Hathaway Noa
- Jegan
💬 Battle conversations in this map (3)
These pairs have their own lines when they fight each other. “Talks to” is a Talk command next to the unit; none of them is needed to win.
- Quess Paraya vs Hathaway Noa
- Gyunei Guss vs Amuro Ray
- Amuro Ray vs Quess Paraya
The Worst Showdown / The Worst Ending
📜 最悪の決戦 / 最悪の結末
Nadesico B route: The Worst Showdown
The final fight with Hokushin, and a Boson Jump accident throws the Excellence’s crew somewhere they never expected.
Walkthrough
- MainDefend the Nadesico C and clear the field. Your hero’s unit is a defeat condition. Hokushin carries a Chobham Armor; let Akito fight him for their last talk.
- WarningClearing the field brings a second Successor wave and Duminas. You can’t win against Duminas here: this is where the time accident happens.
- TipAfter this map the time-flow accident happens. Most of your current team leaves the roster, and you meet the TV-era Nadesico crew instead (Yurika, Akito, Gai and the Aestivalis pilots join after the map).
- TipThe Black Sarena (High Mobility) leaves now and comes back for good at stage 31.
🗺️ Battle map
Circles are units on the map at the start (red enemy, blue ally, green guest). Squares with a number are reinforcement waves. Yellow tags number the named enemies in the table below, and a yellow diamond marks a unit that carries a part. Tap the map to open it full size.
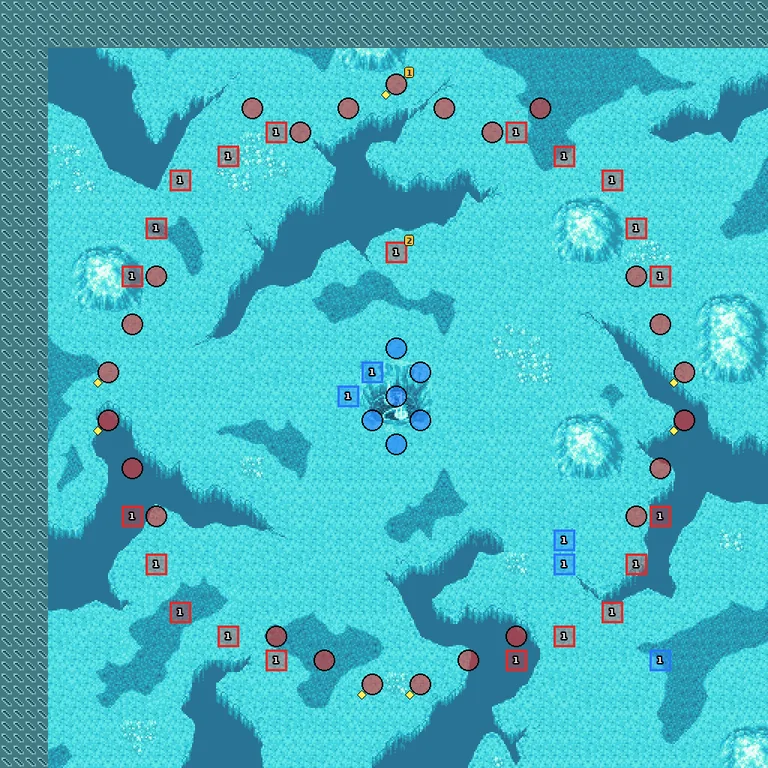
- 1Wave 1 — all enemies defeated
Named enemies & parts
| Pilot | Unit | Part | Appears | |
|---|---|---|---|---|
| 1 Hokushin | Yatenkou | Chobham Armor | start | |
| 2 Duminas | Duminas Proton | — | wave 1: all enemies defeated |
Parts on regular enemies: Cartridge ×2, Propellant Tank ×2, Repair Kit ×2.
New units & pilots
First time each one fights on your side on this route, during the map or right after it. Purple = only if you meet the condition.
- Banjo Haran
- Daifighter
- Yurika Misumaru
- Nadesico
- Akito Tenkawa
- Aestivalis Aerial Frame (Akito)
- Aestivalis 0G Frame (Akito)
- Aestivalis Artillery Frame (Akito)
- Gai Daigoji
- Aestivalis Aerial Frame (Gai)
- Aestivalis 0G Frame (Gai)
- Aestivalis Artillery Frame (Gai)
- Ryoko Subaru
- Aestivalis Aerial Frame (Ryoko)
- Aestivalis 0G Frame (Ryoko)
- Aestivalis Artillery Frame (Ryoko)
- Hikaru Amano
- Aestivalis Aerial Frame (Hikaru)
- Aestivalis 0G Frame (Hikaru)
- Aestivalis Artillery Frame (Hikaru)
- Izumi Maki
- Aestivalis Aerial Frame (Izumi)
- Aestivalis 0G Frame (Izumi)
- Aestivalis Artillery Frame (Izumi)
💬 Battle conversations in this map (1)
These pairs have their own lines when they fight each other. “Talks to” is a Talk command next to the unit; none of them is needed to win.
- Akito Tenkawa vs Hokushin
Ra Cailum route: The Worst Ending
The Axis drop. Char’s last stand, Quess in the Alpha Azieru, and a time accident that sends the Excellence into the past.
⏳ Don’t miss in this map
- Gundam Mk-III: let Chan Agi shoot down Quess, with Hathaway still on the map. Hathaway then shoots Chan, and that event unlocks the Mk-III for Four in stage 20. Save before you try it.
Full list across the game: Missables.
Walkthrough
- MainVictory: defeat all enemies, or bring the Ra Cailum to the marked point to blow up Axis. Your hero’s unit and the Ra Cailum must survive.
- SecretGundam Mk-III: let Chan Agi shoot down Quess, with Hathaway still on the map. Hathaway then shoots Chan, and that event unlocks the Mk-III for Four in stage 20. Save before you try it.
- WarningThis is the only chance for the Mk-III. If anybody else finishes Quess, or Hathaway is gone, Four gets a Jegan instead.
- TipChar carries a Chobham Armor, Gyunei and Quess a Propellant Tank each. All three leave for good after this map.
🗺️ Battle map
Circles are units on the map at the start (red enemy, blue ally, green guest). Squares with a number are reinforcement waves. Yellow tags number the named enemies in the table below, and a yellow diamond marks a unit that carries a part. Tap the map to open it full size.
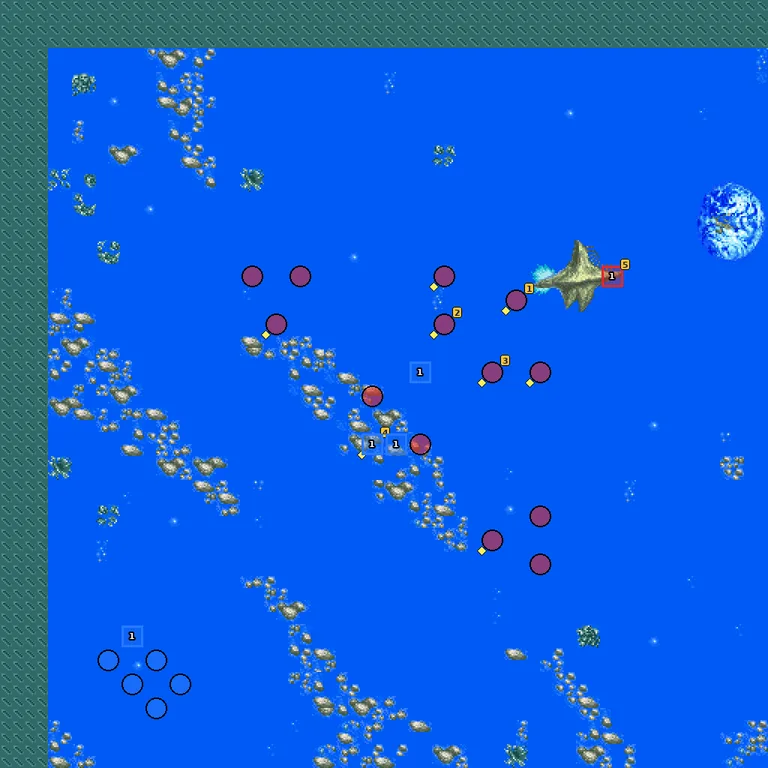
- 1Wave 1 — a story event
Named enemies & parts
| Pilot | Unit | Part | Appears | |
|---|---|---|---|---|
| 1 Char Aznable | Sazabi | Chobham Armor | start | |
| 2 Gyunei Guss | Jagd Doga | Propellant Tank | start | |
| 3 Quess Paraya | α Azieru | Propellant Tank | start | |
| 4 Rezin Schnyder | Geara Doga | Repair Kit | start | |
| 5 Duminas | Duminas Proton | — | wave 1: a story event |
Parts on regular enemies: Cartridge ×2, Propellant Tank, Repair Kit.
💬 Battle conversations in this map (5)
These pairs have their own lines when they fight each other. “Talks to” is a Talk command next to the unit; none of them is needed to win.
- Amuro Ray vs Quess Paraya
- Quess Paraya vs Hathaway Noa
- Amuro Ray vs Char Aznable
- Amuro Ray talks to Char Aznable
- your hero vs Char Aznable
Like a “Fateful Choice” / My Power, to You…
📜 『運命の選択』みたいな / あなたに、力を・・・
Nadesico B route: Like a “Fateful Choice”
Added later in the map: Victory: Nadesico reaches the Tulip.
In the past. Your heroes wake up in the era of the first Nadesico and the Jovian war, on Mars.
Walkthrough
- MainProtect the Nadesico while it takes the Martian refugees aboard (done on turn 5). Then you can win by wiping out the enemy or by bringing the Nadesico to the Tulip.
- TipClearing the Jovians brings Koros and the Meganoids.
- TipTsukumo Shiratori (Tetsujin) carries a Dual Sensor, and Koros’s Ai-Ai a Magnet Coating.
🗺️ Battle map
Circles are units on the map at the start (red enemy, blue ally, green guest). Squares with a number are reinforcement waves. Yellow tags number the named enemies in the table below, and a yellow diamond marks a unit that carries a part. Tap the map to open it full size.
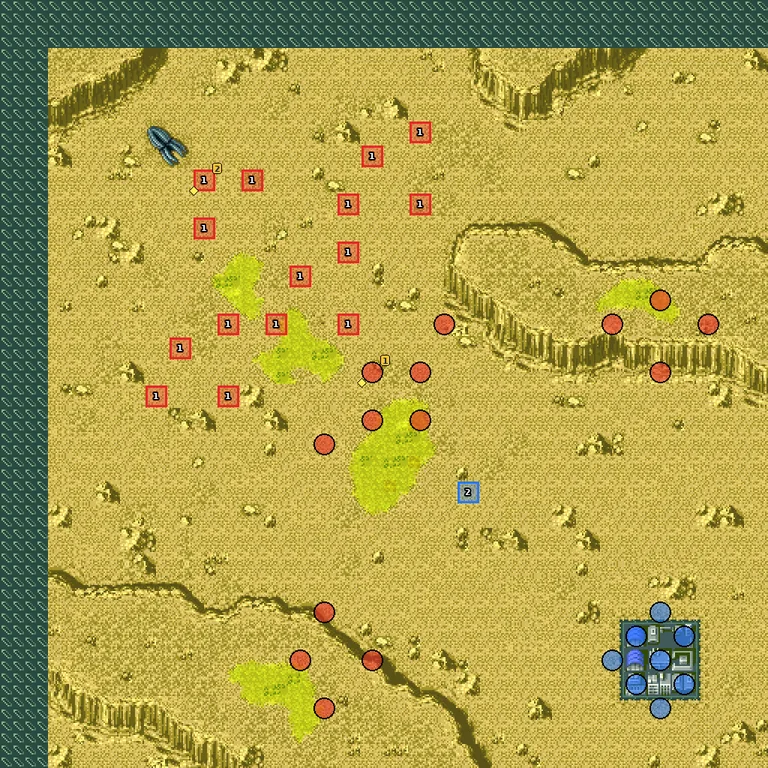
- 1Wave 1 — all enemies defeated
- 2Wave 2 — a story event
Named enemies & parts
| Pilot | Unit | Part | Appears | |
|---|---|---|---|---|
| 1 Tsukumo Shiratori | Tetsujin | Dual Sensor | start | |
| 2 Koros | Ai-Ai | Magnet Coating | wave 1: all enemies defeated |
New units & pilots
First time each one fights on your side on this route, during the map or right after it. Purple = only if you meet the condition.
- Daitarn 3
💬 Battle conversations in this map (1)
These pairs have their own lines when they fight each other. “Talks to” is a Talk command next to the unit; none of them is needed to win.
- Koros vs Banjo Haran
Ra Cailum route: My Power, to You…
In the past. The Excellence lands near the Freeden and meets Garrod, Tiffa and Jamil.
⏳ Don’t miss in this map
- Part on a retreating enemy: Shagia Frost carries Dual Sensor details
- Part on a retreating enemy: Olba Frost carries Magnet Coating details
Full list across the game: Missables.
Walkthrough
- MainGarrod’s unit is a defeat condition. Rakan (Dreissen) carries a Chobham Armor and does not retreat.
- WarningThe Frost brothers (Virsago and Ashtaron) arrive when 6 enemies are left or on turn 5, and both retreat when hurt. Shagia carries a Dual Sensor, Olba a Magnet Coating.
- TipClearing the field brings 15 Jenice. Watch out for the Grandeene MAP weapons in the first wave.
🗺️ Battle map
Circles are units on the map at the start (red enemy, blue ally, green guest). Squares with a number are reinforcement waves. Yellow tags number the named enemies in the table below, and a yellow diamond marks a unit that carries a part. Tap the map to open it full size.
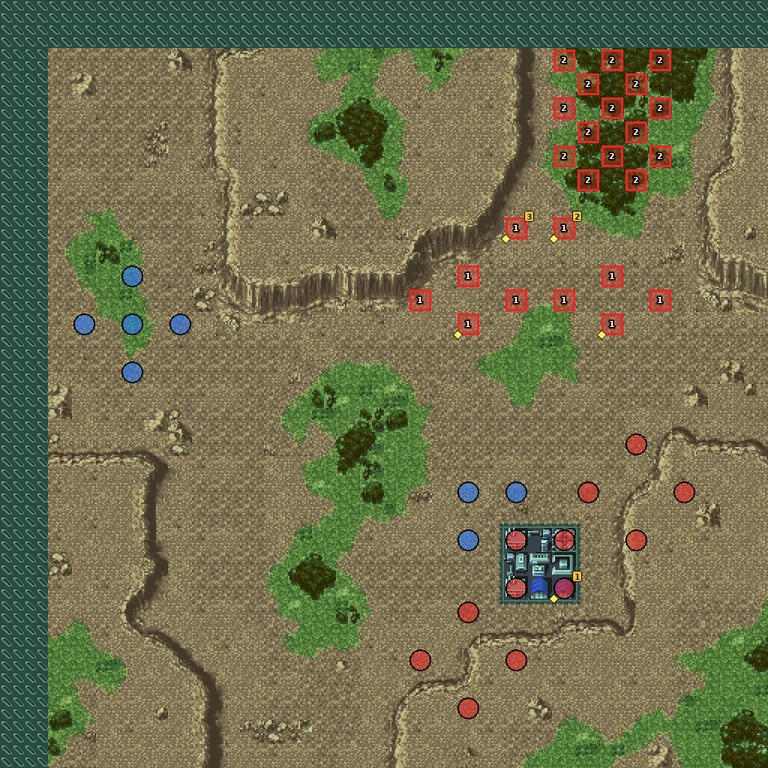
- 1Wave 1 — turn 5, 6 or fewer enemies left
- 2Wave 2 — all enemies defeated
Named enemies & parts
| Pilot | Unit | Part | Appears | |
|---|---|---|---|---|
| 1 Rakan Dahkaran | Dreissen | Chobham Armor | start | |
| 2 Shagia Frost | Gundam Virsago | Dual Sensor | wave 1: turn 5, 6 or fewer enemies left Retreats when damaged | |
| 3 Olba Frost | Gundam Ashtaron | Magnet Coating | wave 1: turn 5, 6 or fewer enemies left Retreats when damaged |
Parts on regular enemies: Cartridge, Propellant Tank.
New units & pilots
First time each one fights on your side on this route, during the map or right after it. Purple = only if you meet the condition.
- Jamil Neate
- Freeden
- Witz Sou
- Gundam Airmaster
- Roybea Loy
- Gundam Leopard
- Fa Yuiry
- Methuss
- Lucrezia Noin
- Taurus
- Garrod Ran
- Gundam X
- Amuro Ray
GEAR Fighter Dendoh / Launch!! Neo Getter Robo!
📜 GEAR戦士 電童 / 出撃!!ネオゲッターロボ!
Nadesico B route: GEAR Fighter Dendoh
Added later in the map: Defeat: Dendoh destroyed; Defeat: Unicorn Drill destroyed; Defeat: Altea next to Unicorn Drill.
Ginga and the GEAR Fighter Dendoh enter the story, and the Galfa’s Altea tries to steal a Data Weapon.
⏳ Don’t miss in this map
- Part on a retreating enemy: Altea carries Learning CP details
Full list across the game: Missables.
Walkthrough
- MainFirst beat the Jovian forces (Genichiro carries a Chobham Armor). Dendoh and the Galfa arrive when the first wave is gone.
- WarningDon’t let Altea reach the Unicorn Drill or destroy it: both are defeat conditions once it appears.
- TipAltea retreats when damaged; he carries a Learning CP. After the map the Freeden and Getter groups join, so the two routes meet again at stage 7.
🗺️ Battle map
Circles are units on the map at the start (red enemy, blue ally, green guest). Squares with a number are reinforcement waves. Yellow tags number the named enemies in the table below, and a yellow diamond marks a unit that carries a part. Tap the map to open it full size.
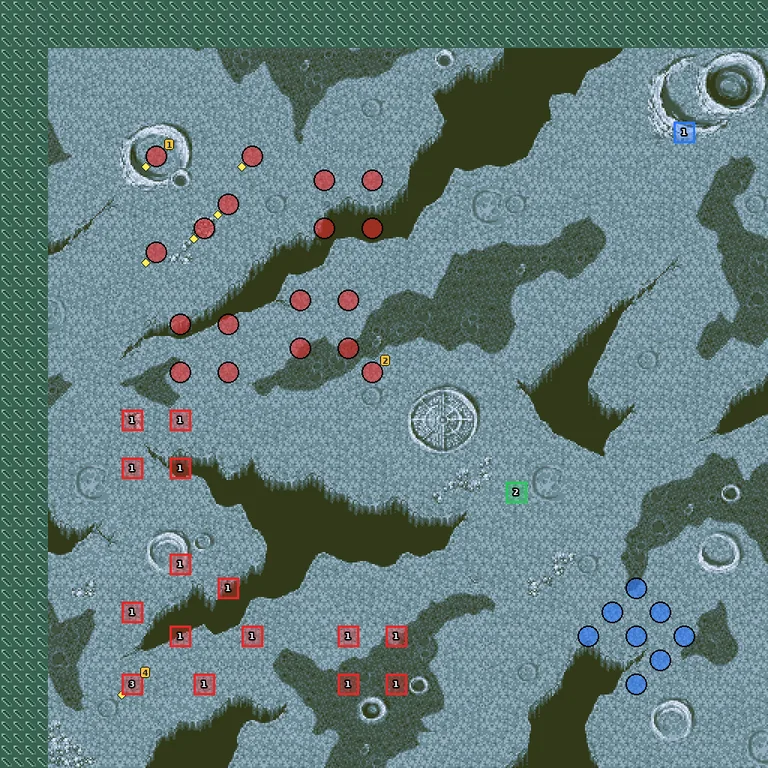
- 1Wave 1 — all enemies defeated
- 2Wave 2 — 1 turns later
- 3Wave 3 — a story event
Named enemies & parts
| Pilot | Unit | Part | Appears | |
|---|---|---|---|---|
| 1 Genichiro Tsukiomi | Majin | Chobham Armor | start | |
| 2 Tsukumo Shiratori | Tetsujin | — | start | |
| 3 Altea | Knight GEAR Ohga | Learning CP | wave 1: all enemies defeated Retreats when damaged | |
| 4 Altea | Ohga Unicorn Drill | — | wave 3: a story event Retreats when damaged |
Parts on regular enemies: Propellant Tank ×2, Repair Kit ×2.
New units & pilots
First time each one fights on your side on this route, during the map or right after it. Purple = only if you meet the condition.
- Ginga Izumo
- GEAR Fighter Dendoh
- Vega
- Walkure
- Amuro Ray
- Fa Yuiry
- Methuss
- Lucrezia Noin
- Taurus
- Garrod Ran
- Gundam X
- Jamil Neate
- Freeden
- Witz Sou
- Gundam Airmaster
- Roybea Loy
- Gundam Leopard
- Go Ichimonji
- Sho Tachibana
- Gai Daido
- Neo Getter-1
💬 Battle conversations in this map (1)
These pairs have their own lines when they fight each other. “Talks to” is a Talk command next to the unit; none of them is needed to win.
- Akito Tenkawa vs Genichiro Tsukiomi
Ra Cailum route: Launch!! Neo Getter Robo!
Added later in the map: Defeat: Allied warship destroyed.
Go Ichimonji launches the Neo Getter Robo against the Dinosaur Empire.
⏳ Don’t miss in this map
- Part on a retreating enemy: General Bat carries Learning CP details
Full list across the game: Missables.
Walkthrough
- MainNeo Getter-1 starts alone; the Freeden group arrives on turn 4 (or once the dinosaurs are gone).
- TipRakan’s Dreissen carries a Solar Panel, one of the best early parts. He does not retreat.
- WarningGeneral Bat retreats when hurt and carries a Learning CP.
🗺️ Battle map
Circles are units on the map at the start (red enemy, blue ally, green guest). Squares with a number are reinforcement waves. Yellow tags number the named enemies in the table below, and a yellow diamond marks a unit that carries a part. Tap the map to open it full size.
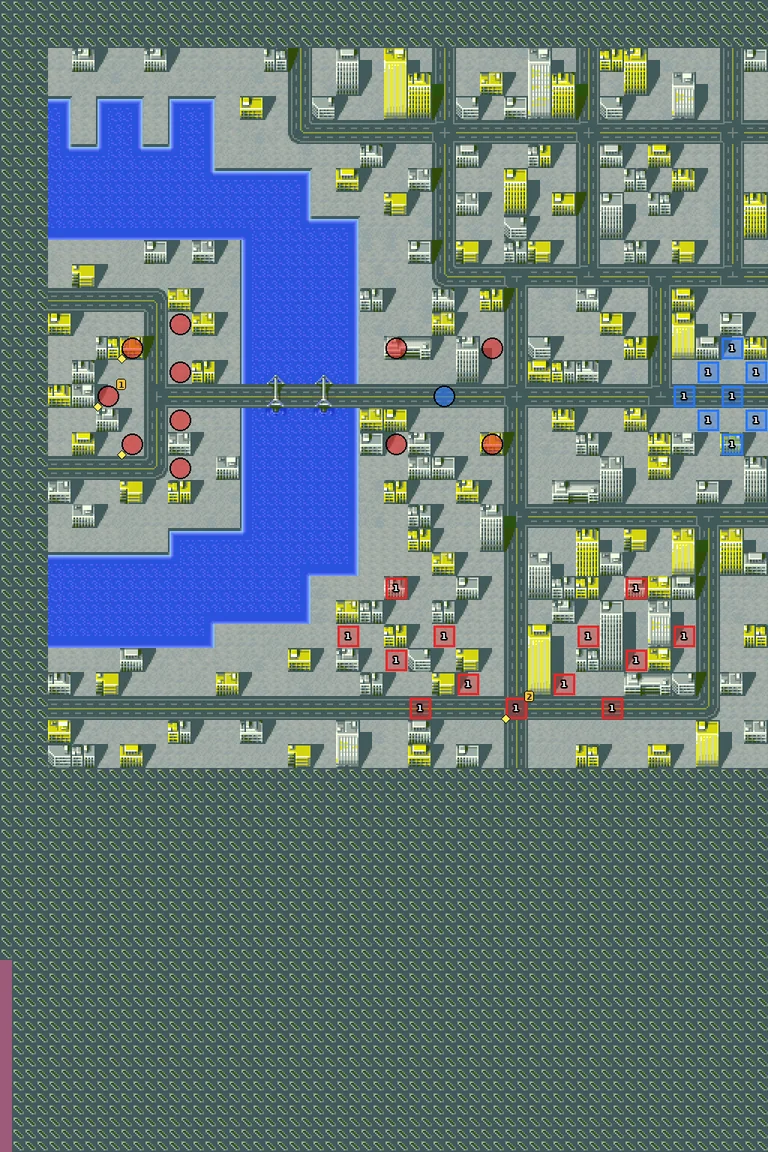
- 1Wave 1 — turn 4, all enemies defeated
Named enemies & parts
| Pilot | Unit | Part | Appears | |
|---|---|---|---|---|
| 1 General Bat | Mechasaurus Boar | Learning CP | start Retreats when damaged | |
| 2 Rakan Dahkaran | Dreissen | Solar Panel | wave 1: turn 4, all enemies defeated |
Parts on regular enemies: Cartridge, Propellant Tank.
New units & pilots
First time each one fights on your side on this route, during the map or right after it. Purple = only if you meet the condition.
- Go Ichimonji
- Neo Getter-1
- Yurika Misumaru
- Nadesico
- Akito Tenkawa
- Aestivalis Aerial Frame (Akito)
- Aestivalis 0G Frame (Akito)
- Aestivalis Artillery Frame (Akito)
- Gai Daigoji
- Aestivalis Aerial Frame (Gai)
- Aestivalis 0G Frame (Gai)
- Aestivalis Artillery Frame (Gai)
- Ryoko Subaru
- Aestivalis Aerial Frame (Ryoko)
- Aestivalis 0G Frame (Ryoko)
- Aestivalis Artillery Frame (Ryoko)
- Hikaru Amano
- Aestivalis Aerial Frame (Hikaru)
- Aestivalis 0G Frame (Hikaru)
- Aestivalis Artillery Frame (Hikaru)
- Izumi Maki
- Aestivalis Aerial Frame (Izumi)
- Aestivalis 0G Frame (Izumi)
- Aestivalis Artillery Frame (Izumi)
- Banjo Haran
- Daitarn 3
- Ginga Izumo
- Hokuto Kusanagi
- GEAR Fighter Dendoh
- Vega
- Walkure
💬 Battle conversations in this map (2)
These pairs have their own lines when they fight each other. “Talks to” is a Talk command next to the unit; none of them is needed to win.
- Amuro Ray vs Rakan Dahkaran
- Rakan Dahkaran vs Garrod Ran
Mazinger Team in Peril!!
📜 危うしマジンガーチーム!!
Both routes join. The Mykene attack the Mazinger team and Great Mazinger is in trouble.
⏳ Don’t miss in this map
- Part on a retreating enemy: Great General of Darkness carries EN Chip details
Full list across the game: Missables.
Walkthrough
- MainMazinger Z, Great Mazinger and the support units start on their own; the Freeden and Nadesico are nearby. Group up before you push.
- WarningThe Great General of Darkness retreats when hurt. He carries an EN Chip.
- TipClearing the field brings Commander Edwin (Megaborg). Let Banjo fight him for the dialogue; Edwin carries a Large Generator.
🗺️ Battle map
Circles are units on the map at the start (red enemy, blue ally, green guest). Squares with a number are reinforcement waves. Yellow tags number the named enemies in the table below, and a yellow diamond marks a unit that carries a part. Tap the map to open it full size.
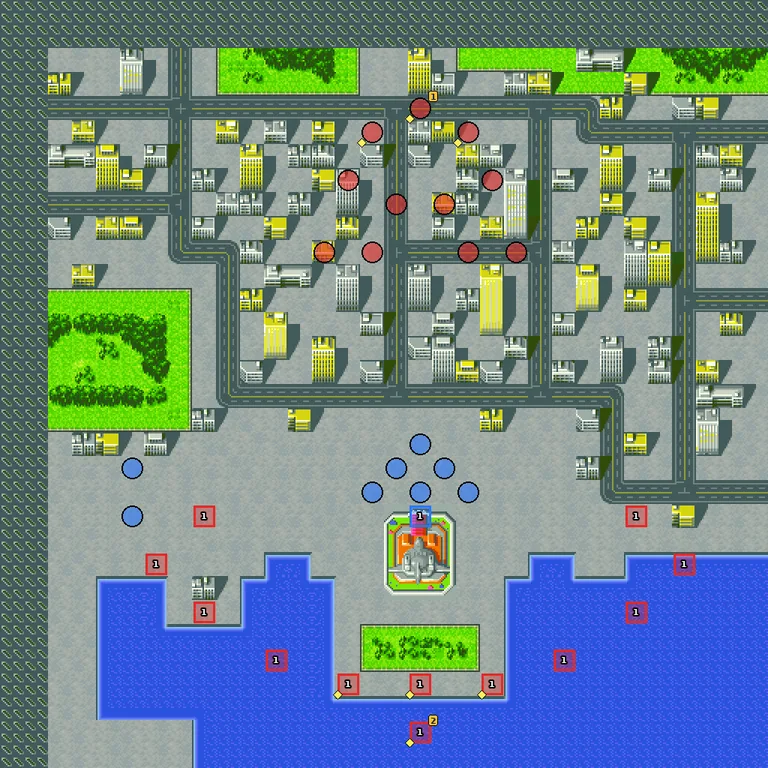
- 1Wave 1 — all enemies defeated
Named enemies & parts
| Pilot | Unit | Part | Appears | |
|---|---|---|---|---|
| 1 Great General of Darkness | Fortress Demonika | EN Chip | start Retreats when damaged | |
| 2 Commander Edwin | Megaborg Edwin | Large Generator | wave 1: all enemies defeated |
Parts on regular enemies: Cartridge, Propellant Tank ×2, Repair Kit ×2.
New units & pilots
First time each one fights on your side on this route, during the map or right after it. Purple = only if you meet the condition.
- Sayaka Yumi
- Diana A
- Jun Hono
- Venus A
- Boss
- Boss Borot
- Koji Kabuto
- Mazinger Z
- Tetsuya Tsurugi
- Great Mazinger
💬 Battle conversations in this map (4)
These pairs have their own lines when they fight each other. “Talks to” is a Talk command next to the unit; none of them is needed to win.
- Koji Kabuto vs Great General of Darkness
- Tetsuya Tsurugi vs Great General of Darkness
- Jun Hono vs Great General of Darkness
- Banjo Haran vs Commander Edwin
Bandock Appears!
📜 バンドック現る!
The Gaizok’s Bandock appears, and the Zambot team, Heero and the Shuffle Alliance join the fight.
⏳ Don’t miss in this map
- Part on a retreating enemy: Killer the Butcher carries Minovsky Craft details
Full list across the game: Missables.
Walkthrough
- MainButcher’s Bandock and the Mecha Boosts first. Heero (Wing Zero) appears on turn 2 or when Butcher retreats.
- WarningButcher retreats when damaged and carries a Minovsky Craft.
- TipOn turn 5 the Devil Gundam group appears, together with Domon and the Shuffle Alliance. The Devil Gundam carries a Chobham Armor and regenerates, so finish it in one round.
🗺️ Battle map
Circles are units on the map at the start (red enemy, blue ally, green guest). Squares with a number are reinforcement waves. Yellow tags number the named enemies in the table below, and a yellow diamond marks a unit that carries a part. Tap the map to open it full size.
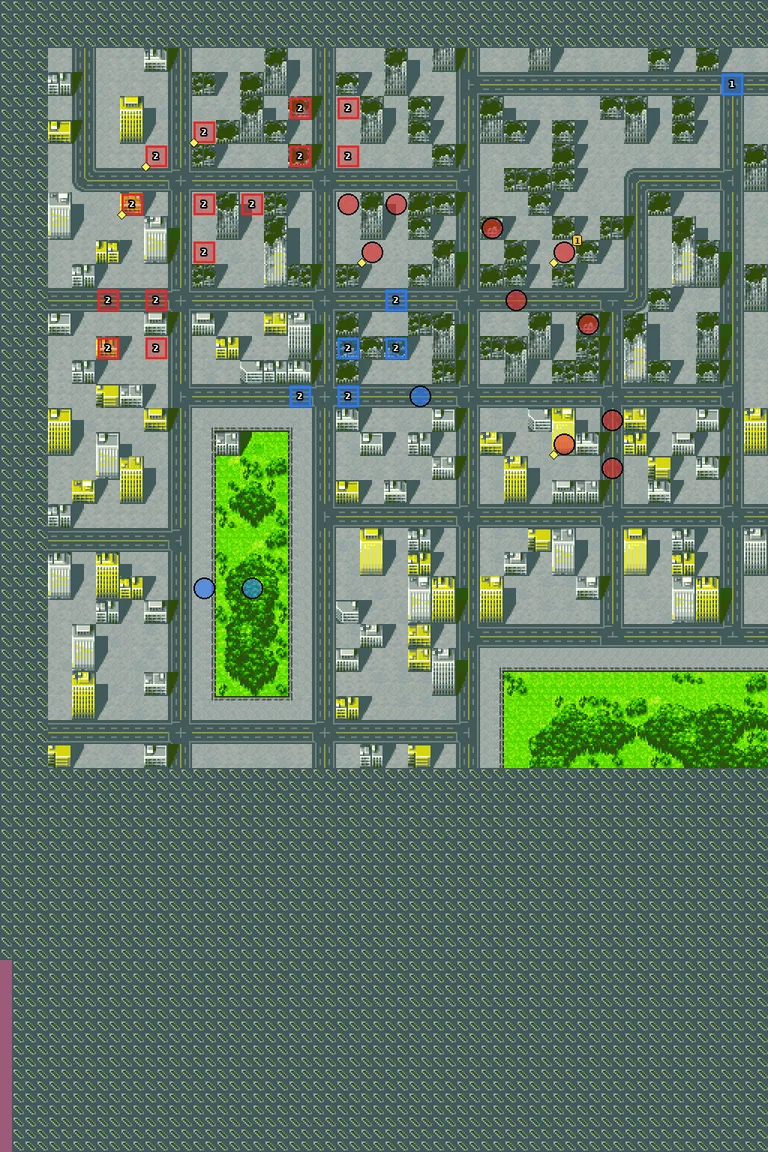
- 1Wave 1 — turn 2
- 2Wave 2 — a story event
Named enemies & parts
| Pilot | Unit | Part | Appears | |
|---|---|---|---|---|
| 1 Killer the Butcher | Bandock | Minovsky Craft | start Retreats when damaged |
Parts on regular enemies: Chobham Armor, Propellant Tank ×2, Repair Kit ×2.
New units & pilots
First time each one fights on your side on this route, during the map or right after it. Purple = only if you meet the condition.
- Kappei Jin
- Zambot 3
- Heero Yuy
- Wing Zero Custom
- Domon Kasshu
- Shining Gundam
- Sai Saici
- Dragon Gundam
- Chibodee Crocket
- Gundam Maxter
- George de Sand
- Gundam Rose
- Argo Gulskii
- Bolt Gundam
Burst! Viper Whip
📜 炸裂!バイパーウィップ
Altea comes back for the Viper Whip, and Neo Zeon follows the Freeden to Hoshimi.
⏳ Don’t miss in this map
- Part on a retreating enemy: Shagia Frost carries Beam Coating details
- Part on a retreating enemy: Olba Frost carries Booster details
Full list across the game: Missables.
Walkthrough
- MainYour hero’s unit is a defeat condition at the start. Galfa forces first, then Neo Zeon arrives when the field is clear.
- WarningThe Frost brothers retreat when hurt: Shagia carries a Beam Coating, Olba a Booster. Rakan carries a Hovercraft.
🗺️ Battle map
Circles are units on the map at the start (red enemy, blue ally, green guest). Squares with a number are reinforcement waves. Yellow tags number the named enemies in the table below, and a yellow diamond marks a unit that carries a part. Tap the map to open it full size.
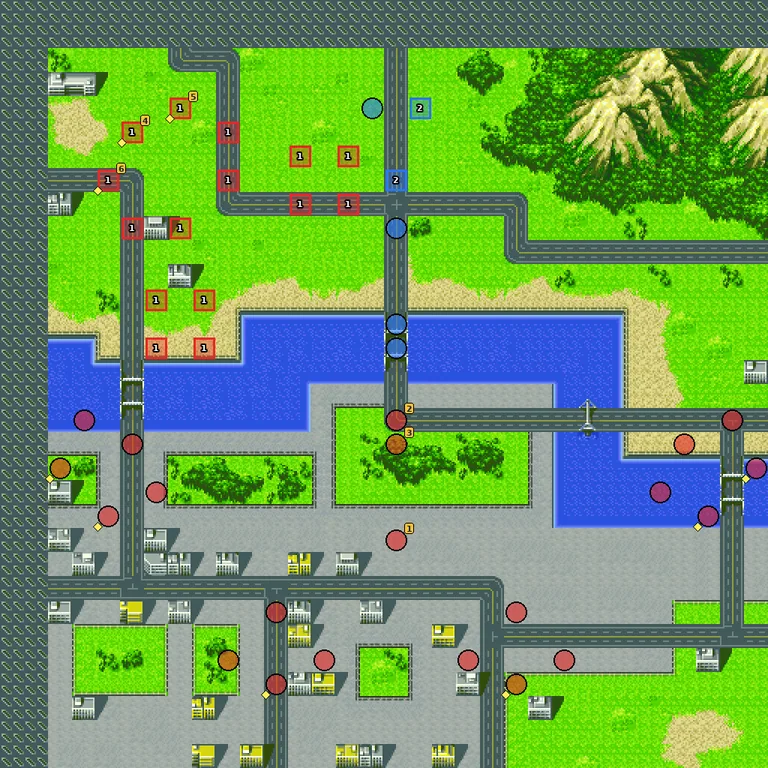
- 1Wave 1 — all enemies defeated
- 2Wave 2 — turn 2
Named enemies & parts
| Pilot | Unit | Part | Appears | |
|---|---|---|---|---|
| 1 Altea | Knight GEAR Ohga | — | start | |
| 2 Viper Whip | Viper Whip | — | start | |
| 3 Altea | Ohga Viper Whip | — | start | |
| 4 Rakan Dahkaran | Dreissen | Hovercraft | wave 1: all enemies defeated | |
| 5 Shagia Frost | Gundam Virsago | Beam Coating | wave 1: all enemies defeated Retreats when damaged | |
| 6 Olba Frost | Gundam Ashtaron | Booster | wave 1: all enemies defeated Retreats when damaged |
Parts on regular enemies: Propellant Tank ×3, Repair Kit ×3.
New units & pilots
First time each one fights on your side on this route, during the map or right after it. Purple = only if you meet the condition.
- Hokuto Kusanagi
- Dendoh Unicorn Drill
💬 Battle conversations in this map (3)
These pairs have their own lines when they fight each other. “Talks to” is a Talk command next to the unit; none of them is needed to win.
- Rakan Dahkaran vs Amuro Ray
- Garrod Ran vs Shagia Frost
- Garrod Ran vs Olba Frost
Enter!! Texas Mack!
📜 登場!! テキサスマック!
Added later in the map: Defeat: Dendoh destroyed; Defeat: Leo Circle destroyed.
Jack and Mary King ride in with Texas Mack while the Dinosaur Empire attacks.
⏳ Don’t miss in this map
- Part on a retreating enemy: Altea carries Hybrid Armor details
Full list across the game: Missables.
Walkthrough
- MainProtect Dendoh (and later the Leo Circle). Chief Galeli arrives when 5 enemies are left; he carries an Apogee Motor.
- WarningAltea arrives when the field is clear and retreats when hurt; he carries a Hybrid Armor. General Bat carries a Magnet Coating and does not retreat this time.
🗺️ Battle map
Circles are units on the map at the start (red enemy, blue ally, green guest). Squares with a number are reinforcement waves. Yellow tags number the named enemies in the table below, and a yellow diamond marks a unit that carries a part. Tap the map to open it full size.
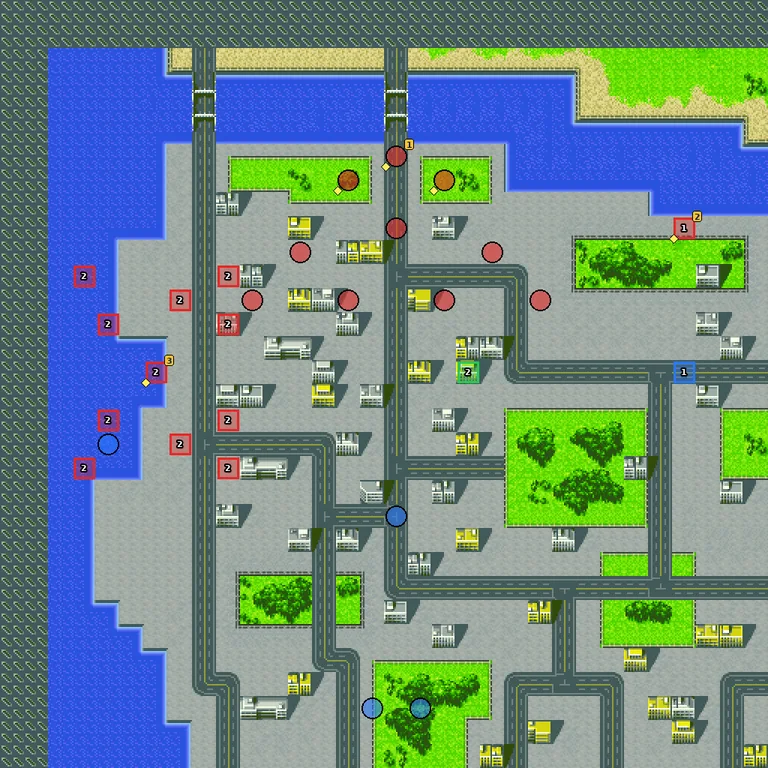
- 1Wave 1 — 5 or fewer enemies left
- 2Wave 2 — all enemies defeated
Named enemies & parts
| Pilot | Unit | Part | Appears | |
|---|---|---|---|---|
| 1 General Bat | Mechasaurus Boar | Magnet Coating | start | |
| 2 Chief Galeli | Mechasaurus Gera | Apogee Motor | wave 1: 5 or fewer enemies left | |
| 3 Altea | Knight GEAR Ohga | Hybrid Armor | wave 2: all enemies defeated Retreats when damaged |
Parts on regular enemies: Propellant Tank, Repair Kit.
New units & pilots
First time each one fights on your side on this route, during the map or right after it. Purple = only if you meet the condition.
- Jack King
- Texas Mack
- Susumu Kirakuni
- Cell Fighter
💬 Battle conversations in this map (2)
These pairs have their own lines when they fight each other. “Talks to” is a Talk command next to the unit; none of them is needed to win.
- Ginga Izumo vs Altea
- Altea vs Vega
My Steed Is Ferocious
📜 私の愛馬は凶暴です
Master Asia pilots the Devil Gundam himself, and Wufei shows up with Neo Zeon.
⏳ Don’t miss in this map
- Part on a retreating enemy: Master Asia carries Shuffle Crest details
Full list across the game: Missables.
Walkthrough
- MainMaster Asia (Devil Gundam) retreats when hurt and carries a Shuffle Crest.
- TipAllenby (Nobel Gundam) joins during this map.
- TipThe second wave has many named pilots with parts: Rakan Hybrid Armor, Shagia Large Magazine, Olba Minovsky Craft, Demar Booster, Duett Dustproofing. Let Heero fight Wufei for their talk.
🗺️ Battle map
Circles are units on the map at the start (red enemy, blue ally, green guest). Squares with a number are reinforcement waves. Yellow tags number the named enemies in the table below, and a yellow diamond marks a unit that carries a part. Tap the map to open it full size.
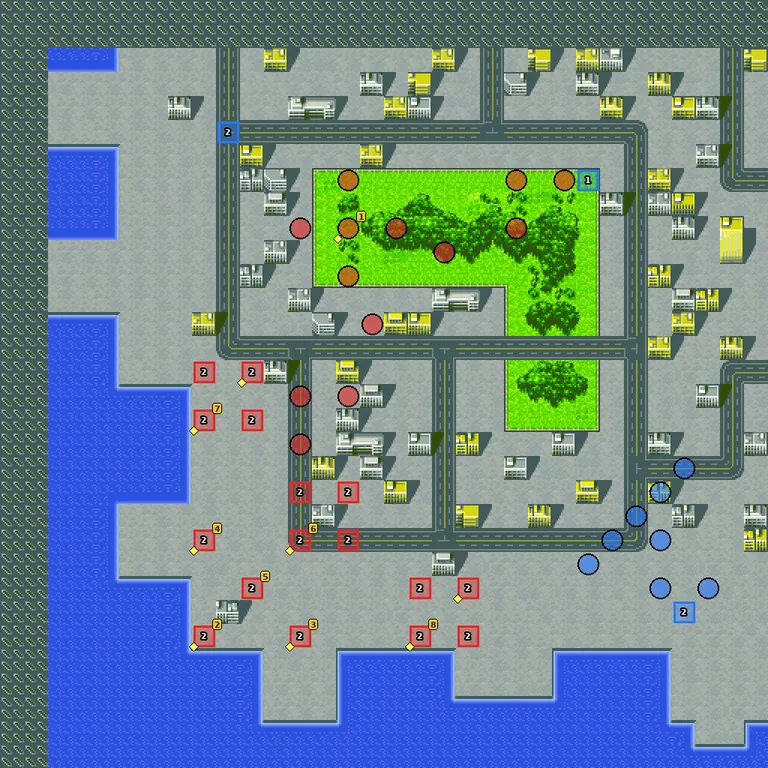
- 1Wave 1 — Master Asia talks to any unit, Master Asia damaged (5)
- 2Wave 2 — all enemies defeated
Named enemies & parts
| Pilot | Unit | Part | Appears | |
|---|---|---|---|---|
| 1 Master Asia | Devil Gundam | Shuffle Crest | start Retreats when damaged | |
| 2 Rakan Dahkaran | Dreissen | Hybrid Armor | wave 2: all enemies defeated | |
| 3 Shagia Frost | Gundam Virsago | Large Magazine | wave 2: all enemies defeated | |
| 4 Olba Frost | Gundam Ashtaron | Minovsky Craft | wave 2: all enemies defeated | |
| 5 Chang Wufei | Altron Custom | — | wave 2: all enemies defeated | |
| 6 Demar Griffe | Correl | Booster | wave 2: all enemies defeated | |
| 7 Milra Draid | Gable | Cartridge | wave 2: all enemies defeated | |
| 8 Duett Langraph | Britova | Dustproofing | wave 2: all enemies defeated |
Parts on regular enemies: Propellant Tank, Repair Kit.
New units & pilots
First time each one fights on your side on this route, during the map or right after it. Purple = only if you meet the condition.
- Excellence Flyer
- Allenby Beardsley
- Nobel Gundam
💬 Battle conversations in this map (7)
These pairs have their own lines when they fight each other. “Talks to” is a Talk command next to the unit; none of them is needed to win.
- Amuro Ray vs Demar Griffe
- Garrod Ran vs Demar Griffe
- Garrod Ran vs Milra Draid
- Heero Yuy vs Chang Wufei
- Heero Yuy talks to Chang Wufei
- Garrod Ran vs Shagia Frost
- Garrod Ran vs Olba Frost
Farewell Youth, Now a Beast
📜 さらば青春! 戦闘獣になった青年!!
Shinichiro has been turned into a Warrior Beast. Afterwards the team splits again.
⏳ Don’t miss in this map
- Part on a retreating enemy: Great General of Darkness carries Mega Booster details
- Part on a retreating enemy: General Dungele carries Chogokin Z details
Full list across the game: Missables.
Walkthrough
- MainTetsuya and Jun can talk to Shinichiro. The Great General of Darkness retreats and carries a Mega Booster.
- WarningGeneral Dungele appears later in a fake Combattler V and retreats; he carries a Chogokin Z.
- MainAfter the map: Go with the Nadesico (stages 13-14: Combattler V, Voltes V) or Go with the Freeden (stages 13-14: Zambot, Daitarn 3 and the Megaborgs). Both groups meet again at stage 15.
🗺️ Battle map
Circles are units on the map at the start (red enemy, blue ally, green guest). Squares with a number are reinforcement waves. Yellow tags number the named enemies in the table below, and a yellow diamond marks a unit that carries a part. Tap the map to open it full size.
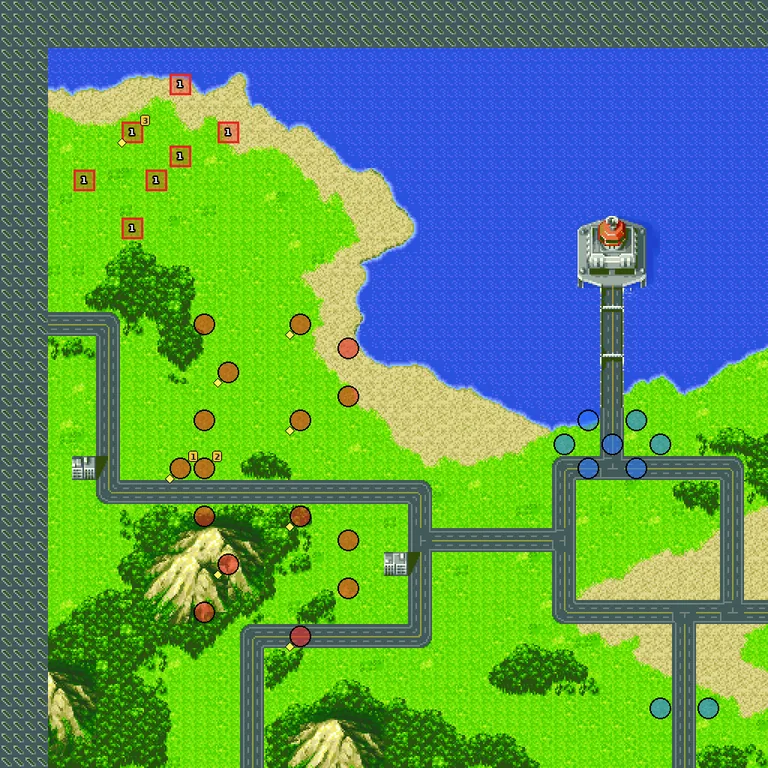
- 1Wave 1 — Shinichiro Ikuta damaged (8)
Named enemies & parts
| Pilot | Unit | Part | Appears | |
|---|---|---|---|---|
| 1 Great General of Darkness | Fortress Demonika | Mega Booster | start Retreats when damaged | |
| 2 Shinichiro Ikuta | Warrior Beast Jerunicas | — | start | |
| 3 General Dungele | Combattler V | Chogokin Z | wave 1: Shinichiro Ikuta damaged (8) Retreats when damaged |
Parts on regular enemies: Cartridge ×2, Propellant Tank ×2, Repair Kit ×2.
💬 Battle conversations in this map (2)
These pairs have their own lines when they fight each other. “Talks to” is a Talk command next to the unit; none of them is needed to win.
- Tetsuya Tsurugi vs Shinichiro Ikuta
- Jun Hono vs Shinichiro Ikuta
Destroy Combattler V / Battle at Sea
📜 コン・バトラーVを破壊せよ / 海の戦い
Nadesico route: Destroy Combattler V
The Campbellians frame Combattler V, and the real one has to clear its name.
⏳ Don’t miss in this map
- Part on a retreating enemy: Commander Warchimedes carries Solar Panel details
- Part on a retreating enemy: Jangal Rui carries Magnet Coating details
Full list across the game: Missables.
Walkthrough
- MainThe Combattler V at the start is an NPC. The real Combattler V and Kerot join on turn 2.
- WarningCommander Warchimedes retreats and carries a Solar Panel. Jangal Rui arrives on turn 4 and retreats; he carries a Magnet Coating.
🗺️ Battle map
Circles are units on the map at the start (red enemy, blue ally, green guest). Squares with a number are reinforcement waves. Yellow tags number the named enemies in the table below, and a yellow diamond marks a unit that carries a part. Tap the map to open it full size.
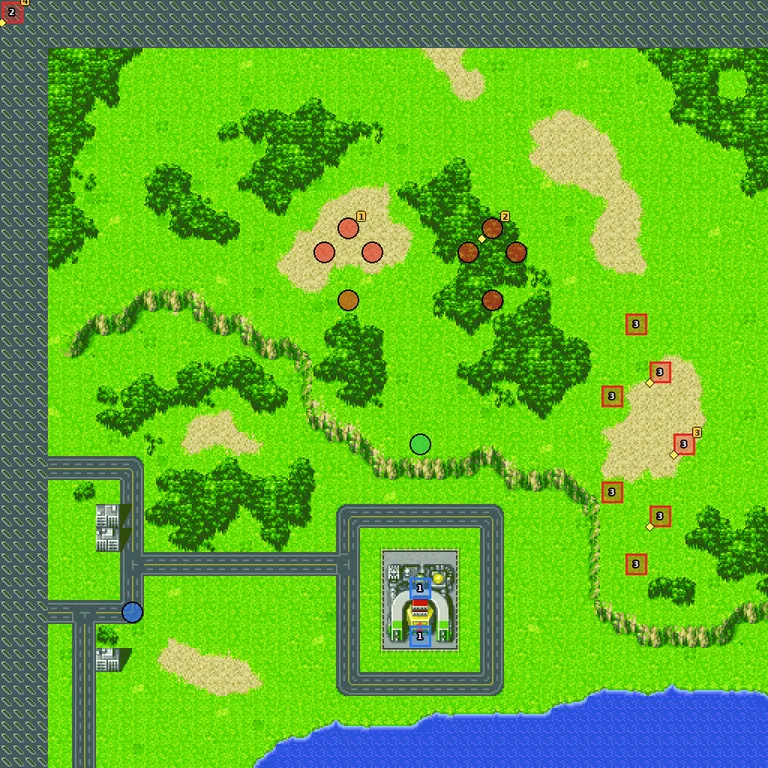
- 1Wave 1 — turn 2
- 2Wave 2 — General Dungele destroyed
- 3Wave 3 — turn 4, General Dungele damaged (9)
Named enemies & parts
| Pilot | Unit | Part | Appears | |
|---|---|---|---|---|
| 1 General Dungele | Combattler V | — | start | |
| 2 Commander Warchimedes | Magma Beast Darkron | Solar Panel | start Retreats when damaged | |
| 3 Jangal Rui | Skullrook | Magnet Coating | wave 3: turn 4, General Dungele damaged (9) Retreats when damaged | |
| 4 General Dungele | Magma Beast Great 1 | Booster | wave 2: General Dungele destroyed |
Parts on regular enemies: Propellant Tank, Repair Kit.
New units & pilots
First time each one fights on your side on this route, during the map or right after it. Purple = only if you meet the condition.
- Hyoma Aoi
- Combattler V
- Kinta Ichinoki
- Kerot
💬 Battle conversations in this map (2)
These pairs have their own lines when they fight each other. “Talks to” is a Talk command next to the unit; none of them is needed to win.
- Hyoma Aoi vs Combattler V
- Hyoma Aoi vs Commander Warchimedes
Freeden route: Battle at Sea
A fight at sea against the Gaizok, then Altea again.
⏳ Don’t miss in this map
- Part on a retreating enemy: Killer the Butcher carries Magnet Coating details
- Part on a retreating enemy: Altea carries Solar Panel details
Full list across the game: Missables.
Walkthrough
- MainUse the Excellence Diver and the Leopard S-1 here, they are built for water.
- WarningButcher retreats (Magnet Coating) and calls in Altea, who carries a Solar Panel.
🗺️ Battle map
Circles are units on the map at the start (red enemy, blue ally, green guest). Squares with a number are reinforcement waves. Yellow tags number the named enemies in the table below, and a yellow diamond marks a unit that carries a part. Tap the map to open it full size.
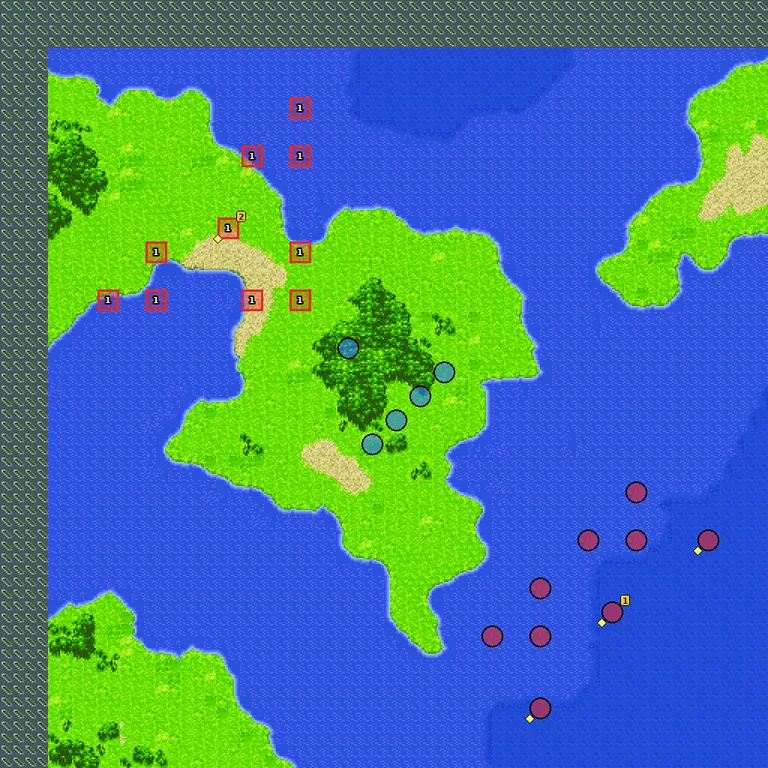
- 1Wave 1 — Killer the Butcher retreats
Named enemies & parts
| Pilot | Unit | Part | Appears | |
|---|---|---|---|---|
| 1 Killer the Butcher | Bandock | Magnet Coating | start Retreats when damaged | |
| 2 Altea | Ohga Viper Whip | Solar Panel | wave 1: Killer the Butcher retreats Retreats when damaged |
Parts on regular enemies: Propellant Tank, Repair Kit.
New units & pilots
First time each one fights on your side on this route, during the map or right after it. Purple = only if you meet the condition.
- Excellence Diver
- Gundam Leopard S-1
- Neo Getter-3
- Gai Daido
💬 Battle conversations in this map (3)
These pairs have their own lines when they fight each other. “Talks to” is a Talk command next to the unit; none of them is needed to win.
- Killer the Butcher vs Kappei Jin
- Ginga Izumo vs Altea
- Altea vs Vega
A Gift from His Majesty / Koros and Zenoia
📜 皇帝陛下のプレゼント / コロスとゼノイア
Nadesico route: A Gift from His Majesty
Added later in the map: Defeat: Allied warship destroyed.
Voltes V fights Boazan alone until the Nadesico finds it.
⏳ Don’t miss in this map
- Part on a retreating enemy: Jangal Rui carries Hi-Perf. Radar details
- Part on a retreating enemy: Commander Warchimedes carries Dual Sensor details
- Part on a retreating enemy: General Dungele carries Bio-Sensor details
Full list across the game: Missables.
Walkthrough
- MainVoltes V starts alone and is a defeat condition. The Nadesico arrives on turn 2.
- WarningJangal Rui retreats (Hi-Perf. Radar). On turn 4 the Campbellians and the Bull Horn arrive: Warchimedes Dual Sensor, Dungele Bio-Sensor, both retreat.
🗺️ Battle map
Circles are units on the map at the start (red enemy, blue ally, green guest). Squares with a number are reinforcement waves. Yellow tags number the named enemies in the table below, and a yellow diamond marks a unit that carries a part. Tap the map to open it full size.
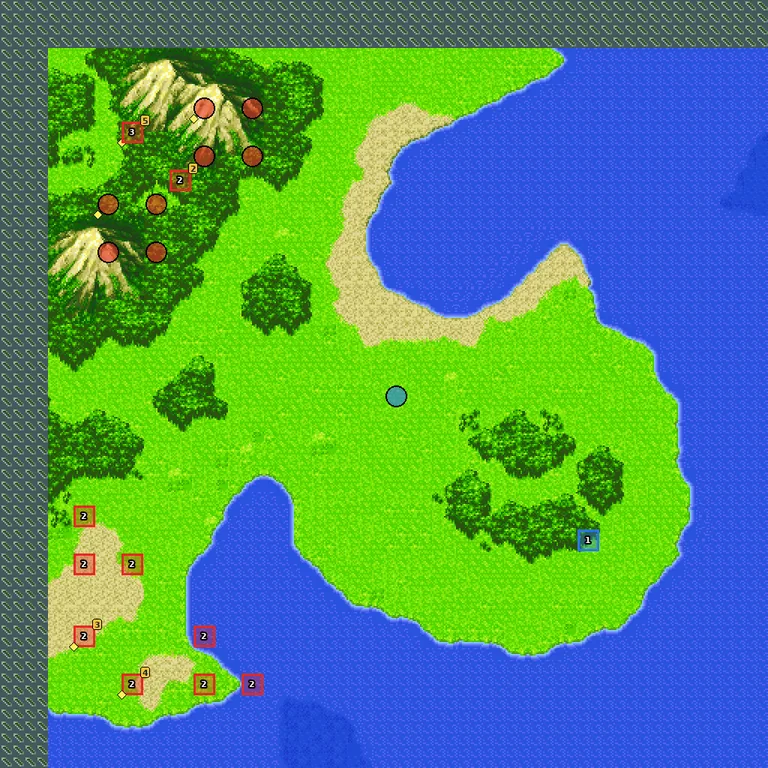
- 1Wave 1 — turn 2
- 2Wave 2 — turn 4, Jangal Rui damaged (6)
- 3Wave 3 — all enemies defeated
Named enemies & parts
| Pilot | Unit | Part | Appears | |
|---|---|---|---|---|
| 1 Jangal Rui | Skullrook | Hi-Perf. Radar | start Retreats when damaged | |
| 2 Bull Horn | Bull Horn | — | wave 2: turn 4, Jangal Rui damaged (6) | |
| 3 Commander Warchimedes | Magma Beast Darkron | Dual Sensor | wave 2: turn 4, Jangal Rui damaged (6) Retreats when damaged | |
| 4 General Dungele | Magma Beast Great 1 | Bio-Sensor | wave 2: turn 4, Jangal Rui damaged (6) Retreats when damaged | |
| 5 Prince Heinel | Skullrook | — | wave 3: all enemies defeated |
Parts on regular enemies: Propellant Tank, Repair Kit.
New units & pilots
First time each one fights on your side on this route, during the map or right after it. Purple = only if you meet the condition.
- Kenichi Go
- Voltes V
- Uchuta Kamie
- Keiko Kamikita
- Mary King
- Sho Tachibana
- Gai Daido
💬 Battle conversations in this map (3)
These pairs have their own lines when they fight each other. “Talks to” is a Talk command next to the unit; none of them is needed to win.
- Kenichi Go vs Jangal Rui
- Hyoma Aoi vs General Dungele
- Hyoma Aoi vs Commander Warchimedes
Freeden route: Koros and Zenoia
Banjo faces Koros’s commanders Zenoia and Beltori, and Neo Zeon returns.
⏳ Don’t miss in this map
- Part on a retreating enemy: Shagia Frost carries Repair Kit details
- Part on a retreating enemy: Olba Frost carries Propellant Tank details
Full list across the game: Missables.
Walkthrough
- MainThe Freeden and Daifighter start at 20% HP, and Daitarn 3 is a defeat condition until turn 3 (when Banjo can combine). Heal or keep them back.
- TipEach Commander revives once in a Megaborg after their Ai-Ai is destroyed.
- TipMegaborg Zenoia carries a Dual Sensor, Megaborg Beltori a Bio-Sensor.
- WarningThe Neo Zeon wave has the Frost brothers (retreat) and Rakan with a Hi-Perf. Radar.
🗺️ Battle map
Circles are units on the map at the start (red enemy, blue ally, green guest). Squares with a number are reinforcement waves. Yellow tags number the named enemies in the table below, and a yellow diamond marks a unit that carries a part. Tap the map to open it full size.
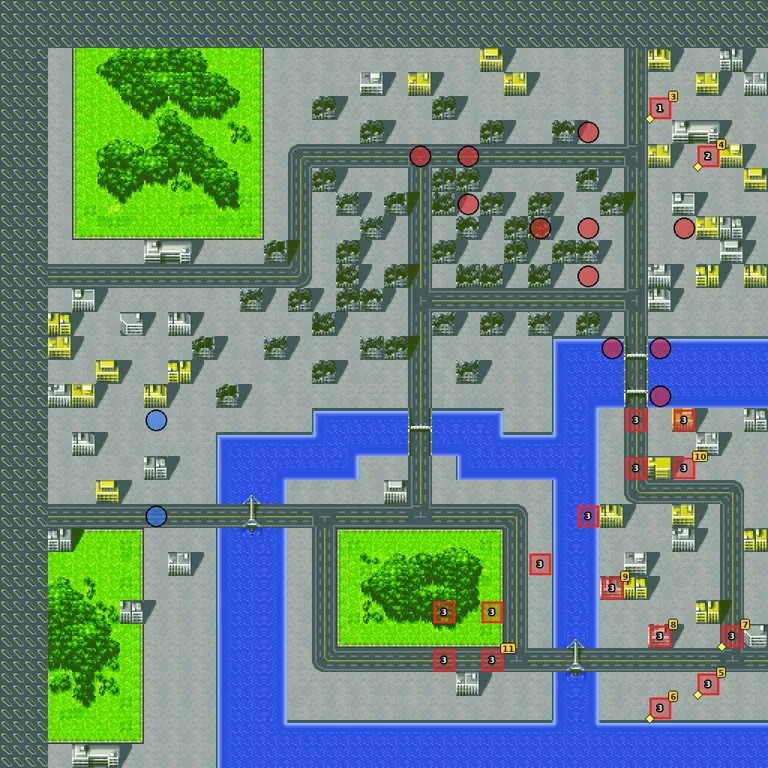
- 1Wave 1 — Commander Zenoia destroyed
- 2Wave 2 — Commander Beltori destroyed
- 3Wave 3 — Commander Zenoia damaged (A)
Named enemies & parts
| Pilot | Unit | Part | Appears | |
|---|---|---|---|---|
| 1 Commander Zenoia | Ai-Ai | — | start | |
| 2 Commander Beltori | Ai-Ai | — | start | |
| 3 Commander Zenoia | Megaborg Zenoia | Dual Sensor | wave 1: Commander Zenoia destroyed | |
| 4 Commander Beltori | Megaborg Beltori | Bio-Sensor | wave 2: Commander Beltori destroyed | |
| 5 Rakan Dahkaran | Dreissen | Hi-Perf. Radar | wave 3: Commander Zenoia damaged (A) | |
| 6 Shagia Frost | Gundam Virsago | Repair Kit | wave 3: Commander Zenoia damaged (A) Retreats when damaged | |
| 7 Olba Frost | Gundam Ashtaron | Propellant Tank | wave 3: Commander Zenoia damaged (A) Retreats when damaged | |
| 8 Chang Wufei | Altron Custom | — | wave 3: Commander Zenoia damaged (A) | |
| 9 Demar Griffe | Correl | — | wave 3: Commander Zenoia damaged (A) | |
| 10 Milra Draid | Gable | — | wave 3: Commander Zenoia damaged (A) | |
| 11 Duett Langraph | Britova | — | wave 3: Commander Zenoia damaged (A) |
New units & pilots
First time each one fights on your side on this route, during the map or right after it. Purple = only if you meet the condition.
- Hyoma Aoi
- Juzo Naniwa
- Daisaku Nishikawa
- Chizuru Nanbara
- Kosuke Kita
- Combattler V
- Kinta Ichinoki
- Chie Ichinoki
- Kerot
- Kenichi Go
- Ippei Mine
- Daijiro Go
- Hiyoshi Go
- Megumi Oka
- Voltes V
- Daifighter
💬 Battle conversations in this map (5)
These pairs have their own lines when they fight each other. “Talks to” is a Talk command next to the unit; none of them is needed to win.
- Banjo Haran vs Commander Beltori
- Banjo Haran vs Commander Zenoia
- Demar Griffe vs Amuro Ray
- Rakan Dahkaran vs your hero
- Chang Wufei vs your hero
Lethal! Hyper Great Booster
📜 必殺! 超高速グレートブースター!!
The groups reunite against the Mykene’s Dragonosaurus, then the Galfa’s Ragou attacks.
⏳ Don’t miss in this map
- Part on a retreating enemy: Ragou carries Multi-Sensor details
Full list across the game: Missables.
Walkthrough
- MainMazinger Z and Great Mazinger arrive on turn 3. Dendoh is a defeat condition.
- TipThe Great General carries an EN Mega Chip and the Dragonosaurus a Shuffle Crest.
- WarningRagou retreats when hurt and carries a Multi-Sensor.
- MainAfter the map: Go to Fort Severn (stages 16-17: Super Gundam, Gundam X Divider) or Stay at GEAR HQ (stages 16-17: Voltes V, the Dendoh/Ohga duel). Both meet again at stage 18.
🗺️ Battle map
Circles are units on the map at the start (red enemy, blue ally, green guest). Squares with a number are reinforcement waves. Yellow tags number the named enemies in the table below, and a yellow diamond marks a unit that carries a part. Tap the map to open it full size.
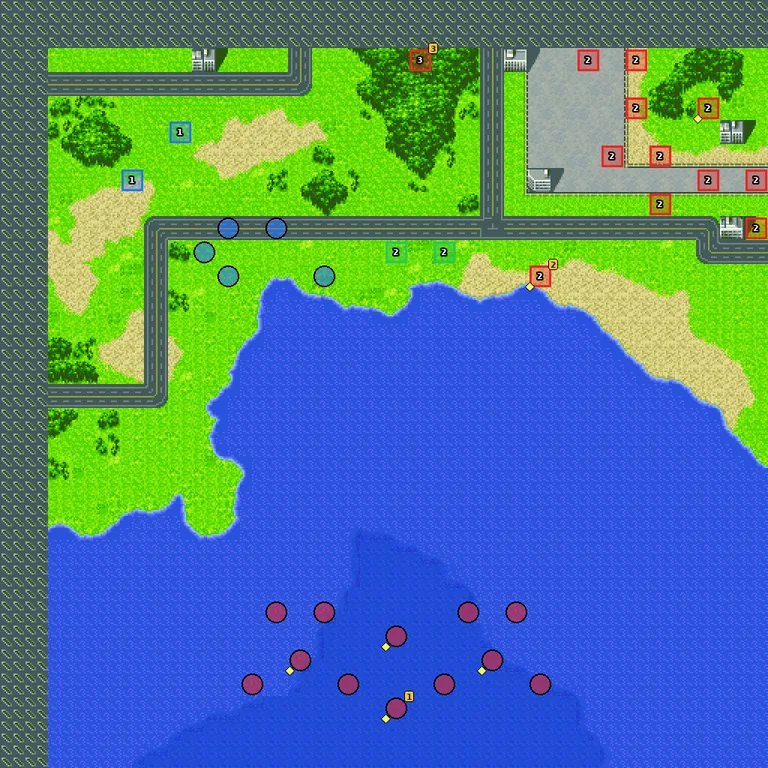
- 1Wave 1 — turn 3
- 2Wave 2 — Dragonosaurus damaged (A)
- 3Wave 3 — Ragou retreats
Named enemies & parts
| Pilot | Unit | Part | Appears | |
|---|---|---|---|---|
| 1 Great General of Darkness | Fortress Demonika | EN Mega Chip | start | |
| 2 Ragou | Ragou | Multi-Sensor | wave 2: Dragonosaurus damaged (A) Retreats when damaged | |
| 3 Tis | Thugater | — | wave 3: Ragou retreats |
Parts on regular enemies: Chobham Armor, Propellant Tank, Repair Kit, Shuffle Crest.
New units & pilots
First time each one fights on your side on this route, during the map or right after it. Purple = only if you meet the condition.
- Excellence Diver
💬 Battle conversations in this map (4)
These pairs have their own lines when they fight each other. “Talks to” is a Talk command next to the unit; none of them is needed to win.
- Tetsuya Tsurugi vs Great General of Darkness
- Tetsuya Tsurugi vs Dragonosaurus
- Koji Kabuto vs Great General of Darkness
- Koji Kabuto vs Dragonosaurus
This Is My Masterpiece / Showdown! Dendoh vs. Ohga
📜 私の最高傑作です / 決戦! 電童vs凰牙
Fort Severn route: This Is My Masterpiece
Carris and Ennil El of the New United Nations attack the Freeden.
⏳ Don’t miss in this map
- Part on a retreating enemy: Ennil El carries Chobham Armor details
- Part on a retreating enemy: Killer the Butcher carries Large Generator details
Full list across the game: Missables.
Walkthrough
- MainEnnil El retreats; she carries a Chobham Armor.
- WarningButcher arrives when the field is clear, retreats, and carries a Large Generator.
🗺️ Battle map
Circles are units on the map at the start (red enemy, blue ally, green guest). Squares with a number are reinforcement waves. Yellow tags number the named enemies in the table below, and a yellow diamond marks a unit that carries a part. Tap the map to open it full size.
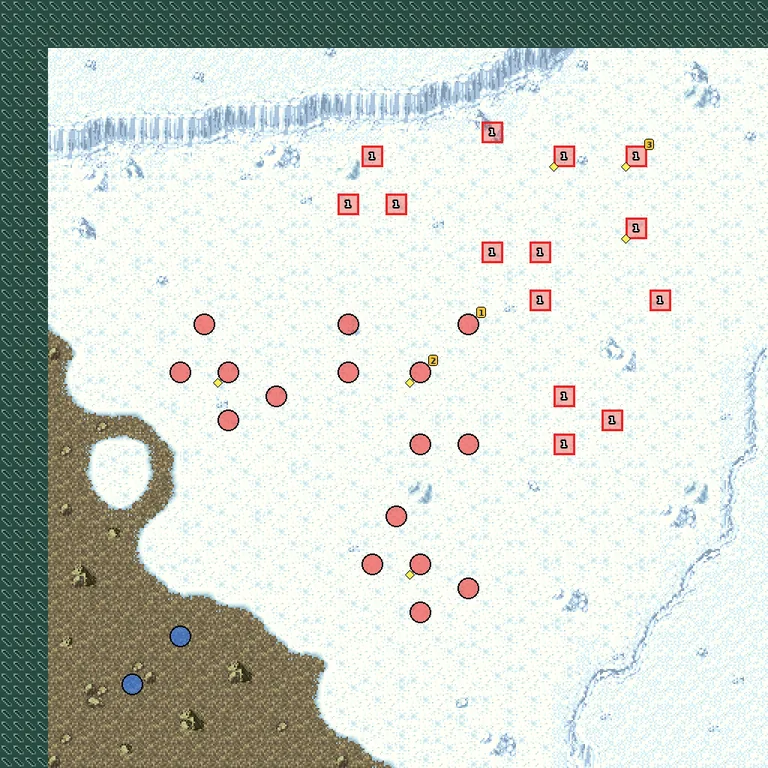
- 1Wave 1 — all enemies defeated
Named enemies & parts
| Pilot | Unit | Part | Appears | |
|---|---|---|---|---|
| 1 Carris Nautilus | Bertigo | — | start | |
| 2 Ennil El | Wise Wallaby | Chobham Armor | start Retreats when damaged | |
| 3 Killer the Butcher | Bandock | Large Generator | wave 1: all enemies defeated Retreats when damaged |
Parts on regular enemies: Cartridge ×2, Propellant Tank, Repair Kit.
💬 Battle conversations in this map (1)
These pairs have their own lines when they fight each other. “Talks to” is a Talk command next to the unit; none of them is needed to win.
- Killer the Butcher vs Kappei Jin
GEAR HQ route: Showdown! Dendoh vs. Ohga
The Jovians attack while Dendoh’s systems boot up, then Ohga and every Data Weapon come at once.
Walkthrough
- MainHold the base until turn 5, when Dendoh launches. Tsukumo carries an EN Chip, Genichiro a Learning CP+.
- WarningAltea in the Ohga Bull Horn carries a Booster.
🗺️ Battle map
Circles are units on the map at the start (red enemy, blue ally, green guest). Squares with a number are reinforcement waves. Yellow tags number the named enemies in the table below, and a yellow diamond marks a unit that carries a part. Tap the map to open it full size.
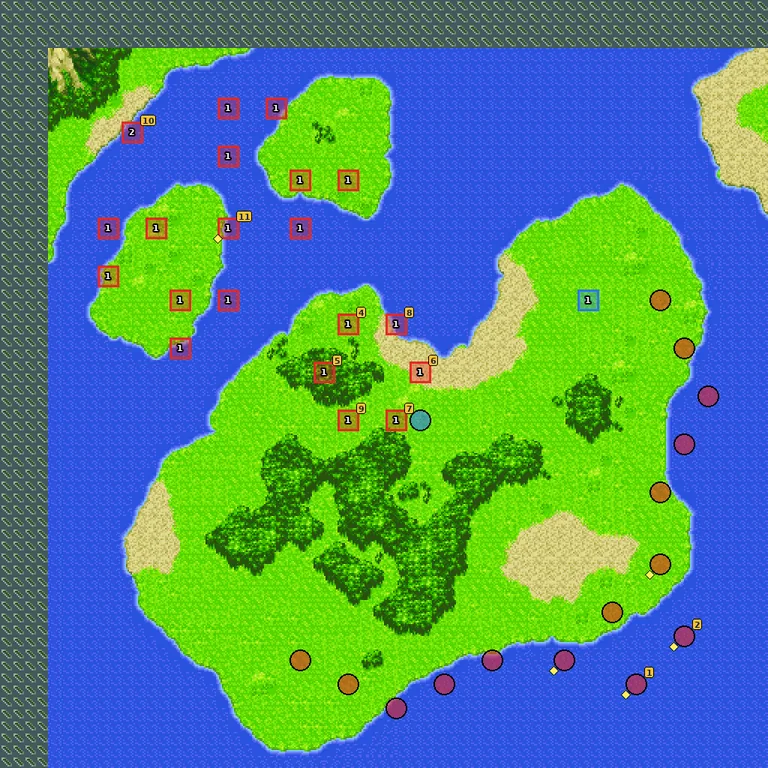
- 1Wave 1 — turn 5
- 2Wave 2 — Altea destroyed
Named enemies & parts
| Pilot | Unit | Part | Appears | |
|---|---|---|---|---|
| 1 Tsukumo Shiratori | Tetsujin | EN Chip | start | |
| 2 Genichiro Tsukiomi | Majin | Learning CP+ | start | |
| 3 Altea | Knight GEAR Ohga | — | wave 1: turn 5 | |
| 4 Viper Whip | Viper Whip | — | wave 1: turn 5 | |
| 5 Bull Horn | Bull Horn | — | wave 1: turn 5 | |
| 6 Unicorn Drill | Unicorn Drill | — | wave 1: turn 5 | |
| 7 Leo Circle | Leo Circle | — | wave 1: turn 5 | |
| 8 Dragon Flare | Dragon Flare | — | wave 1: turn 5 | |
| 9 Gatling Boar | Gatling Boar | — | wave 1: turn 5 | |
| 10 Tis | Thugater | — | wave 2: Altea destroyed | |
| 11 Altea | Ohga Bull Horn | Booster | wave 1: turn 5 |
Parts on regular enemies: Propellant Tank, Repair Kit.
💬 Battle conversations in this map (2)
These pairs have their own lines when they fight each other. “Talks to” is a Talk command next to the unit; none of them is needed to win.
- Altea vs Ginga Izumo
- Vega vs Altea
Can You Hear My Voice!? / Father’s Plot Targets Earth
📜 俺の声が聞こえるか! / 謀略の父が地球を狙う
Fort Severn route: Can You Hear My Voice!?
The Patulia awakens and Kamille joins in the Super Gundam.
⏳ Don’t miss in this map
- Part on a retreating enemy: Ennil El carries Beam Coating details
Full list across the game: Missables.
Walkthrough
- MainGarrod’s unit is a defeat condition. Ennil El (Beam Coating) and the Frost brothers (Shagia Booster, Olba Learning CP+) retreat.
- WarningDestroying the Patulia brings the Mykene with mass-produced Great Mazingers. The Great General carries an EN Chip.
🗺️ Battle map
Circles are units on the map at the start (red enemy, blue ally, green guest). Squares with a number are reinforcement waves. Yellow tags number the named enemies in the table below, and a yellow diamond marks a unit that carries a part. Tap the map to open it full size.
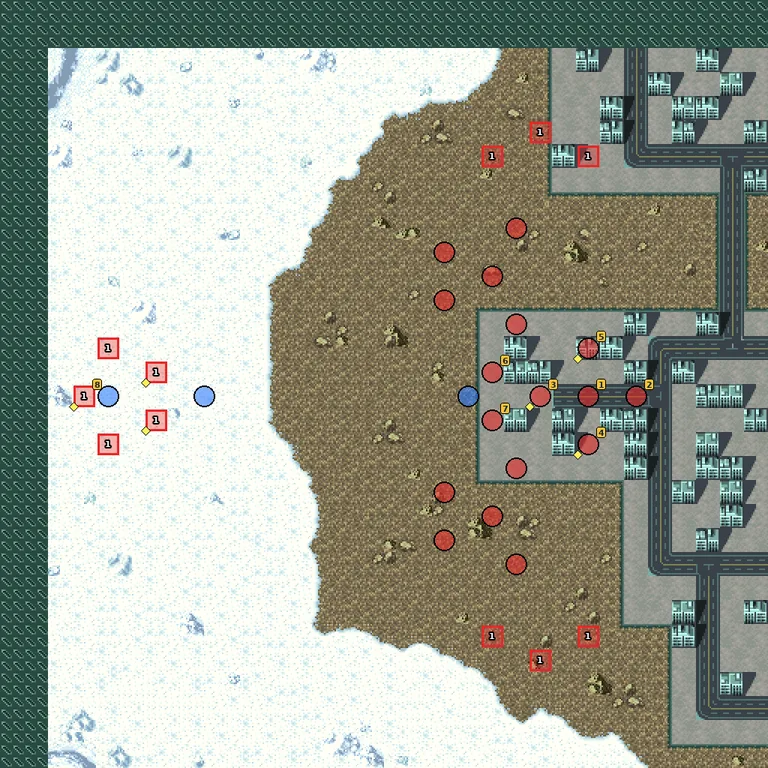
- 1Wave 1 — Carris Nautilus destroyed
Named enemies & parts
| Pilot | Unit | Part | Appears | |
|---|---|---|---|---|
| 1 Carris Nautilus | Patulia | — | start Retreats when damaged | |
| 2 Glemy Toto | Bawoo | — | start | |
| 3 Ennil El | Wise Wallaby | Beam Coating | start Retreats when damaged | |
| 4 Shagia Frost | Gundam Virsago | Booster | start | |
| 5 Olba Frost | Gundam Ashtaron | Learning CP+ | start | |
| 6 Milra Draid | Gable | — | start | |
| 7 Duett Langraph | Britova | — | start | |
| 8 Great General of Darkness | Fortress Demonika | EN Chip | wave 1: Carris Nautilus destroyed |
Parts on regular enemies: Propellant Tank, Repair Kit.
New units & pilots
First time each one fights on your side on this route, during the map or right after it. Purple = only if you meet the condition.
- Kamille Bidan
- Super Gundam
- Gundam X Divider
- Ippei Mine
- Daijiro Go
- Hiyoshi Go
- Megumi Oka
💬 Battle conversations in this map (7)
These pairs have their own lines when they fight each other. “Talks to” is a Talk command next to the unit; none of them is needed to win.
- Carris Nautilus vs Jamil Neate
- Garrod Ran vs Carris Nautilus
- Garrod Ran vs Glemy Toto
- Amuro Ray vs Glemy Toto
- Kamille Bidan vs Glemy Toto
- Garrod Ran vs Shagia Frost
- Garrod Ran vs Olba Frost
GEAR HQ route: Father’s Plot Targets Earth
Boazan uses a fake Kentaro Go to strike at the Big Falcon.
⏳ Don’t miss in this map
- Part on a retreating enemy: Prince Heinel carries Booster details
- Part on a retreating enemy: Jangal Rui carries Large Generator details
Full list across the game: Missables.
Walkthrough
- MainVoltes V arrives on turn 3. Heinel (Booster) and Jangal (Large Generator) both retreat.
- TipMaster Asia’s Devil Gundam comes with the second wave and carries a Chobham Armor. Domon can talk to him.
🗺️ Battle map
Circles are units on the map at the start (red enemy, blue ally, green guest). Squares with a number are reinforcement waves. Yellow tags number the named enemies in the table below, and a yellow diamond marks a unit that carries a part. Tap the map to open it full size.
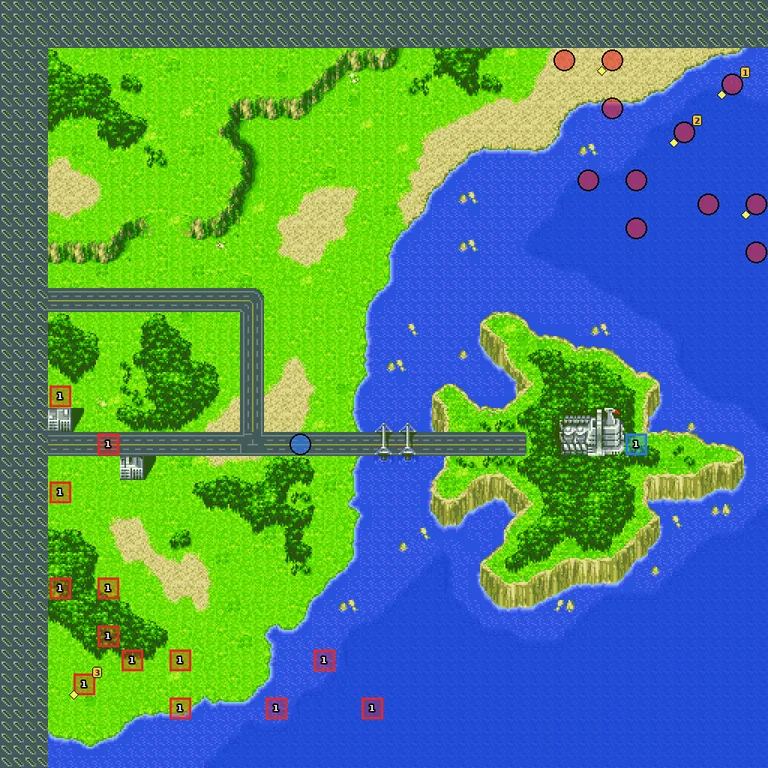
- 1Wave 1 — turn 3, all enemies defeated
Named enemies & parts
| Pilot | Unit | Part | Appears | |
|---|---|---|---|---|
| 1 Prince Heinel | Skullrook | Booster | start Retreats when damaged | |
| 2 Jangal Rui | Skullrook | Large Generator | start Retreats when damaged | |
| 3 Master Asia | Devil Gundam | Chobham Armor | wave 1: turn 3, all enemies defeated |
Parts on regular enemies: Propellant Tank, Repair Kit.
New units & pilots
First time each one fights on your side on this route, during the map or right after it. Purple = only if you meet the condition.
- Gundam X Divider
- Juzo Naniwa
- Daisaku Nishikawa
- Chizuru Nanbara
- Kosuke Kita
- Chie Ichinoki
- Kamille Bidan
- Super Gundam
- Uchuta Kamie
- Keiko Kamikita
- Mary King
- Sho Tachibana
💬 Battle conversations in this map (3)
These pairs have their own lines when they fight each other. “Talks to” is a Talk command next to the unit; none of them is needed to win.
- Kenichi Go vs Prince Heinel
- Kenichi Go vs Jangal Rui
- Domon Kasshu vs Master Asia
More Than One “Truth”
📜 『真実』はひとつじゃない
Added later in the map: Defeat: Allied warship destroyed; Defeat: Hero’s unit destroyed; Defeat: Akito’s unit destroyed; Defeat: Atmo Corp. infiltrated.
The groups meet again. Ragou and the Galfa’s three Mech Generals attack, then the Jovian Denjin.
Walkthrough
- MainDaitarn 3 starts alone; the fleet arrives on turn 2. Banjo, your hero and Akito are defeat conditions.
- WarningGenpachiro (Denjin) retreats when only one enemy is left; he carries a Psycho Frame. Saburota’s Denjin carries a Dustproofing.
🗺️ Battle map
Circles are units on the map at the start (red enemy, blue ally, green guest). Squares with a number are reinforcement waves. Yellow tags number the named enemies in the table below, and a yellow diamond marks a unit that carries a part. Tap the map to open it full size.
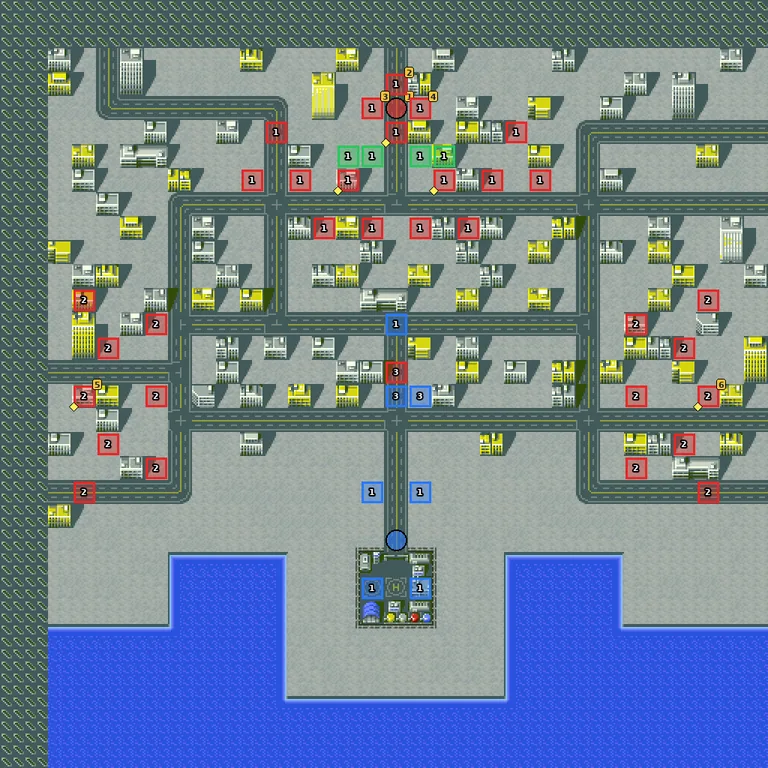
- 1Wave 1 — turn 2
- 2Wave 2 — all enemies defeated
- 3Wave 3 — a story event
Named enemies & parts
| Pilot | Unit | Part | Appears | |
|---|---|---|---|---|
| 1 Ragou | Ragou | — | start | |
| 2 Mech General Giga Absolute | Mech General Giga Absolute | — | wave 1: turn 2 | |
| 3 Mech General Giga Gurumei | Mech General Giga Gurumei | — | wave 1: turn 2 | |
| 4 Mech General Giga Witter | Mech General Giga Witter | — | wave 1: turn 2 | |
| 5 Genpachiro Akiyama | Denjin | Psycho Frame | wave 2: all enemies defeated | |
| 6 Saburota Takasugi | Denjin | Dustproofing | wave 2: all enemies defeated |
Parts on regular enemies: Propellant Tank, Repair Kit, Super Repair Kit.
💬 Battle conversations in this map (1)
These pairs have their own lines when they fight each other. “Talks to” is a Talk command next to the unit; none of them is needed to win.
- your hero vs Saburota Takasugi
A Life Reborn
📜 よみがえる命
Ragou is brought back to life, and Quattro joins in the Hyaku Shiki.
⏳ Don’t miss in this map
- Part on a retreating enemy: Mech General Giga Absolute carries Thruster Module details
- Part on a retreating enemy: Mech General Giga Gurumei carries EN Chip details
- Part on a retreating enemy: Mech General Giga Witter carries Solar Panel details
Full list across the game: Missables.
Walkthrough
- MainDendoh is a defeat condition. The three Mech Generals retreat when hurt and carry a Thruster Module, an EN Chip and a Solar Panel.
- TipRagou carries a Shuffle Crest. A Mech Knight Jam in the first wave carries Mom’s Stew.
- TipAfter the map Witz and Roybea get the Airmaster Burst and Leopard Destroy.
🗺️ Battle map
Circles are units on the map at the start (red enemy, blue ally, green guest). Squares with a number are reinforcement waves. Yellow tags number the named enemies in the table below, and a yellow diamond marks a unit that carries a part. Tap the map to open it full size.
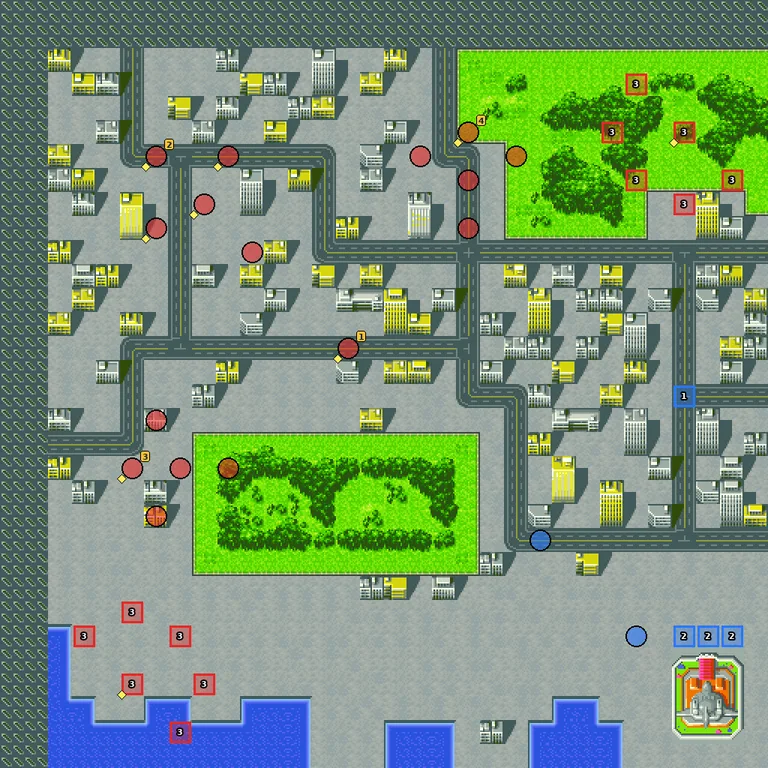
- 1Wave 1 — turn 2
- 2Wave 2 — turn 5
- 3Wave 3 — Ragou damaged (D)
Named enemies & parts
| Pilot | Unit | Part | Appears | |
|---|---|---|---|---|
| 1 Ragou | Ragou | Shuffle Crest | start | |
| 2 Mech General Giga Absolute | Mech General Giga Absolute | Thruster Module | start Retreats when damaged | |
| 3 Mech General Giga Gurumei | Mech General Giga Gurumei | EN Chip | start Retreats when damaged | |
| 4 Mech General Giga Witter | Mech General Giga Witter | Solar Panel | start Retreats when damaged |
Parts on regular enemies: Cartridge ×2, Mom’s Stew, Propellant Tank, Repair Kit, Super Repair Kit ×2.
New units & pilots
First time each one fights on your side on this route, during the map or right after it. Purple = only if you meet the condition.
- Quattro Bajeena
- Hyaku Shiki
- Unicorn Drill
- Unicorn Drill
- Leo Circle
- Leo Circle
- Super Beast King Kiba
- Super Beast King Kiba
- Gundam Airmaster Burst
- Gundam Leopard Destroy
💬 Battle conversations in this map (4)
These pairs have their own lines when they fight each other. “Talks to” is a Talk command next to the unit; none of them is needed to win.
- Ragou vs Ginga Izumo
- Ginga Izumo vs Mech General Giga Absolute
- Ginga Izumo vs Mech General Giga Gurumei
- Ginga Izumo vs Mech General Giga Witter
Double X, Activate!
📜 ダブルエックス起動!
The Gundam Double X activates, and Neo Zeon, the Frost brothers and Trowa attack together.
Walkthrough
- MainGarrod now pilots the Double X. If you got the Mk-III event in stage 4, Four arrives in the Gundam Mk-III; otherwise in a Jegan.
- TipLots of parts: Glemy Hybrid Armor, Rakan Bio-Sensor, Abel Shuffle Crest, Shagia Apogee Motor, Olba Beam Coating. None of them retreat here.
- TipQuatre and Duo join on turn 2. Genichiro (Hovercraft) and Hokushin (Linear Seat) arrive after the first wave.
🗺️ Battle map
Circles are units on the map at the start (red enemy, blue ally, green guest). Squares with a number are reinforcement waves. Yellow tags number the named enemies in the table below, and a yellow diamond marks a unit that carries a part. Tap the map to open it full size.
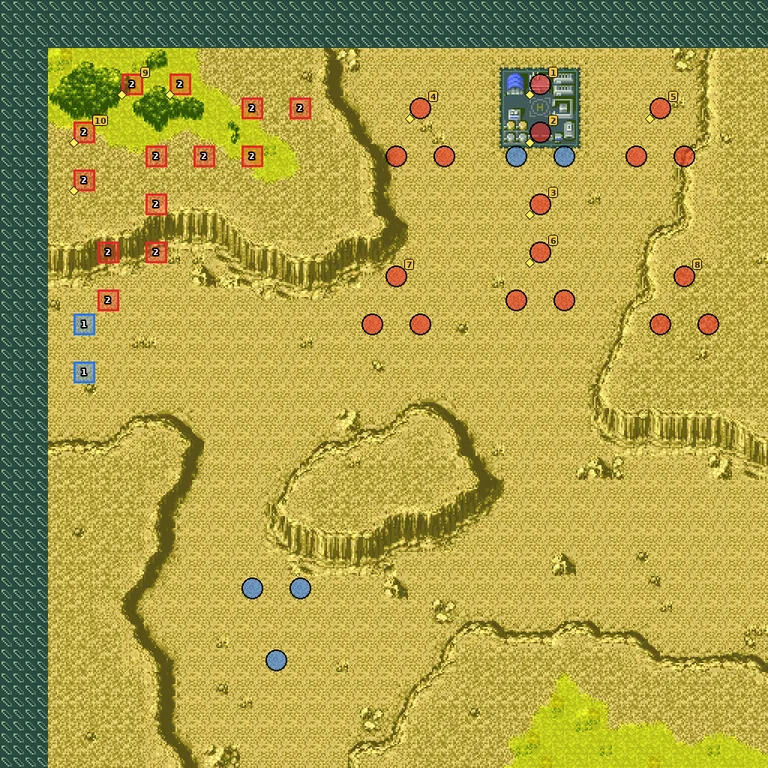
- 1Wave 1 — turn 2
- 2Wave 2 — all enemies defeated
Named enemies & parts
| Pilot | Unit | Part | Appears | |
|---|---|---|---|---|
| 1 Glemy Toto | Bawoo | Hybrid Armor | start | |
| 2 Rakan Dahkaran | Dreissen | Bio-Sensor | start | |
| 3 Abel Bauer | Rasveht | Shuffle Crest | start | |
| 4 Shagia Frost | Gundam Virsago | Apogee Motor | start | |
| 5 Olba Frost | Gundam Ashtaron (MA) | Beam Coating | start | |
| 6 Ennil El | Wise Wallaby | Cartridge | start | |
| 7 Chang Wufei | Altron Custom | — | start | |
| 8 Trowa Barton | Heavyarms Custom | — | start | |
| 9 Genichiro Tsukiomi | Majin | Hovercraft | wave 2: all enemies defeated | |
| 10 Hokushin | Denjin | Linear Seat | wave 2: all enemies defeated |
Parts on regular enemies: Propellant Tank, Repair Kit.
New units & pilots
First time each one fights on your side on this route, during the map or right after it. Purple = only if you meet the condition.
- Gundam Double X
- Four Murasame
- Gundam Mk-III
- Quatre Raberba Winner
- Sandrock Custom
- Duo Maxwell
- Deathscythe Hell Custom
💬 Battle conversations in this map (5)
These pairs have their own lines when they fight each other. “Talks to” is a Talk command next to the unit; none of them is needed to win.
- Trowa Barton vs Quatre Raberba Winner
- Chang Wufei vs Duo Maxwell
- Shagia Frost vs Garrod Ran
- Olba Frost vs Garrod Ran
- Yurika Misumaru vs Genichiro Tsukiomi
Black Knight & Mom’s Secret
📜 黒騎士と母の秘密
The Gaizok attack Earth while the Galfa kidnap Vega.
⏳ Don’t miss in this map
- Part on a retreating enemy: Killer the Butcher carries Large Magazine details
Full list across the game: Missables.
Walkthrough
- MainDendoh and Walkure are defeat conditions until the second wave.
- WarningButcher retreats and carries a Large Magazine.
- MainAfter the map: Go rescue Vega (stages 22-23, Galfa story, Full Armor Dendoh) or Go stop the colony drop (stages 22-23, Neo Zeon and Gundam W story). The colony route has two secret recruits (Ple and Febral), the Vega route has none. Wufei joins after stage 23 on both.
🗺️ Battle map
Circles are units on the map at the start (red enemy, blue ally, green guest). Squares with a number are reinforcement waves. Yellow tags number the named enemies in the table below, and a yellow diamond marks a unit that carries a part. Tap the map to open it full size.
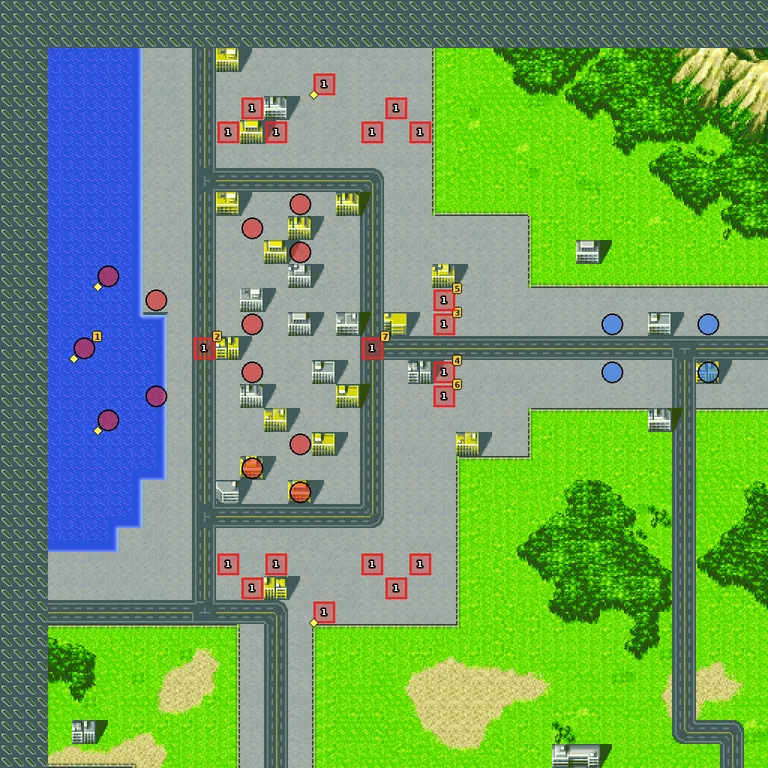
- 1Wave 1 — all enemies defeated
Named enemies & parts
| Pilot | Unit | Part | Appears | |
|---|---|---|---|---|
| 1 Killer the Butcher | Bandock | Large Magazine | start Retreats when damaged | |
| 2 Altea | Knight GEAR Ohga | — | wave 1: all enemies defeated | |
| 3 Unicorn Drill | Unicorn Drill | — | wave 1: all enemies defeated | |
| 4 Leo Circle | Leo Circle | — | wave 1: all enemies defeated | |
| 5 Dragon Flare | Dragon Flare | — | wave 1: all enemies defeated | |
| 6 Gatling Boar | Gatling Boar | — | wave 1: all enemies defeated | |
| 7 Tis | Thugater | — | wave 1: all enemies defeated |
Parts on regular enemies: Cartridge, Propellant Tank, Repair Kit ×2.
New units & pilots
First time each one fights on your side on this route, during the map or right after it. Purple = only if you meet the condition.
- Cell Booster
💬 Battle conversations in this map (1)
These pairs have their own lines when they fight each other. “Talks to” is a Talk command next to the unit; none of them is needed to win.
- Kappei Jin vs Killer the Butcher
In the Flames / Haman’s Dark Shadow
📜 炎の中で / ハマーンの黒い影
Vega Rescue route: In the Flames
Added later in the map: Victory: Dendoh reaches Aldebaran.
Full Armor Dendoh storms the Galfa fleet to rescue Vega.
Walkthrough
- MainVictory: defeat all enemies, or bring Dendoh to Aldebaran.
- WarningAltea (Viper Whip) carries a Chogokin Z. The Mech Generals carry a Learning CP, a Bio-Sensor and a Mega Booster.
🗺️ Battle map
Circles are units on the map at the start (red enemy, blue ally, green guest). Squares with a number are reinforcement waves. Yellow tags number the named enemies in the table below, and a yellow diamond marks a unit that carries a part. Tap the map to open it full size.
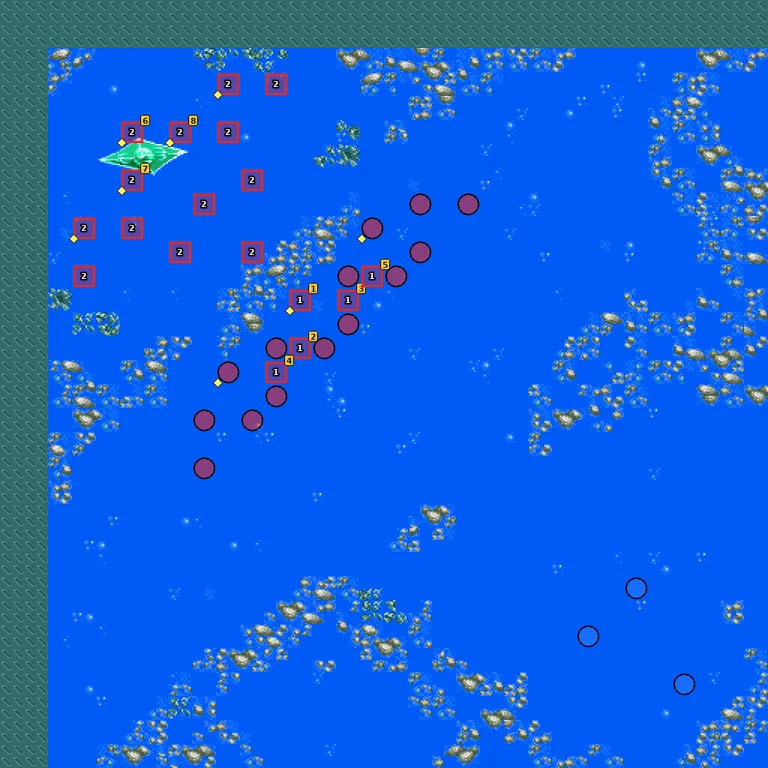
- 1Wave 1 — 8 or fewer enemies left
- 2Wave 2 — Altea destroyed
Named enemies & parts
| Pilot | Unit | Part | Appears | |
|---|---|---|---|---|
| 1 Altea | Ohga Viper Whip | Chogokin Z | wave 1: 8 or fewer enemies left | |
| 2 Unicorn Drill | Unicorn Drill | — | wave 1: 8 or fewer enemies left | |
| 3 Leo Circle | Leo Circle | — | wave 1: 8 or fewer enemies left | |
| 4 Dragon Flare | Dragon Flare | — | wave 1: 8 or fewer enemies left | |
| 5 Gatling Boar | Gatling Boar | — | wave 1: 8 or fewer enemies left | |
| 6 Mech General Giga Absolute | Mech General Giga Absolute | Learning CP | wave 2: Altea destroyed | |
| 7 Mech General Giga Gurumei | Mech General Giga Gurumei | Bio-Sensor | wave 2: Altea destroyed | |
| 8 Mech General Giga Witter | Mech General Giga Witter | Mega Booster | wave 2: Altea destroyed |
Parts on regular enemies: Cartridge, Propellant Tank, Repair Kit ×2.
New units & pilots
First time each one fights on your side on this route, during the map or right after it. Purple = only if you meet the condition.
- Full Armor Dendoh
💬 Battle conversations in this map (3)
These pairs have their own lines when they fight each other. “Talks to” is a Talk command next to the unit; none of them is needed to win.
- Ginga Izumo vs Mech General Giga Absolute
- Ginga Izumo vs Mech General Giga Gurumei
- Ginga Izumo vs Mech General Giga Witter
Colony Drop route: Haman’s Dark Shadow
Haman tries to drop a colony on Earth, and Judau’s group joins.
⏳ Don’t miss in this map
- Elpeo Ple: Judau must use Convince on Ple twice (the first try fails). She then joins with her Qubeley Mk-II. Never let Judau attack her: one battle between them cancels the Convince option.
- Febral: if Jamil has 20 or more kills when this map ends, the Febral joins. Feed Jamil kills on the earlier stages.
- Part on a retreating enemy: Haman Karn carries Mega Booster details
- Part on a retreating enemy: Prince Heinel carries Bio-Sensor details
Full list across the game: Missables.
Walkthrough
- MainVictory: wipe out the enemy, or destroy the colony’s engine within 5 turns (any unit can do it once it reaches the colony). The colony passes the point of no return on turn 6.
- SecretElpeo Ple: Judau must use Convince on Ple twice (the first try fails). She then joins with her Qubeley Mk-II. Never let Judau attack her: one battle between them cancels the Convince option.
- SecretFebral: if Jamil has 20 or more kills when this map ends, the Febral joins. Feed Jamil kills on the earlier stages.
- TipJamil vs Lancerow has a conversation here, but it is not needed for Lancerow later (the script only checks stage 29).
- WarningHaman retreats when hurt; she carries a Mega Booster. Glemy carries a Chogokin Z.
🗺️ Battle map
Circles are units on the map at the start (red enemy, blue ally, green guest). Squares with a number are reinforcement waves. Yellow tags number the named enemies in the table below, and a yellow diamond marks a unit that carries a part. Tap the map to open it full size.
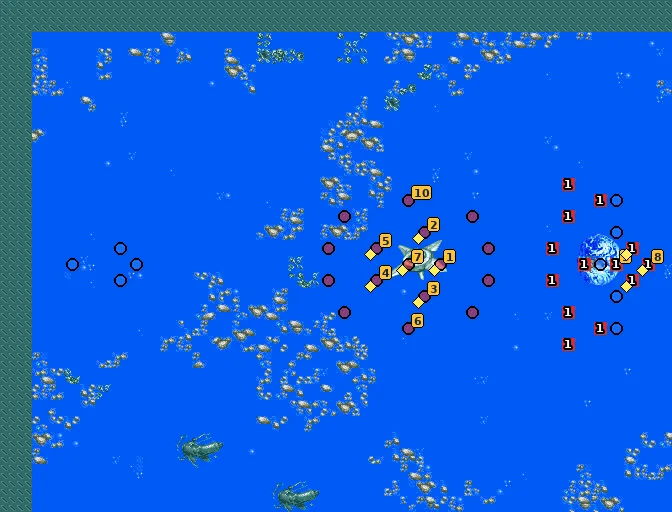
- 1Wave 1 — a story event
Named enemies & parts
| Pilot | Unit | Part | Appears | |
|---|---|---|---|---|
| 1 Glemy Toto | Bawoo | Chogokin Z | start | |
| 2 Mashymre Cello | Hamma-Hamma | Propellant Tank | start | |
| 3 Chara Soon | R-Jarja | Repair Kit | start | |
| 4 Illia Pazom | ReGelgu | Cartridge | start | |
| 5 Lancerow Dawell | Crouda | Repair Kit | start | |
| 6 Ple Two | Qubeley Mk-II | — | start | |
| 7 Haman Karn | Qubeley | Mega Booster | start Retreats when damaged | |
| 8 Prince Heinel | Skullrook | Bio-Sensor | wave 1: a story event Retreats when damaged | |
| 9 Jangal Rui | Skullrook | — | wave 1: a story event | |
| 10 Elpeo Ple | Qubeley Mk-II | — | start |
Parts on regular enemies: Propellant Tank, Repair Kit.
New units & pilots
First time each one fights on your side on this route, during the map or right after it. Purple = only if you meet the condition.
- Zechs Merquise
- Tallgeese III
- Bright Noa
- Nahel Argama
- Trowa Barton
- Heavyarms Custom
- Judau Ashta
- ZZ Gundam
- Roux Louka
- Zeta Gundam
- Febral (Jamil Neate has 20+ kills)
💬 Battle conversations in this map (14)
These pairs have their own lines when they fight each other. “Talks to” is a Talk command next to the unit; none of them is needed to win.
- Jamil Neate vs Lancerow Dawell
- Judau Ashta vs Haman Karn
- Quattro Bajeena vs Haman Karn
- Kamille Bidan vs Haman Karn
- Jamil Neate vs Haman Karn
- Zechs Merquise vs Haman Karn
- Judau Ashta vs Mashymre Cello
- Judau Ashta vs Chara Soon
- Judau Ashta vs Illia Pazom
- Judau Ashta vs Elpeo Ple
- Judau Ashta vs Glemy Toto
- Roux Louka vs Glemy Toto
- Kenichi Go vs Prince Heinel
- Kenichi Go vs Jangal Rui
The Day Spiral Castle Falls / Endless Waltz
📜 螺旋城の落ちる日 / エンドレスワルツ
Vega Rescue route: The Day Spiral Castle Falls
The Galfa’s Spiral Castle falls and Hokuto returns with the Ohga.
⏳ Don’t miss in this map
- Part on a retreating enemy: Tis carries 3D Radar details
Full list across the game: Missables.
Walkthrough
- MainDendoh and Ohga arrive on turn 3. The Mech Generals don’t retreat any more: Chobham Armor, Multi-Sensor, Magnet Coating.
- TipThe Spiral Castle carries a Psycho Frame; Tis retreats and carries a 3D Radar.
- TipAfter the map both groups meet; Wufei, the Gundam W pilots and the Judau group join here on this route.
🗺️ Battle map
Circles are units on the map at the start (red enemy, blue ally, green guest). Squares with a number are reinforcement waves. Yellow tags number the named enemies in the table below, and a yellow diamond marks a unit that carries a part. Tap the map to open it full size.
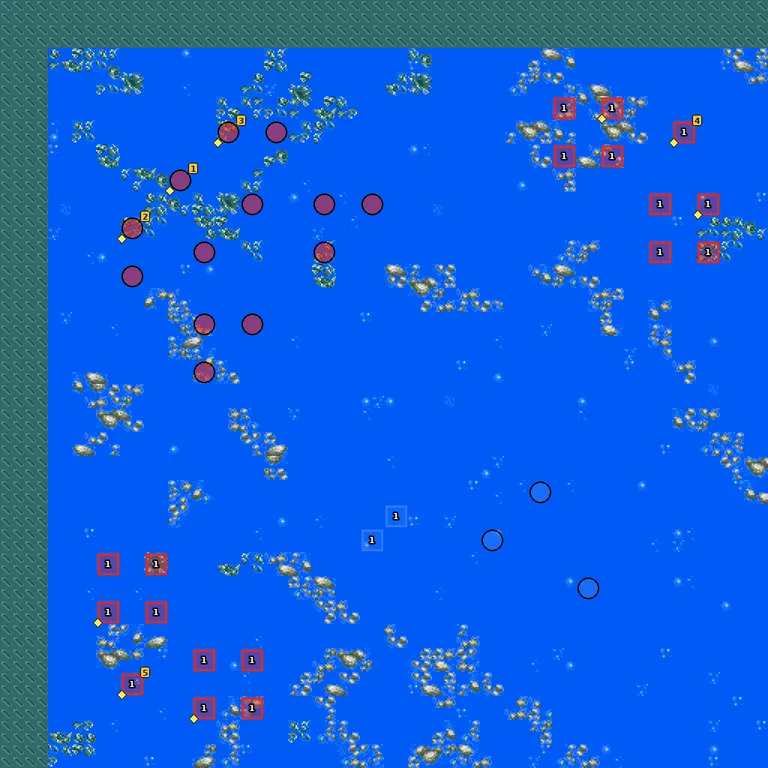
- 1Wave 1 — turn 3, all enemies defeated
Named enemies & parts
| Pilot | Unit | Part | Appears | |
|---|---|---|---|---|
| 1 Mech General Giga Absolute | Mech General Giga Absolute | Chobham Armor | start | |
| 2 Mech General Giga Gurumei | Mech General Giga Gurumei | Multi-Sensor | start | |
| 3 Mech General Giga Witter | Mech General Giga Witter | Magnet Coating | start | |
| 4 Spiral Castle | Spiral Castle | Psycho Frame | wave 1: turn 3, all enemies defeated | |
| 5 Tis | Thugater | 3D Radar | wave 1: turn 3, all enemies defeated Retreats when damaged |
Parts on regular enemies: Cartridge, Propellant Tank, Repair Kit ×2.
New units & pilots
First time each one fights on your side on this route, during the map or right after it. Purple = only if you meet the condition.
- Valhalla
- Knight GEAR Ohga
- Juzo Naniwa
- Daisaku Nishikawa
- Chizuru Nanbara
- Kosuke Kita
- Chie Ichinoki
- Judau Ashta
- ZZ Gundam
- Roux Louka
- Zeta Gundam
- Bright Noa
- Nahel Argama
- Zechs Merquise
- Tallgeese III
- Trowa Barton
- Heavyarms Custom
- Chang Wufei
- Altron Custom
- Ennil El
- Jenice Ennil Custom
- Carris Nautilus
- Bertigo
- Ippei Mine
- Daijiro Go
- Hiyoshi Go
- Megumi Oka
💬 Battle conversations in this map (8)
These pairs have their own lines when they fight each other. “Talks to” is a Talk command next to the unit; none of them is needed to win.
- Ginga Izumo vs Spiral Castle
- Hokuto Kusanagi vs Spiral Castle
- Ginga Izumo vs Mech General Giga Absolute
- Hokuto Kusanagi vs Mech General Giga Absolute
- Ginga Izumo vs Mech General Giga Gurumei
- Hokuto Kusanagi vs Mech General Giga Gurumei
- Ginga Izumo vs Mech General Giga Witter
- Hokuto Kusanagi vs Mech General Giga Witter
Colony Drop route: Endless Waltz
Added later in the map: Defeat: Heero’s unit destroyed.
The Mariemaia Army’s coup, and Wufei stands against Heero.
⏳ Don’t miss in this map
- Chang Wufei / Altron Custom: let Heero fight Wufei to start their talk, then use Convince with Heero. Wufei switches sides on the spot.
- Part on a retreating enemy: Shagia Frost carries Multi-Sensor details
- Part on a retreating enemy: Olba Frost carries 3D Radar details
Full list across the game: Missables.
Walkthrough
- MainYour hero, Garrod and (from turn 2) Heero are defeat conditions.
- SecretChang Wufei / Altron Custom: let Heero fight Wufei to start their talk, then use Convince with Heero. Wufei switches sides on the spot.
- WarningThe Frost brothers and Ennil El retreat: Shagia Multi-Sensor, Olba 3D Radar. Rakan carries a Psycho Frame.
- TipDestroying Wufei instead brings Master Asia’s Devil Gundams.
🗺️ Battle map
Circles are units on the map at the start (red enemy, blue ally, green guest). Squares with a number are reinforcement waves. Yellow tags number the named enemies in the table below, and a yellow diamond marks a unit that carries a part. Tap the map to open it full size.
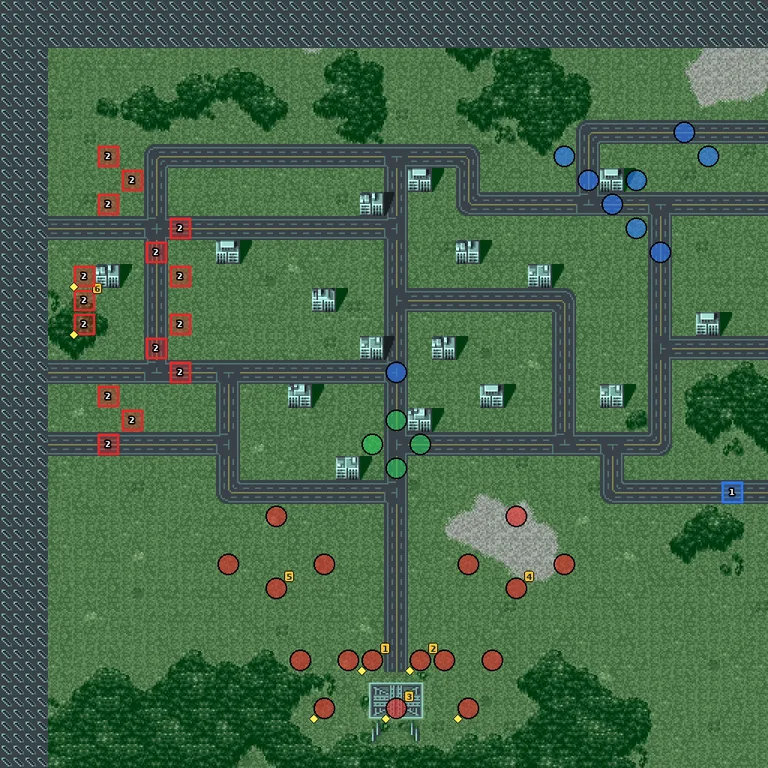
- 1Wave 1 — turn 2
- 2Wave 2 — a story event
- 3Wave 3 — Chang Wufei destroyed
Named enemies & parts
| Pilot | Unit | Part | Appears | |
|---|---|---|---|---|
| 1 Shagia Frost | Gundam Virsago Chest Break | Multi-Sensor | start Retreats when damaged | |
| 2 Olba Frost | Gundam Ashtaron Hermit Crab (MA) | 3D Radar | start Retreats when damaged | |
| 3 Rakan Dahkaran | Dreissen | Psycho Frame | start | |
| 4 Chang Wufei | Altron Custom | — | start | |
| 5 Ennil El | Jenice Ennil Custom | — | start Retreats when damaged | |
| 6 Master Asia | Devil Gundam | — | wave 2: a story event |
Parts on regular enemies: Cartridge, Mom’s Stew, Propellant Tank, Repair Kit ×2, Super Repair Kit.
New units & pilots
First time each one fights on your side on this route, during the map or right after it. Purple = only if you meet the condition.
- Carris Nautilus
- Bertigo
- Knight GEAR Ohga
- Valhalla
- Ennil El
- Jenice Ennil Custom
- Chang Wufei
- Altron Custom
- Uchuta Kamie
- Keiko Kamikita
- Mary King
- Sho Tachibana
💬 Battle conversations in this map (8)
These pairs have their own lines when they fight each other. “Talks to” is a Talk command next to the unit; none of them is needed to win.
- Heero Yuy vs Chang Wufei
- Rakan Dahkaran vs Judau Ashta
- Carris Nautilus vs Ennil El
- Carris Nautilus vs Rakan Dahkaran
- Gundam Double X vs Shagia Frost
- Gundam Double X vs Olba Frost
- Carris Nautilus vs Shagia Frost
- Carris Nautilus vs Olba Frost
Volcano Isle Base of Rage!
📜 怒りの火山島基地!
Everybody heads for the Mykene’s Volcano Isle base.
⏳ Don’t miss in this map
- Part on a retreating enemy: Lalia carries Large Generator details
Full list across the game: Missables.
Walkthrough
- MainA big fight against the Mykene and the Campbellians. Combattler V and Kerot arrive on turn 2.
- TipEmpress Janera carries a Shuffle Crest. Dungele and the Great General each come back in a second form: Dual Sensor and Solar Panel.
- WarningLalia arrives on turn 2, retreats, and carries a Large Generator.
🗺️ Battle map
Circles are units on the map at the start (red enemy, blue ally, green guest). Squares with a number are reinforcement waves. Yellow tags number the named enemies in the table below, and a yellow diamond marks a unit that carries a part. Tap the map to open it full size.
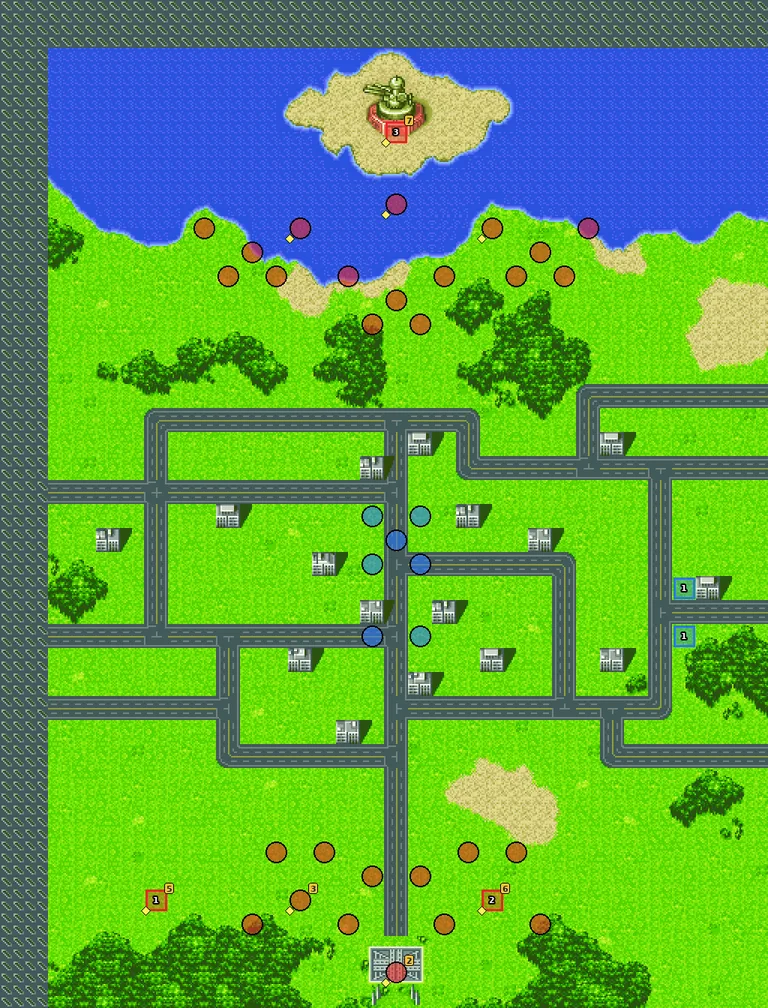
- 1Wave 1 — turn 2
- 2Wave 2 — General Dungele destroyed
- 3Wave 3 — Great General of Darkness destroyed
Named enemies & parts
| Pilot | Unit | Part | Appears | |
|---|---|---|---|---|
| 1 Great General of Darkness | Fortress Demonika | — | start | |
| 2 Empress Janera | Saint Magma | Shuffle Crest | start | |
| 3 Commander Warchimedes | Magma Beast Darkron | Booster | start | |
| 4 General Dungele | Magma Beast Great 1 | — | start | |
| 5 Lalia | Hypocrisis | Large Generator | wave 1: turn 2 Retreats when damaged | |
| 6 General Dungele | Magma Beast Great 2 | Dual Sensor | wave 2: General Dungele destroyed | |
| 7 Great General of Darkness | Great General of Darkness | Solar Panel | wave 3: Great General of Darkness destroyed |
Parts on regular enemies: Dustproofing, Propellant Tank, Repair Kit.
💬 Battle conversations in this map (12)
These pairs have their own lines when they fight each other. “Talks to” is a Talk command next to the unit; none of them is needed to win.
- Tetsuya Tsurugi vs Great General of Darkness
- Hyoma Aoi vs Empress Janera
- Hyoma Aoi vs Commander Warchimedes
- Hyoma Aoi vs General Dungele
- Kinta Ichinoki vs Empress Janera
- Kinta Ichinoki vs Commander Warchimedes
- Kinta Ichinoki vs General Dungele
- your hero vs Lalia
- Koji Kabuto vs Great General of Darkness
- Sayaka Yumi vs Great General of Darkness
- Jun Hono vs Great General of Darkness
- Boss vs Great General of Darkness
Master Asia Dies Twice
📜 東方不敗は二度死ぬ
Domon faces Master Asia again, and Rain brings the God Gundam.
Walkthrough
- MainDomon’s unit is a defeat condition. On turn 2 Rain arrives with the God Gundam and Fuunsaiki.
- TipMaster Asia carries a Hybrid Armor. Tis (Learning CP), Lalia (Mega Booster) and Despinis (Linear Seat) are also here.
🗺️ Battle map
Circles are units on the map at the start (red enemy, blue ally, green guest). Squares with a number are reinforcement waves. Yellow tags number the named enemies in the table below, and a yellow diamond marks a unit that carries a part. Tap the map to open it full size.
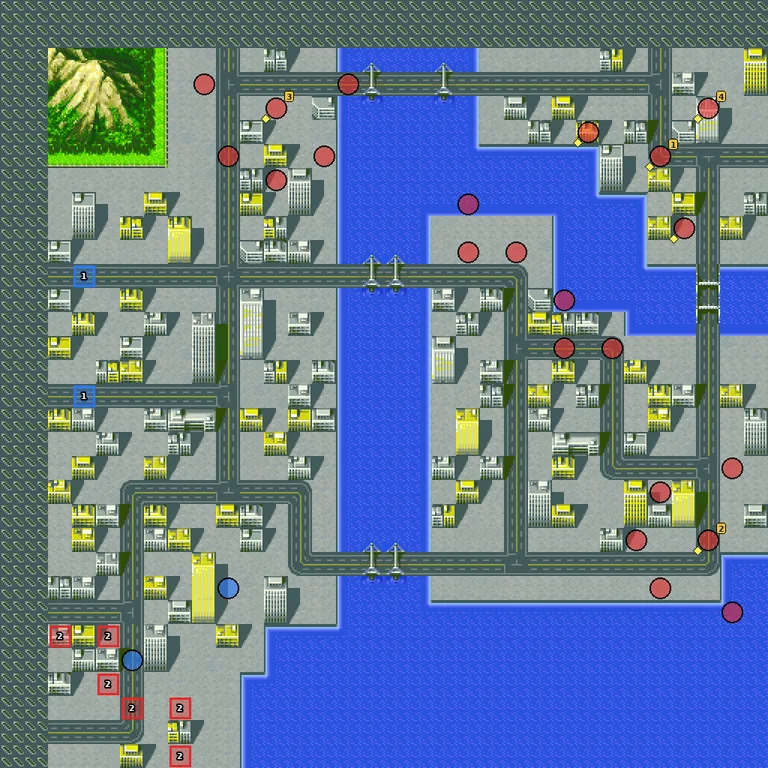
- 1Wave 1 — turn 2
- 2Wave 2 — turn 5, all enemies defeated
Named enemies & parts
| Pilot | Unit | Part | Appears | |
|---|---|---|---|---|
| 1 Master Asia | Devil Gundam | Hybrid Armor | start | |
| 2 Tis | Thugater | Learning CP | start | |
| 3 Lalia | Hypocrisis | Mega Booster | start | |
| 4 Despinis | Eleos | Linear Seat | start |
Parts on regular enemies: Propellant Tank, Repair Kit.
New units & pilots
First time each one fights on your side on this route, during the map or right after it. Purple = only if you meet the condition.
- Rain Mikamura
- God Gundam
- Shining Gundam
- Fuunsaiki
- Fuunsaiki
- God Gundam (Fuunsaiki)
Revival!! Shin Getter Robo!
📜 復活!! 真ゲッターロボ!
Added later in the map: Defeat: Allied warship destroyed.
Shin Getter Robo is revived, and the Devil Gundam evolves with Master Asia inside.
⏳ Don’t miss in this map
- Master Asia, part 1: destroy Master Asia’s Devil Gundam. If it only retreats, he is lost. Attack with your strongest unit so the final hit takes it out from above its retreat line.
- Part on a retreating enemy: Lalia carries Multi-Sensor details
- Part on a retreating enemy: Despinis carries Learning CP+ details
- Part on a retreating enemy: Master Asia carries Large Generator details
Full list across the game: Missables.
Walkthrough
- MainNeo Getter-2 is a defeat condition at the start. Shin Getter-1 arrives on turn 3.
- SecretMaster Asia, part 1: destroy Master Asia’s Devil Gundam. If it only retreats, he is lost. Attack with your strongest unit so the final hit takes it out from above its retreat line.
- WarningLalia (Multi-Sensor) and Despinis (Learning CP+) retreat. Master Asia’s evolved Devil Gundam carries a Large Generator.
🗺️ Battle map
Circles are units on the map at the start (red enemy, blue ally, green guest). Squares with a number are reinforcement waves. Yellow tags number the named enemies in the table below, and a yellow diamond marks a unit that carries a part. Tap the map to open it full size.
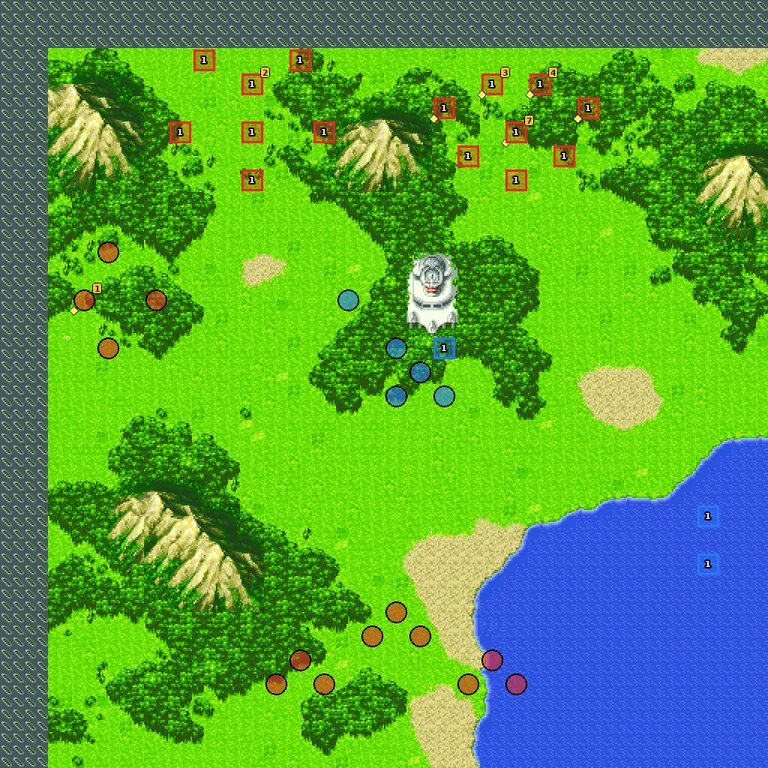
- 1Wave 1 — turn 3
Named enemies & parts
| Pilot | Unit | Part | Appears | |
|---|---|---|---|---|
| 1 Neon | Prototype Getter | Beam Coating | start | |
| 2 General Bat | Mechasaurus Boar | — | wave 1: turn 3 | |
| 3 Lalia | Hypocrisis | Multi-Sensor | wave 1: turn 3 Retreats when damaged | |
| 4 Despinis | Eleos | Learning CP+ | wave 1: turn 3 Retreats when damaged | |
| 5 Master Asia | Devil Gundam | — | wave 1: turn 3 Retreats when damaged | |
| 6 Master Asia | Devil Gundam | Large Generator | wave 1: turn 3 Retreats when damaged | |
| 7 Master Asia | Devil Gundam | — | wave 1: turn 3 Retreats when damaged |
Parts on regular enemies: Propellant Tank, Repair Kit.
New units & pilots
First time each one fights on your side on this route, during the map or right after it. Purple = only if you meet the condition.
- Neo Getter-2
- Shin Getter-1
- Sho Tachibana
💬 Battle conversations in this map (2)
These pairs have their own lines when they fight each other. “Talks to” is a Talk command next to the unit; none of them is needed to win.
- Go Ichimonji vs General Bat
- Domon Kasshu vs Master Asia
Forge On!! Earth’s Future!
📜 切り拓け!! 地球の未来!
Emperor Gore of the Dinosaur Empire makes his last move, and Boazan joins the battle.
⏳ Don’t miss in this map
- Master Asia, part 2: after Emperor Gore’s first form is destroyed, let Shin Getter’s HP drop to 30% or less. The Getter awakens; if Master Asia was destroyed in stage 26, the Getter Rays cleanse his DG Cells and he joins in stage 28.
Full list across the game: Missables.
Walkthrough
- MainShin Getter is a defeat condition.
- SecretMaster Asia, part 2: after Emperor Gore’s first form is destroyed, let Shin Getter’s HP drop to 30% or less. The Getter awakens; if Master Asia was destroyed in stage 26, the Getter Rays cleanse his DG Cells and he joins in stage 28.
- TipEmperor Gore (second form) carries a New Chogokin Z, Godol (Heinel’s second unit) a Haro, Jangal an A-Adapter.
- TipVoltes V and Tsukumo arrive on turn 4.
🗺️ Battle map
Circles are units on the map at the start (red enemy, blue ally, green guest). Squares with a number are reinforcement waves. Yellow tags number the named enemies in the table below, and a yellow diamond marks a unit that carries a part. Tap the map to open it full size.
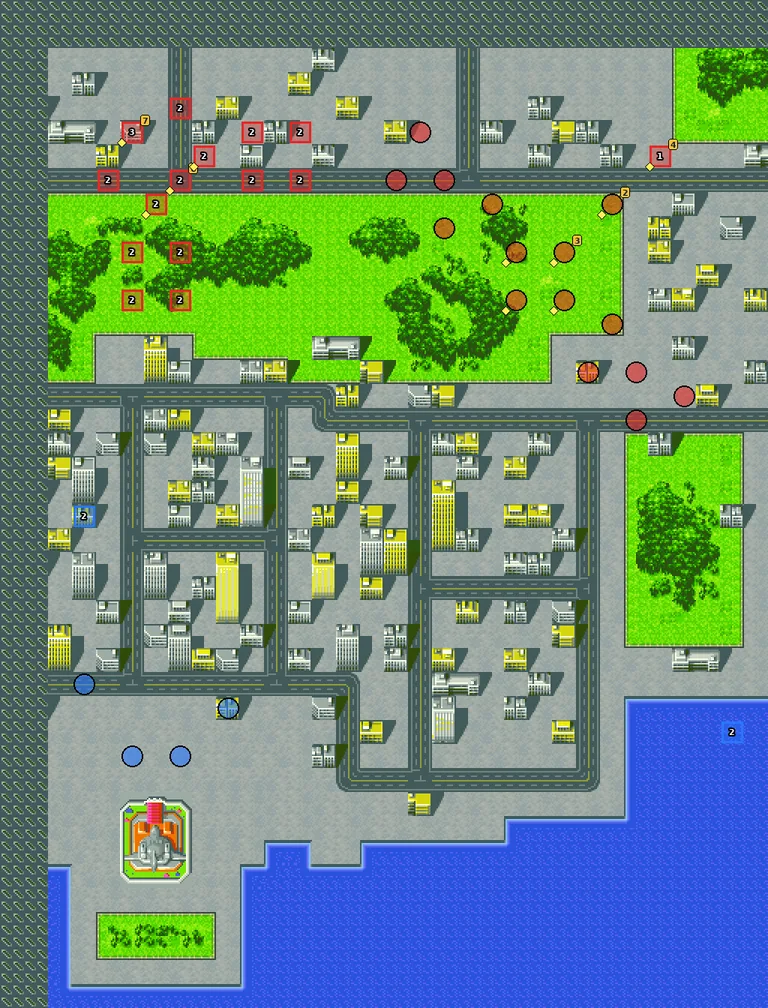
- 1Wave 1 — Emperor Gore destroyed
- 2Wave 2 — turn 4, all enemies defeated
- 3Wave 3 — Prince Heinel destroyed
Named enemies & parts
| Pilot | Unit | Part | Appears | |
|---|---|---|---|---|
| 1 Emperor Gore | Giant Saucer | — | start | |
| 2 Chief Galeli | Mechasaurus Gera | Hi-Perf. Scope | start | |
| 3 Neon | Prototype Getter | Mom’s Stew | start | |
| 4 Emperor Gore | Giant Gore | New Chogokin Z | wave 1: Emperor Gore destroyed | |
| 5 Prince Heinel | Skullrook | — | wave 2: turn 4, all enemies defeated | |
| 6 Jangal Rui | Skullrook | A-Adapter | wave 2: turn 4, all enemies defeated | |
| 7 Prince Heinel | Guardian God Godol | Haro | wave 3: Prince Heinel destroyed |
Parts on regular enemies: Cartridge, Propellant Tank ×2, Repair Kit ×2.
New units & pilots
First time each one fights on your side on this route, during the map or right after it. Purple = only if you meet the condition.
- Texas Mack (Pasture King)
- Tsukumo Shiratori
- Tetsujin
💬 Battle conversations in this map (10)
These pairs have their own lines when they fight each other. “Talks to” is a Talk command next to the unit; none of them is needed to win.
- Go Ichimonji vs Chief Galeli
- Neon vs Shin Getter-1
- Go Ichimonji vs Emperor Gore
- Jack King vs Emperor Gore
- Kenichi Go vs Prince Heinel
- Kenichi Go vs Jangal Rui
- Tsukumo Shiratori vs Prince Heinel
- Tsukumo Shiratori vs Jangal Rui
- Neon vs Shin Getter-2
- Neon vs Shin Getter-3
Tomorrow’s “Captain” Is You
📜 明日の『艦長』は君だ!
Added later in the map: Victory: Defeat all enemies.
The Y Nadesico has been hijacked and Akito has to take it back.
Walkthrough
- MainVictory: bring Akito’s unit or your hero’s unit next to the Y Nadesico. Akito, your hero and the Ra Cailum must survive.
- TipZenoia carries a Chobham Armor, Nendol a Booster, Beltori a Magnet Coating.
- MainAfter the map: Stay at GEAR HQ (stages 29-31, Galfa and Gaizok) or Go to space (stages 29-31, Neo Zeon). Space has two secret recruits (Ple Two, Lancerow) plus Tiffa’s G-Bits; GEAR HQ gives the fully upgraded Ohga.
🗺️ Battle map
Circles are units on the map at the start (red enemy, blue ally, green guest). Squares with a number are reinforcement waves. Yellow tags number the named enemies in the table below, and a yellow diamond marks a unit that carries a part. Tap the map to open it full size.
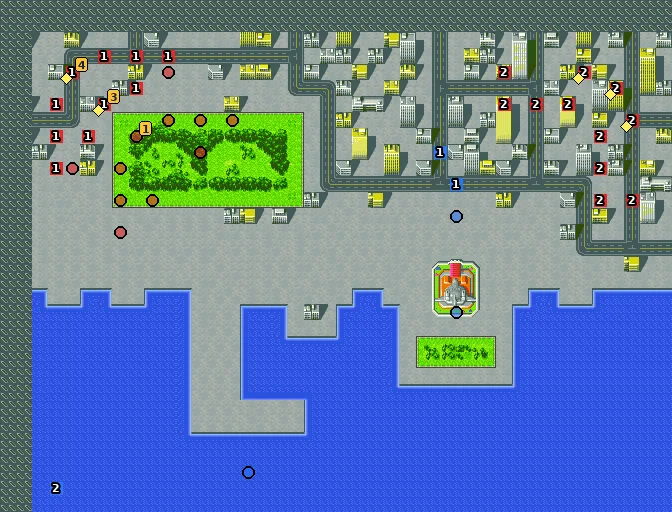
- 1Wave 1 — a story event
- 2Wave 2 — turn 4, all enemies defeated
Named enemies & parts
| Pilot | Unit | Part | Appears | |
|---|---|---|---|---|
| 1 Omoikane | Y Nadesico | — | start Retreats when damaged | |
| 2 Commander Zenoia | Megaborg Zenoia | Chobham Armor | start | |
| 3 Commander Nendol | Megaborg Nendol | Booster | wave 1: a story event | |
| 4 Commander Beltori | Megaborg Beltori | Magnet Coating | wave 1: a story event |
Parts on regular enemies: Cartridge, Propellant Tank, Repair Kit.
New units & pilots
First time each one fights on your side on this route, during the map or right after it. Purple = only if you meet the condition.
- Y Nadesico
- Master Asia (secret)
- Master Gundam (secret)
- Master Gundam (Fuunsaiki) (secret)
💬 Battle conversations in this map (3)
These pairs have their own lines when they fight each other. “Talks to” is a Talk command next to the unit; none of them is needed to win.
- Commander Nendol vs Banjo Haran
- Commander Nendol vs Yurika Misumaru
- Commander Zenoia vs Banjo Haran
Hokuto’s Cry, Ginga’s Tears / I Can See the Moon!
📜 北斗の叫び、銀河の涙 / 月が見えた!
GEAR HQ route: Hokuto’s Cry, Ginga’s Tears
Hokuto, brainwashed by the Galfa, attacks in the Ohga.
⏳ Don’t miss in this map
- Hokuto / Ohga: fight Hokuto with Ginga, then use Ginga’s Talk command on him to bring him back in the middle of the map. Either way Hokuto rejoins after the map, and the Ohga comes back fully upgraded.
- Part on a retreating enemy: Killer the Butcher carries I-Field Barrier details
Full list across the game: Missables.
Walkthrough
- MainDendoh is a defeat condition. Only Ginga should fight Hokuto at first.
- SecretHokuto / Ohga: fight Hokuto with Ginga, then use Ginga’s Talk command on him to bring him back in the middle of the map. Either way Hokuto rejoins after the map, and the Ohga comes back fully upgraded.
- WarningButcher arrives later, retreats, and carries an I-Field Barrier.
🗺️ Battle map
Circles are units on the map at the start (red enemy, blue ally, green guest). Squares with a number are reinforcement waves. Yellow tags number the named enemies in the table below, and a yellow diamond marks a unit that carries a part. Tap the map to open it full size.
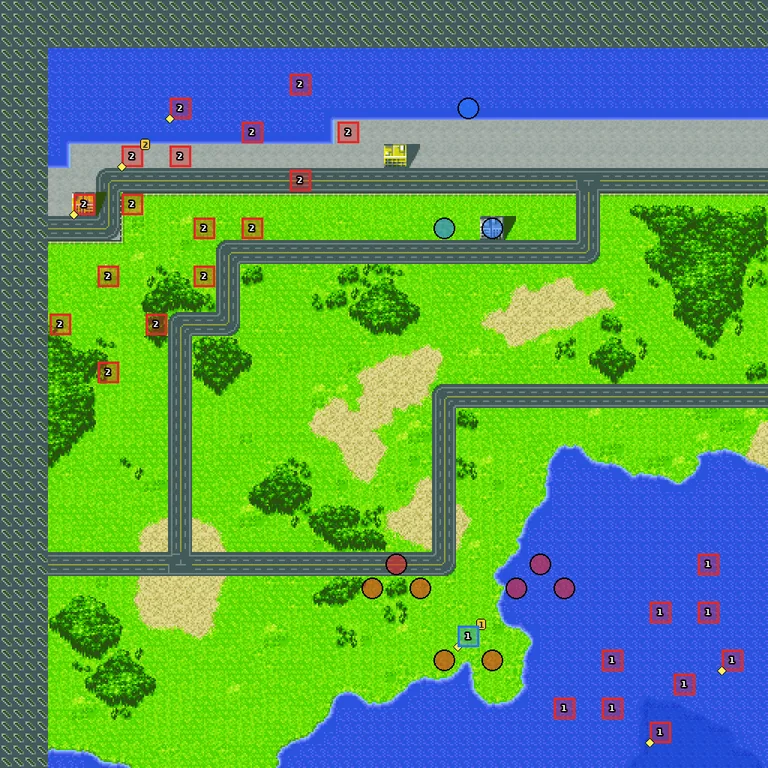
- 1Wave 1 — a story event
- 2Wave 2 — a story event
Named enemies & parts
| Pilot | Unit | Part | Appears | |
|---|---|---|---|---|
| 1 Hokuto Kusanagi | Ohga Unicorn Drill | Large Magazine | start | |
| 2 Killer the Butcher | Bandock | I-Field Barrier | wave 2: a story event Retreats when damaged |
Parts on regular enemies: Propellant Tank ×2, Repair Kit ×2.
New units & pilots
First time each one fights on your side on this route, during the map or right after it. Purple = only if you meet the condition.
- Ohga Unicorn Drill
💬 Battle conversations in this map (3)
These pairs have their own lines when they fight each other. “Talks to” is a Talk command next to the unit; none of them is needed to win.
- Ginga Izumo vs Hokuto Kusanagi
- Ginga Izumo talks to Hokuto Kusanagi
- Kappei Jin vs Killer the Butcher
Space route: I Can See the Moon!
Neo Zeon’s Colony Laser is charging, and Ple Two is back in the Psycho Gundam Mk-II.
⏳ Don’t miss in this map
- Ple Two: make Judau (or Ple, if you recruited her) fight Ple Two twice. After the second conversation Judau can Convince her and she joins on the spot. Glemy does not have to be defeated.
- Lancerow, part 1: fight Lancerow with Jamil here. This conversation is the one the game remembers.
- Part on a retreating enemy: Shagia Frost carries I-Field Barrier details
- Part on a retreating enemy: Olba Frost carries Apogee Motor details
Full list across the game: Missables.
Walkthrough
- MainVictory: wipe out the enemy, or reach the Colony Laser within 5 turns. It fires on turn 6.
- SecretPle Two: make Judau (or Ple, if you recruited her) fight Ple Two twice. After the second conversation Judau can Convince her and she joins on the spot. Glemy does not have to be defeated.
- SecretLancerow, part 1: fight Lancerow with Jamil here. This conversation is the one the game remembers.
- WarningShagia (I-Field Barrier) and Olba (Apogee Motor) retreat. Glemy carries a Large Magazine.
🗺️ Battle map
Circles are units on the map at the start (red enemy, blue ally, green guest). Squares with a number are reinforcement waves. Yellow tags number the named enemies in the table below, and a yellow diamond marks a unit that carries a part. Tap the map to open it full size.
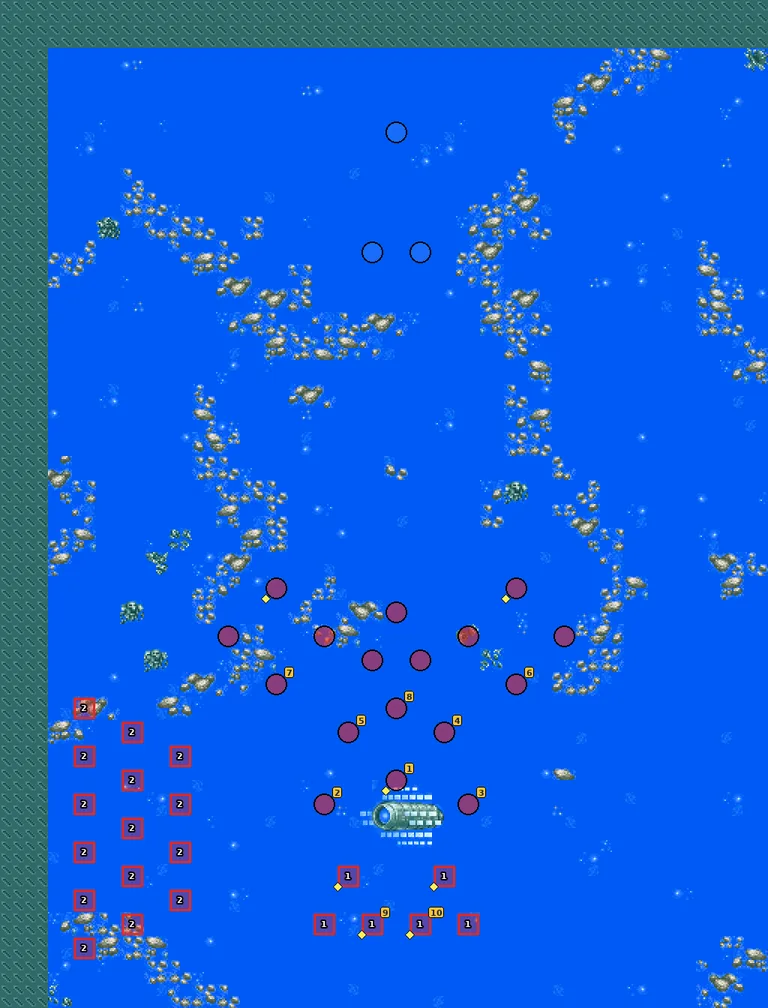
- 1Wave 1 — a story event
- 2Wave 2 — all enemies defeated
Named enemies & parts
| Pilot | Unit | Part | Appears | |
|---|---|---|---|---|
| 1 Glemy Toto | Queen Mansa | Large Magazine | start | |
| 2 Mashymre Cello | Zaku III Custom | — | start | |
| 3 Chara Soon | Geymalk | — | start | |
| 4 Rakan Dahkaran | Doven Wolf | — | start | |
| 5 Illia Pazom | ReGelgu | — | start | |
| 6 Ple Two | Psycho Gundam Mk-II | — | start | |
| 7 Lancerow Dawell | Crouda | — | start | |
| 8 Elpeo Ple | Qubeley Mk-II | — | start | |
| 9 Shagia Frost | Gundam Virsago Chest Break | I-Field Barrier | wave 1: a story event Retreats when damaged | |
| 10 Olba Frost | Gundam Ashtaron Hermit Crab | Apogee Motor | wave 1: a story event Retreats when damaged |
Parts on regular enemies: Propellant Tank ×2, Repair Kit ×2.
New units & pilots
First time each one fights on your side on this route, during the map or right after it. Purple = only if you meet the condition.
- Pala Sys
- G-Falcon
- Gundam Double X (G-Falcon)
- Gundam Airmaster Burst (G-Falcon)
- Gundam Leopard Destroy (G-Falcon)
- Ple Two
💬 Battle conversations in this map (12)
These pairs have their own lines when they fight each other. “Talks to” is a Talk command next to the unit; none of them is needed to win.
- Judau Ashta vs Glemy Toto
- Judau Ashta vs Rakan Dahkaran
- Judau Ashta vs Mashymre Cello
- Judau Ashta vs Chara Soon
- Judau Ashta vs Illia Pazom
- Judau Ashta vs Elpeo Ple
- Judau Ashta vs Ple Two
- Elpeo Ple vs Ple Two
- Jamil Neate vs Lancerow Dawell
- Garrod Ran vs Lancerow Dawell
- Garrod Ran vs Shagia Frost
- Garrod Ran vs Olba Frost
GEAR Destroyed! / A Warrior, Once More…
📜 GEAR壊滅! / 戦士、再び・・・
GEAR HQ route: GEAR Destroyed!
GEAR headquarters falls, and Hokuto must face Subaru.
⏳ Don’t miss in this map
- Part on a retreating enemy: Killer the Butcher carries Dual Sensor details
Full list across the game: Missables.
Walkthrough
- MainOhga is a defeat condition. Hokuto can talk to Subaru after fighting him.
- TipIf Master Asia joined, he arrives with the second wave in the Master Gundam.
- WarningZero carries a Minovsky Craft; Butcher (Dual Sensor) and Lalia (Large Magazine) retreat.
🗺️ Battle map
Circles are units on the map at the start (red enemy, blue ally, green guest). Squares with a number are reinforcement waves. Yellow tags number the named enemies in the table below, and a yellow diamond marks a unit that carries a part. Tap the map to open it full size.
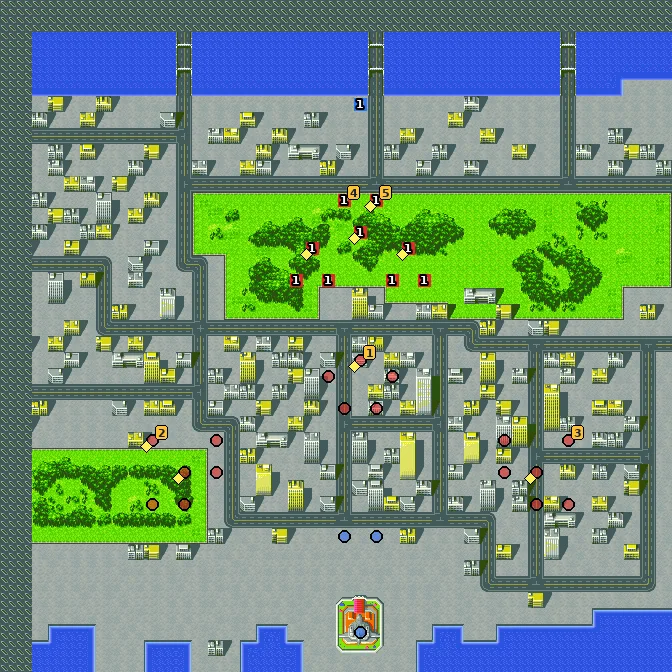
- 1Wave 1 — a story event
Named enemies & parts
| Pilot | Unit | Part | Appears | |
|---|---|---|---|---|
| 1 Killer the Butcher | Bandock | Dual Sensor | start Retreats when damaged | |
| 2 Lalia | Hypocrisis | Large Magazine | start | |
| 3 Subaru | Mech Knight Legacy | — | start Retreats when damaged | |
| 4 Tis | Thugater | — | wave 1: a story event | |
| 5 Zero | Zero | Minovsky Craft | wave 1: a story event |
Parts on regular enemies: Cartridge, Mom’s Stew ×2, Propellant Tank ×2, Repair Kit ×2, Super Repair Kit.
💬 Battle conversations in this map (7)
These pairs have their own lines when they fight each other. “Talks to” is a Talk command next to the unit; none of them is needed to win.
- Subaru vs Hokuto Kusanagi
- Subaru talks to Hokuto Kusanagi
- Killer the Butcher vs Kappei Jin
- Ginga Izumo vs Subaru
- Ginga Izumo vs Zero
- Hokuto Kusanagi vs Zero
- your hero vs Zero
Space route: A Warrior, Once More…
The fight for the microwave transmitter on the Moon, and Haman’s last battle.
⏳ Don’t miss in this map
- Lancerow, part 2: if Jamil fought Lancerow in stage 29, fight him with Jamil again. Jamil can then Convince him and Lancerow joins (with the Crouda after the map).
- Part on a retreating enemy: Despinis carries Dual Sensor details
Full list across the game: Missables.
Walkthrough
- SecretLancerow, part 2: if Jamil fought Lancerow in stage 29, fight him with Jamil again. Jamil can then Convince him and Lancerow joins (with the Crouda after the map).
- TipIf you recruited Ple Two, her own Qubeley Mk-II is ready before this map.
- TipHaman carries a Large Magazine, Glemy a Minovsky Craft, two Mass Production Qubeleys a Hybrid Armor each. Despinis and Seidel retreat.
🗺️ Battle map
Circles are units on the map at the start (red enemy, blue ally, green guest). Squares with a number are reinforcement waves. Yellow tags number the named enemies in the table below, and a yellow diamond marks a unit that carries a part. Tap the map to open it full size.
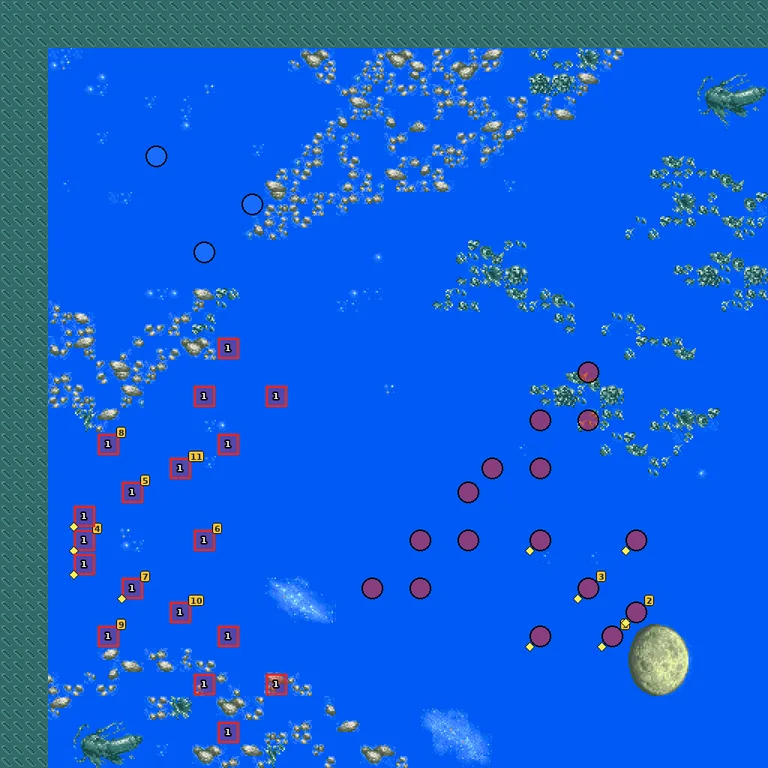
- 1Wave 1 — a story event
Named enemies & parts
| Pilot | Unit | Part | Appears | |
|---|---|---|---|---|
| 1 Shagia Frost | Gundam Virsago Chest Break | EN Chip | start | |
| 2 Olba Frost | Gundam Ashtaron Hermit Crab | Magnet Coating | start | |
| 3 Despinis | Eleos | Dual Sensor | start Retreats when damaged | |
| 4 Haman Karn | Qubeley | Large Magazine | wave 1: a story event | |
| 5 Seidel Rasso | Sadalahn | — | wave 1: a story event Retreats when damaged | |
| 6 Lancerow Dawell | Crouda | — | wave 1: a story event | |
| 7 Glemy Toto | Queen Mansa | Minovsky Craft | wave 1: a story event | |
| 8 Mashymre Cello | Zaku III Custom | — | wave 1: a story event | |
| 9 Chara Soon | Geymalk | — | wave 1: a story event | |
| 10 Rakan Dahkaran | Doven Wolf | — | wave 1: a story event | |
| 11 Illia Pazom | ReGelgu | — | wave 1: a story event |
Parts on regular enemies: Cartridge, Hybrid Armor ×2, Propellant Tank, Repair Kit.
New units & pilots
First time each one fights on your side on this route, during the map or right after it. Purple = only if you meet the condition.
- Qubeley Mk-II (secret)
💬 Battle conversations in this map (13)
These pairs have their own lines when they fight each other. “Talks to” is a Talk command next to the unit; none of them is needed to win.
- Garrod Ran vs Shagia Frost
- Garrod Ran vs Olba Frost
- Haman Karn vs Judau Ashta
- Haman Karn vs Quattro Bajeena
- Haman Karn vs Kamille Bidan
- Haman Karn vs Amuro Ray
- Judau Ashta vs Rakan Dahkaran
- Judau Ashta vs Mashymre Cello
- Judau Ashta vs Chara Soon
- Judau Ashta vs Glemy Toto
- Judau Ashta vs Illia Pazom
- Carris Nautilus vs Lancerow Dawell
- Lancerow Dawell vs Jamil Neate
Butcher’s Last Day / I Am Duminas…
📜 ブッチャーの最期の日 / 私はデュミナス・・・
GEAR HQ route: Butcher’s Last Day
Butcher’s last day, and the Gaizok mother ship itself.
⏳ Don’t miss in this map
- Alstroemeria: if Tsukumo has 10 or more kills at the end of this map, he gets the Alstroemeria.
- Part on a retreating enemy: Tis carries Mega Generator details
- Part on a retreating enemy: Lalia carries Mega Magazine details
Full list across the game: Missables.
Walkthrough
- MainYour hero’s unit is a defeat condition. Butcher arrives when 8 enemies are left and does not retreat (3D Radar).
- TipThe Gaizok carries an I-Field Barrier, Tis a Mega Generator, Lalia a Mega Magazine.
- SecretAlstroemeria: if Tsukumo has 10 or more kills at the end of this map, he gets the Alstroemeria.
- MainAfter the map everybody from the future joins: ν Gundam, Sazabi, Full Armor ZZ, Super Aestivalis, Black Sarena, and the secret units you unlocked earlier.
🗺️ Battle map
Circles are units on the map at the start (red enemy, blue ally, green guest). Squares with a number are reinforcement waves. Yellow tags number the named enemies in the table below, and a yellow diamond marks a unit that carries a part. Tap the map to open it full size.
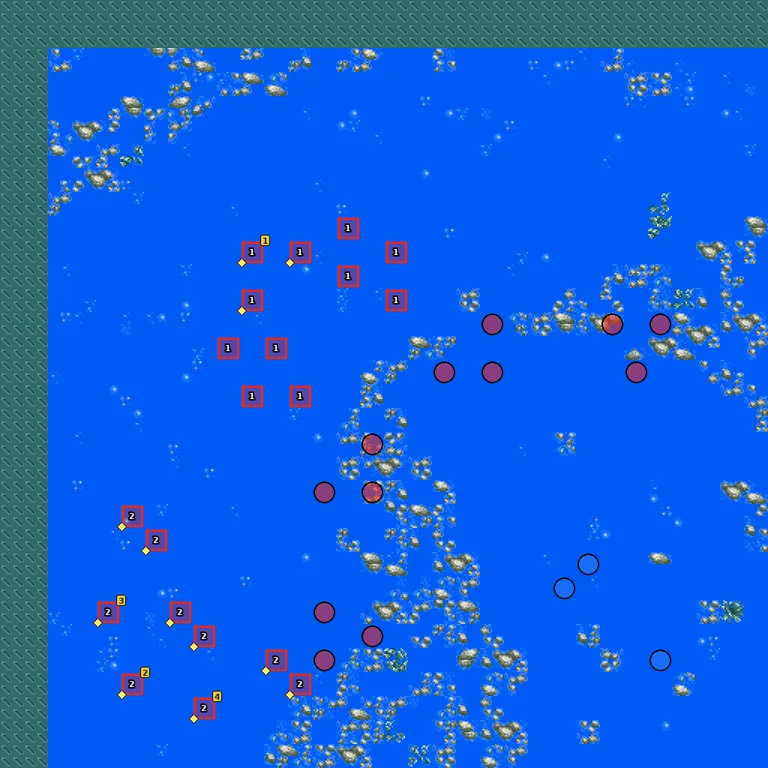
- 1Wave 1 — 8 or fewer enemies left
- 2Wave 2 — all enemies defeated
Named enemies & parts
| Pilot | Unit | Part | Appears | |
|---|---|---|---|---|
| 1 Killer the Butcher | Bandock | 3D Radar | wave 1: 8 or fewer enemies left | |
| 2 Gaizok | Bandock | I-Field Barrier | wave 2: all enemies defeated | |
| 3 Tis | Thugater | Mega Generator | wave 2: all enemies defeated Retreats when damaged | |
| 4 Lalia | Hypocrisis | Mega Magazine | wave 2: all enemies defeated Retreats when damaged |
Parts on regular enemies: Cartridge ×2, Propellant Tank ×2, Repair Kit ×2, Super Repair Kit ×2.
New units & pilots
First time each one fights on your side on this route, during the map or right after it. Purple = only if you meet the condition.
- Super Aestivalis (Gai)
- Full Armor ZZ Gundam
- ν Gundam
- Sazabi
- Alstroemeria (secret)
- Elpeo Ple (secret)
- Qubeley Mk-II (secret)
- Febral (secret)
- Subaru
- Pala Sys
- G-Falcon
- Gundam Double X (G-Falcon)
- Gundam Airmaster Burst (G-Falcon)
- Gundam Leopard Destroy (G-Falcon)
- Juzo Naniwa
- Daisaku Nishikawa
- Chizuru Nanbara
- Kosuke Kita
- Chie Ichinoki
- Mary King
- Aestivalis Custom (Ryoko)
- Aestivalis Custom (Hikaru)
- Aestivalis Custom (Izumi)
- Black Sarena
- Mass Production ν Gundam (Fin Funnels)
💬 Battle conversations in this map (4)
These pairs have their own lines when they fight each other. “Talks to” is a Talk command next to the unit; none of them is needed to win.
- Killer the Butcher vs Kappei Jin
- Kappei Jin vs Gaizok
- Tis vs your hero
- Lalia vs your hero
Space route: I Am Duminas…
Duminas shows itself at last.
⏳ Don’t miss in this map
- Alstroemeria: if Tsukumo has 10 or more kills at the end of this map, he gets the Alstroemeria.
- Tiffa and the G-Bits: Tiffa joins Garrod after this map and the Double X can use the G-Bits.
Full list across the game: Missables.
Walkthrough
- MainDomon and your hero are defeat conditions. G-Bits keep coming when 8 enemies are left.
- SecretAlstroemeria: if Tsukumo has 10 or more kills at the end of this map, he gets the Alstroemeria.
- SecretTiffa and the G-Bits: Tiffa joins Garrod after this map and the Double X can use the G-Bits.
- TipShagia carries a Mega Generator, Olba a Mega Magazine, Master Asia’s Devil Gundam a 3D Radar.
🗺️ Battle map
Circles are units on the map at the start (red enemy, blue ally, green guest). Squares with a number are reinforcement waves. Yellow tags number the named enemies in the table below, and a yellow diamond marks a unit that carries a part. Tap the map to open it full size.
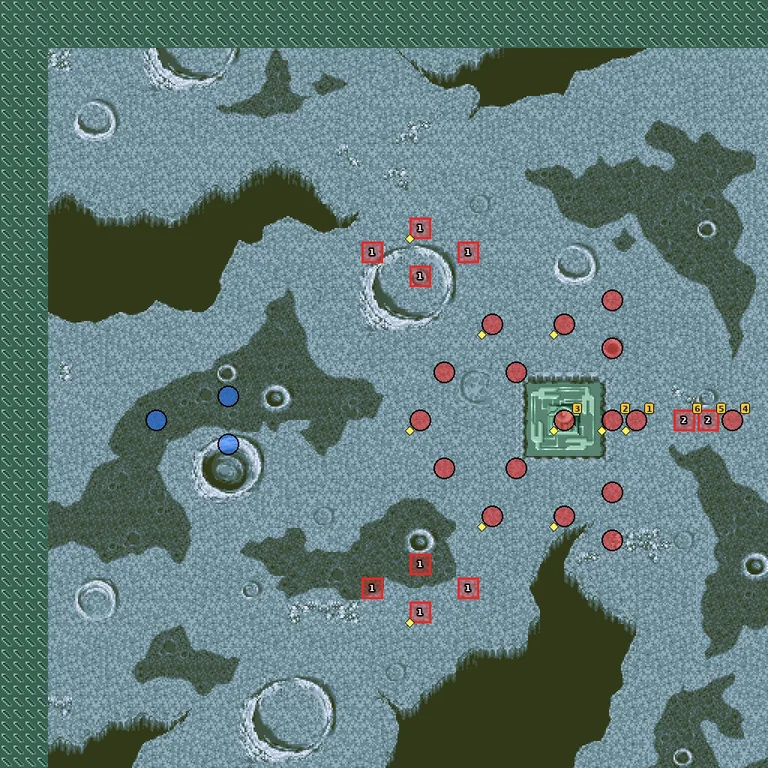
- 1Wave 1 — 8 or fewer enemies left
- 2Wave 2 — a story event
Named enemies & parts
| Pilot | Unit | Part | Appears | |
|---|---|---|---|---|
| 1 Shagia Frost | Gundam Virsago Chest Break | Mega Generator | start | |
| 2 Olba Frost | Gundam Ashtaron Hermit Crab | Mega Magazine | start | |
| 3 Master Asia | Devil Gundam | 3D Radar | start | |
| 4 Seidel Rasso | Sadalahn | — | start | |
| 5 Duminas | Duminas Proton | — | wave 2: a story event | |
| 6 Despinis | Eleos | — | wave 2: a story event |
Parts on regular enemies: 3D Radar, Propellant Tank ×2, Repair Kit ×3, Super Repair Kit ×2.
New units & pilots
First time each one fights on your side on this route, during the map or right after it. Purple = only if you meet the condition.
- Tiffa Adill
- Full Armor ZZ Gundam
- ν Gundam
- Sazabi
- Super Aestivalis (Gai)
- Alstroemeria (secret)
- Subaru
- Ippei Mine
- Daijiro Go
- Hiyoshi Go
- Megumi Oka
- Uchuta Kamie
- Keiko Kamikita
- Aestivalis Custom (Ryoko)
- Aestivalis Custom (Hikaru)
- Aestivalis Custom (Izumi)
- Black Sarena
- Mass Production ν Gundam (Fin Funnels)
💬 Battle conversations in this map (3)
These pairs have their own lines when they fight each other. “Talks to” is a Talk command next to the unit; none of them is needed to win.
- Garrod Ran vs Shagia Frost
- Garrod Ran vs Olba Frost
- Domon Kasshu vs Master Asia
This Is the War We Wanted
📜 僕らが求めた戦争だ
The Martian Successors and the Jovians start the war they wanted, and the Excellence gets its final form.
Walkthrough
- MainBoth warships are defeat conditions (any of them).
- TipAfter the first wave your hero receives the final Excellence: Excellence Lightning for Raul, Excellence Eternal for Fiona.
- TipGenichiro carries an EN Giga Chip, Genpachiro a Mega Generator, Saburota a Learning CP, Hokushin a Hybrid Armor.
🗺️ Battle map
Circles are units on the map at the start (red enemy, blue ally, green guest). Squares with a number are reinforcement waves. Yellow tags number the named enemies in the table below, and a yellow diamond marks a unit that carries a part. Tap the map to open it full size.
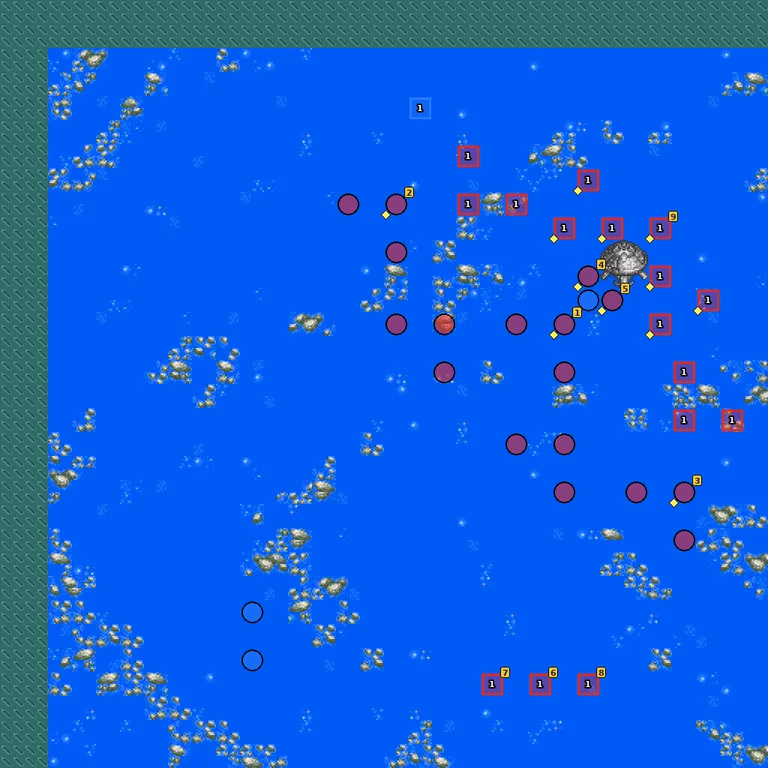
- 1Wave 1 — all enemies defeated
Named enemies & parts
| Pilot | Unit | Part | Appears | |
|---|---|---|---|---|
| 1 Genichiro Tsukiomi | Daimajin | EN Giga Chip | start | |
| 2 Genpachiro Akiyama | Daitetsujin | Mega Generator | start | |
| 3 Saburota Takasugi | Denjin | Learning CP | start | |
| 4 Shagia Frost | Gundam Virsago Chest Break | Hi-Perf. Radar | start | |
| 5 Olba Frost | Gundam Ashtaron Hermit Crab | Mega Booster | start | |
| 6 Tis | Thugater | — | wave 1: all enemies defeated | |
| 7 Lalia | Hypocrisis | — | wave 1: all enemies defeated | |
| 8 Despinis | Eleos | — | wave 1: all enemies defeated | |
| 9 Hokushin | Yatenkou | Hybrid Armor | wave 1: all enemies defeated |
Parts on regular enemies: Cartridge ×2, Propellant Tank ×2, Repair Kit ×2.
New units & pilots
First time each one fights on your side on this route, during the map or right after it. Purple = only if you meet the condition.
- Excellence Lightning
- Excellence Eternal
- Daifighter
💬 Battle conversations in this map (8)
These pairs have their own lines when they fight each other. “Talks to” is a Talk command next to the unit; none of them is needed to win.
- Garrod Ran vs Shagia Frost
- Garrod Ran vs Olba Frost
- Amuro Ray vs Shagia Frost
- Amuro Ray vs Olba Frost
- Tsukumo Shiratori vs Genichiro Tsukiomi
- Tsukumo Shiratori vs Genpachiro Akiyama
- Tsukumo Shiratori vs Saburota Takasugi
- Tsukumo Shiratori vs Hokushin
The Man Lost to the Galaxy
📜 銀河に消えた男
Banjo’s last battle with Don Zauser.
Walkthrough
- MainEach Megaborg commander comes back once in their own Megaborg: Beltori Thruster Module, Nendol Multi-Sensor, Edwin EN Mega Chip, Zenoia 3D Radar.
- TipKoros carries a Haro, and Don Zauser a Learning CP++. Four Nibelguns in the first group carry a Super Repair Kit each.
🗺️ Battle map
Circles are units on the map at the start (red enemy, blue ally, green guest). Squares with a number are reinforcement waves. Yellow tags number the named enemies in the table below, and a yellow diamond marks a unit that carries a part. Tap the map to open it full size.
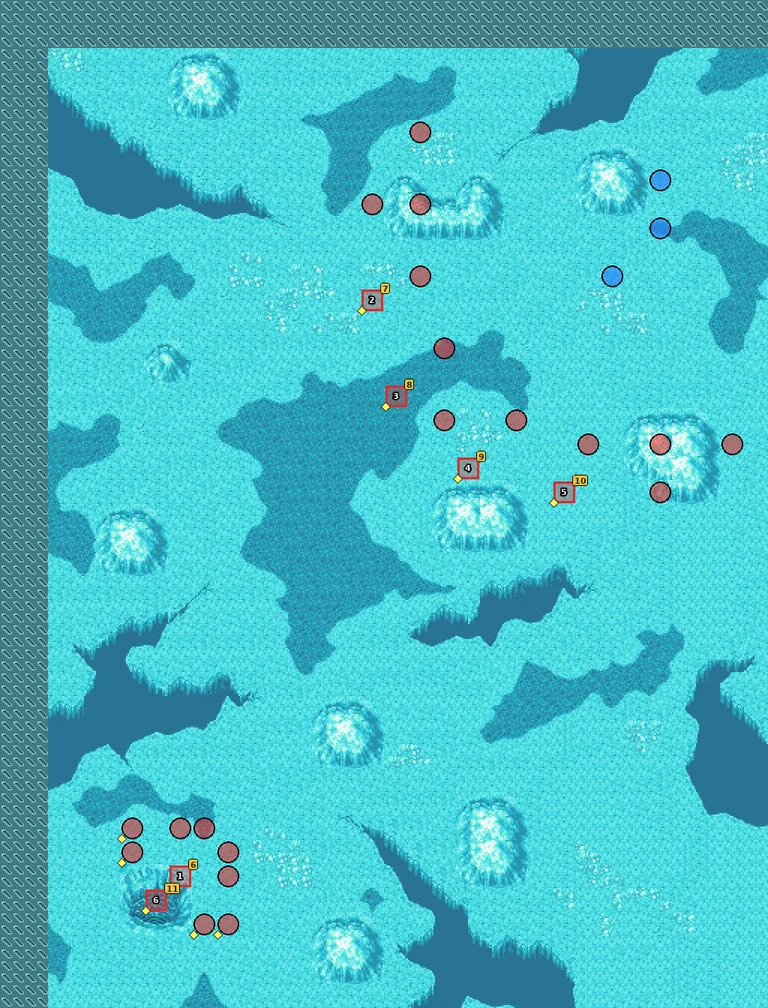
- 1Wave 1 — Koros destroyed
- 2Wave 2 — Commander Beltori destroyed
- 3Wave 3 — Commander Nendol destroyed
- 4Wave 4 — Commander Edwin destroyed
- 5Wave 5 — Commander Zenoia destroyed
- 6Wave 6 — Koros destroyed
Named enemies & parts
| Pilot | Unit | Part | Appears | |
|---|---|---|---|---|
| 1 Koros | Ai-Ai | — | start | |
| 2 Commander Beltori | Nibelgun | — | start | |
| 3 Commander Nendol | Nibelgun | — | start | |
| 4 Commander Zenoia | Nibelgun | — | start | |
| 5 Commander Edwin | Nibelgun | — | start | |
| 6 Koros | Koros | Haro | wave 1: Koros destroyed | |
| 7 Commander Beltori | Megaborg Beltori | Thruster Module | wave 2: Commander Beltori destroyed | |
| 8 Commander Nendol | Megaborg Nendol | Multi-Sensor | wave 3: Commander Nendol destroyed | |
| 9 Commander Edwin | Megaborg Edwin | EN Mega Chip | wave 4: Commander Edwin destroyed | |
| 10 Commander Zenoia | Megaborg Zenoia | 3D Radar | wave 5: Commander Zenoia destroyed | |
| 11 Don Zauser | Don Zauser | Learning CP++ | wave 6: Koros destroyed |
Parts on regular enemies: Super Repair Kit ×4.
💬 Battle conversations in this map (6)
These pairs have their own lines when they fight each other. “Talks to” is a Talk command next to the unit; none of them is needed to win.
- Banjo Haran vs Koros
- Banjo Haran vs Commander Beltori
- Banjo Haran vs Commander Nendol
- Banjo Haran vs Commander Edwin
- Banjo Haran vs Commander Zenoia
- Banjo Haran vs Don Zauser
Go Beyond “Gekiganger”!
📜 『ゲキ・ガンガー』を越えてゆけ!
Akito, the Jovians and Gekiganger: going beyond the cartoon that started it all.
Walkthrough
- MainShishiki reinforcements keep coming whenever 8 enemies are left, so take down the named pilots early.
- TipHokushin carries a New Chogokin Z, Genpachiro a Shuffle Crest, Genichiro a Mega Magazine.
🗺️ Battle map
Circles are units on the map at the start (red enemy, blue ally, green guest). Squares with a number are reinforcement waves. Yellow tags number the named enemies in the table below, and a yellow diamond marks a unit that carries a part. Tap the map to open it full size.
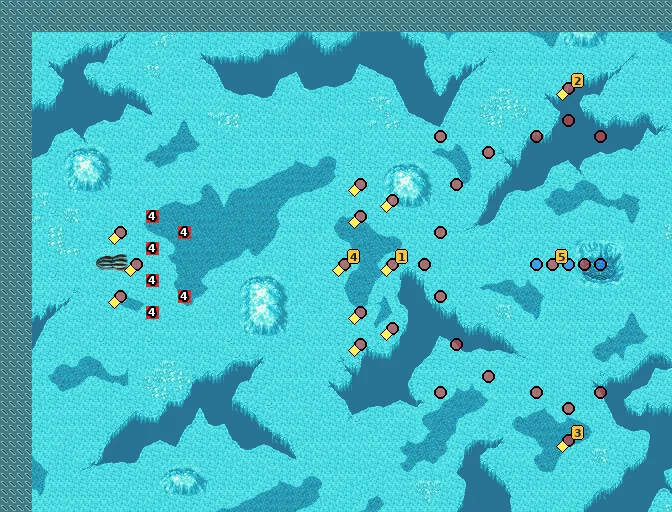
- 1Wave 1 — 8 or fewer enemies left
- 2Wave 2 — 8 or fewer enemies left
- 3Wave 3 — 8 or fewer enemies left
- 4Wave 4 — 8 or fewer enemies left
Named enemies & parts
| Pilot | Unit | Part | Appears | |
|---|---|---|---|---|
| 1 Genichiro Tsukiomi | Daimajin | Mega Magazine | start | |
| 2 Genpachiro Akiyama | Daitetsujin | Shuffle Crest | start | |
| 3 Saburota Takasugi | Denjin | Hi-Perf. Radar | start | |
| 4 Hokushin | Yatenkou | New Chogokin Z | start | |
| 5 Despinis | Eleos | — | start |
Parts on regular enemies: Cartridge ×2, Mom’s Stew, Propellant Tank ×3, Repair Kit ×3.
New units & pilots
First time each one fights on your side on this route, during the map or right after it. Purple = only if you meet the condition.
- Altea
- Alstroemeria
- Nadesico C
💬 Battle conversations in this map (1)
These pairs have their own lines when they fight each other. “Talks to” is a Talk command next to the unit; none of them is needed to win.
- Tsukumo Shiratori vs Genichiro Tsukiomi
Stormy Seas
📜 嵐の海
Added later in the map: Victory: Defeat all enemies.
Valhalla must reach the shield satellite while Zero keeps coming back.
⏳ Don’t miss in this map
- Phoenix Alae: destroy Zero three times. The Phoenix Alae Data Weapon awakens and Dendoh and Ohga get their Phoenix forms.
Full list across the game: Missables.
Walkthrough
- MainVictory: bring Valhalla to the shield satellite (later: defeat all enemies). Valhalla, Dendoh and Ohga are defeat conditions.
- SecretPhoenix Alae: destroy Zero three times. The Phoenix Alae Data Weapon awakens and Dendoh and Ohga get their Phoenix forms.
- TipIf you can’t manage it here, it is not lost: in stage 36 it happens anyway after Lalia, Despinis and Tis are defeated.
- TipDespinis carries a Chogokin Z; Shagia a Learning CP+, Olba a Hi-Perf. Scope, Tis a Psycho Frame, Lalia an A-Adapter.
🗺️ Battle map
Circles are units on the map at the start (red enemy, blue ally, green guest). Squares with a number are reinforcement waves. Yellow tags number the named enemies in the table below, and a yellow diamond marks a unit that carries a part. Tap the map to open it full size.
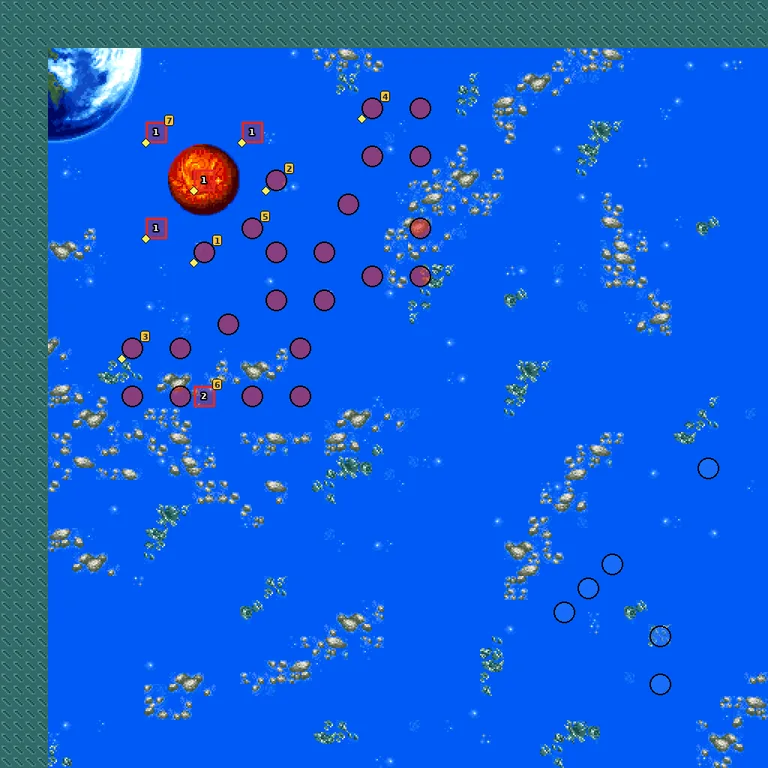
- 1Wave 1 — unit reaches area
- 2Wave 2 — Zero destroyed
Named enemies & parts
| Pilot | Unit | Part | Appears | |
|---|---|---|---|---|
| 1 Shagia Frost | Gundam Virsago Chest Break | Learning CP+ | start | |
| 2 Olba Frost | Gundam Ashtaron Hermit Crab | Hi-Perf. Scope | start | |
| 3 Tis | Thugater | Psycho Frame | start | |
| 4 Lalia | Hypocrisis | A-Adapter | start | |
| 5 Zero | Zero + Vector | — | start | |
| 6 Unicorn Drill | Phoenix Alae | — | wave 2: Zero destroyed | |
| 7 Despinis | Eleos | Chogokin Z | wave 1: unit reaches area |
Parts on regular enemies: Mom’s Stew, Super Repair Kit ×2.
New units & pilots
First time each one fights on your side on this route, during the map or right after it. Purple = only if you meet the condition.
- Genichiro Tsukiomi
💬 Battle conversations in this map (3)
These pairs have their own lines when they fight each other. “Talks to” is a Talk command next to the unit; none of them is needed to win.
- Zero vs Ginga Izumo
- Zero vs Altea
- Zero vs Vega
The Truth of Arctos
📜 アルクトスの真実
Added later in the map: Defeat: Hero’s unit destroyed; Defeat: Allied warship destroyed; Defeat: Dendoh destroyed; Defeat: Ouga destroyed.
The truth of Arctos and the Galfa Emperor.
Walkthrough
- MainDefeat the three Duminas girls first; then Zero and the Vector combine and the Galfa Emperor appears.
- TipZero carries a Mega Generator, Tis an I-Field Barrier, Lalia a Linear Seat, Despinis a Bio-Sensor.
🗺️ Battle map
Circles are units on the map at the start (red enemy, blue ally, green guest). Squares with a number are reinforcement waves. Yellow tags number the named enemies in the table below, and a yellow diamond marks a unit that carries a part. Tap the map to open it full size.
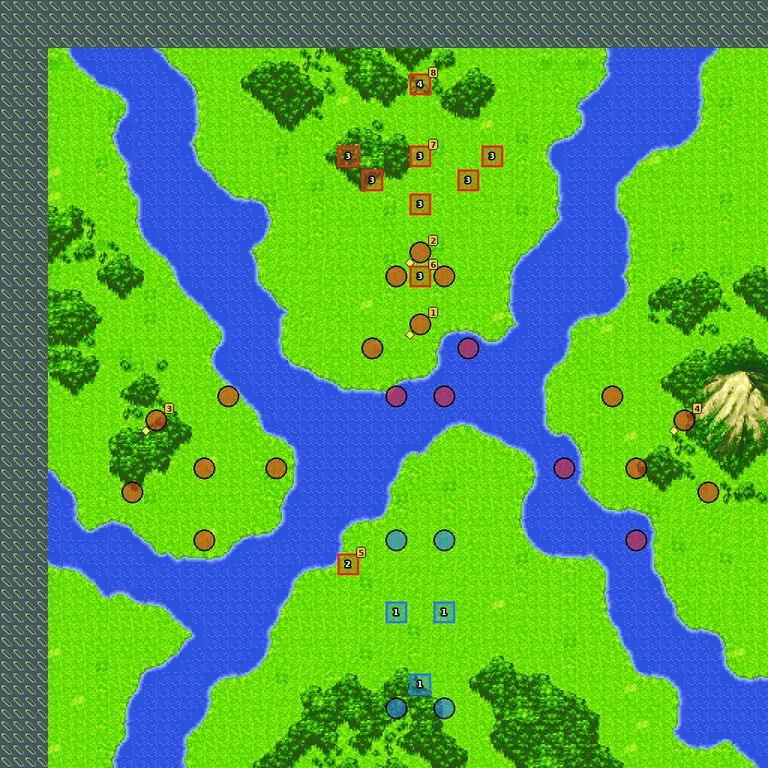
- 1Wave 1 — turn 2
- 2Wave 2 — a story event
- 3Wave 3 — a story event
- 4Wave 4 — a story event
Named enemies & parts
| Pilot | Unit | Part | Appears | |
|---|---|---|---|---|
| 1 Zero | Zero + Vector | Mega Generator | start | |
| 2 Tis | Thugater | I-Field Barrier | start | |
| 3 Lalia | Hypocrisis | Linear Seat | start | |
| 4 Despinis | Eleos | Bio-Sensor | start | |
| 5 Unicorn Drill | Phoenix Alae | — | wave 2: a story event | |
| 6 Zero | Vector Zero | — | wave 3: a story event | |
| 7 Galfa Emperor | Galfa Emperor | — | wave 3: a story event | |
| 8 Duminas | Duminas Proton | — | wave 4: a story event |
💬 Battle conversations in this map (7)
These pairs have their own lines when they fight each other. “Talks to” is a Talk command next to the unit; none of them is needed to win.
- Ginga Izumo vs Galfa Emperor
- Altea vs Galfa Emperor
- Susumu Kirakuni vs Galfa Emperor
- Vega vs Galfa Emperor
- Subaru vs Galfa Emperor
- Ginga Izumo vs Zero
- Altea vs Zero
Duminas’s Answer
📜 デュミナスの答え
The final battle against Duminas.
Walkthrough
- MainVictory: destroy Duminas. Duminas changes form (Proton, Deuteron, Triton) as you damage it.
- TipNearly every enemy carries a Super Repair Kit, but you don’t keep parts after the last map. Spend everything you have.
- TipThe epilogue changes with your stage 1 choice and your hero. On the Ra Cailum route there is an extra scene if Lancerow joined.
🗺️ Battle map
Circles are units on the map at the start (red enemy, blue ally, green guest). Squares with a number are reinforcement waves. Yellow tags number the named enemies in the table below, and a yellow diamond marks a unit that carries a part. Tap the map to open it full size.
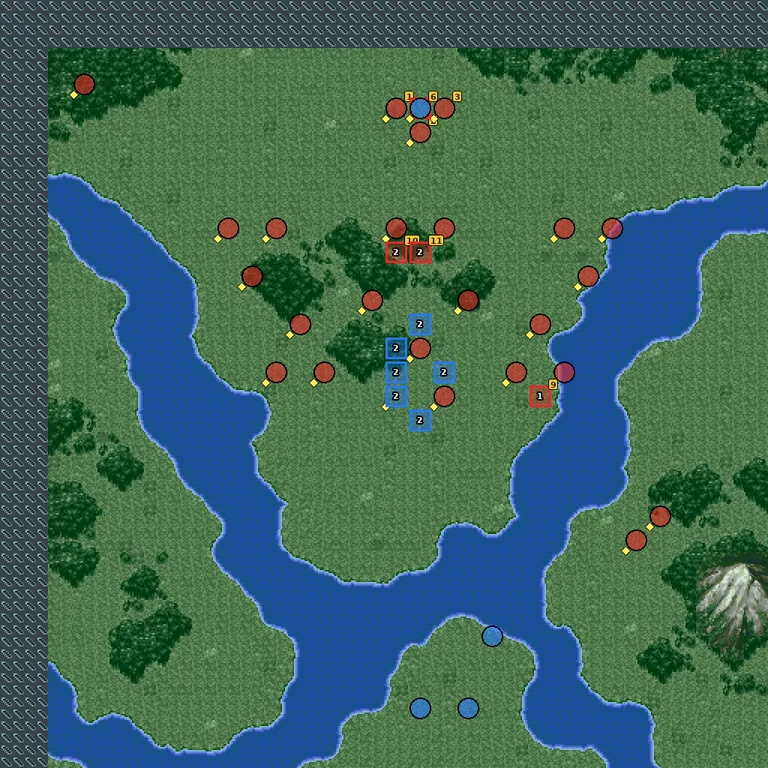
- 1Wave 1 — a story event
- 2Wave 2 — a story event
- 3Wave 3 — a story event
Named enemies & parts
| Pilot | Unit | Part | Appears | |
|---|---|---|---|---|
| 1 Tis | Thugater | Super Repair Kit | start | |
| 2 Lalia | Hypocrisis | Super Repair Kit | start | |
| 3 Despinis | Eleos | Super Repair Kit | start | |
| 4 Duminas | Duminas Proton | — | start | |
| 5 Duminas | Duminas Deuteron | Super Repair Kit | wave 3: a story event | |
| 6 Duminas | Duminas Triton | Super Repair Kit | wave 1: a story event | |
| 7 Duminas | Duminas Proton | — | start | |
| 8 Duminas | Duminas Deuteron | — | wave 3: a story event | |
| 9 Duminas | Duminas Triton | — | wave 1: a story event | |
| 10 Duminas | Duminas Triton | — | wave 2: a story event | |
| 11 Duminas | Duminas Triton | — | wave 2: a story event |
Parts on regular enemies: Super Repair Kit ×24.
New units & pilots
First time each one fights on your side on this route, during the map or right after it. Purple = only if you meet the condition.
- Char Aznable
- Sazabi
- Gyunei Guss
- Jagd Doga
💬 Battle conversations in this map (1)
These pairs have their own lines when they fight each other. “Talks to” is a Talk command next to the unit; none of them is needed to win.
- Duminas vs your hero